Posts | Comments

Planet Arduino

Archive for the ‘Raspberry Pi’ Category

Raspberry Pi Pico ESP32-S3 quad display board

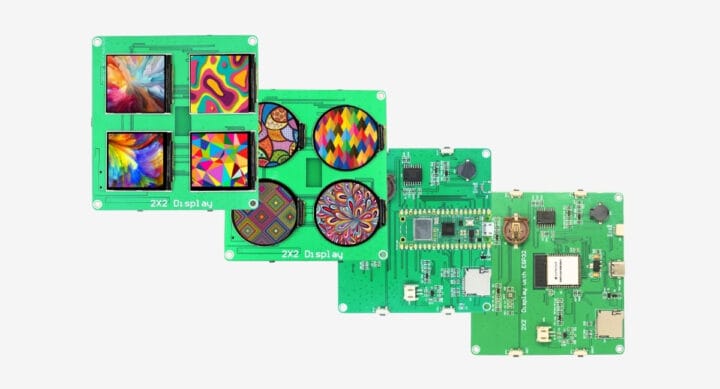
SB Components’ 2×2 Quad Display Board is an MCU development board fitted with either a Raspberry Pi Pico W board or an ESP32-S3-WROOM-1 module used to drive four small color displays in square or round shapes. The board specifically features either four 1.54-inch square TFT displays or four 1.28-inch round displays, a microSD card, an RTC with coin-cell battery holder, and a USB-C port for power and programming, plus a few buttons. It may feel like it’s coming out of the but-why-because-we-can department, but the company expects it to be used for signage, interactive displays, art projects, portable devices, data loggers, education, and more. 2×2 Quad Display Board specifications: Main control (one or the other) Raspberry Pi Pico W MCU – Raspberry Pi RP2040 dual-core Cortex-M0+ microcontroller @ 133 MHz with 264KB SRAM Storage – 2MB QSPI flash Wireless – WiFi 4 and Bluetooth LE 5.2 USB – 1x Micro [...]

The post 2×2 Quad Display Board uses Raspberry Pi Pico W or ESP32-S3-WROOM-1 module to drive four displays (Crowdfunding) appeared first on CNX Software - Embedded Systems News.

Boards Guide 2024: Boards Are Back

From Make: Vol. 87: New evolutions in dev boards make this a metamorphic period for Makers.

The post Boards Guide 2024: Boards Are Back appeared first on Make: DIY Projects and Ideas for Makers.

RP2040-GEEK

Waveshare RP2040-GEEK is a development board that looks like a USB flash drive but is based on a Raspberry Pi RP2040 microcontroller with a 1.14-inch 65K color LCD and some expansion ports all housed in a white plastic case. The device comes with a 4MB flash to store the firmware, a microSD card slot for data storage, a BOOT button to enter bootloader mode, two 3-pin connectors for UART and SWD debug, and a 4-pin I2C port. Waveshare RP2040-GEEK specifications: MCU – Raspberry Pi RP2040 dual-core Arm Cortex-M0+ microcontroller clocked up to 133 MHz with 264 kB SRAM Storage – 4MB flash (W25Q32JVSSIQ) and microSD card slot Display – 1.14-inch 240×135 pixel 65K color IPS LCD display USB – 1x USB Type-A female port for power and programming Debugging – 3-pin SWD port for connecting a target board; the standard CMSIS-DAP interface can be used to debug most Arm-based microcontrollers; [...]

The post Waveshare RP2040-GEEK USB development board features RP2040 MCU, 1.14-inch color display, UART/I2C/SWD ports appeared first on CNX Software - Embedded Systems News.

Smarter Serial Communications with WiSer

Surely you’ve been there: you need to capture serial output from a microcontroller or other device, so you reach for a PL2303 or CP210x or FT232RL-based USB-to-TTL serial cable (if you can remember where you put the damn thing after you last used it!) and…realize you don’t have the drivers installed on the computer you […]

The post Smarter Serial Communications with WiSer appeared first on Make: DIY Projects and Ideas for Makers.

flipper zero video game module

Flipper Zero hardware & wireless hacking tool can now be used as a proper game console thanks to a Raspberry Pi RP2040-powered video game module that mirrors the display of the device on a larger monitor or TV via DVI/HDMI video output, and also adds a 6-axis motion tracking sensor. The Flipper Zero has been in the news in recent days, notably with Canada’s government banning the device due to car theft (although it only seems feasible on older cars), and today the company has announced the launch of a video game module developed in collaboration with Raspberry Pi Ltd. Video game module specifications: MCU – Raspberry Pi RP2040 dual-core Arm Cortex-M0+ microcontroller clocked up to 133 MHz with 264 kB SRAM Video Output – DVI-D at 640х480 with 60 Hz refresh rate. It also supports HDMI. USB – USB Type-C port connected to the microcontroller. Acts as a USB device [...]

The post Flipper Zero gets a Raspberry Pi RP2040-powered video game module appeared first on CNX Software - Embedded Systems News.

DivingBoard is a homemade MIDI controller aiming to solve the lack of parameter accessibility on the Roland JD-Xi synthesiser. It differs from other solutions – customizability and potential ease-of-use are greater, and general use with a range of synthesisers is possible, rather than just with the JD-Xi.

The project uses an Arduino Nano running Arduino and a Raspberry Pi Zero 2 W running Python.

See the video below and read more on hackster.io and the project website.

After some inconsistent and unreliable results reading an analog input from an ESP32 board, Dr. Simon Monk decided to get scientific and do some experimenting.

Three boards were chosen: An ESP32, a Raspberry Pi Pico and the ATmega328p-based Arduino Uno R3.

I was particularly interested in three things:

  • finding any dead-zones at each end of the analog input voltage range
  • measuring the reproducibility of the readings
  • linearity through the range

On looking at the documentation in MicroPython and learning that the analog readings for a Pico and ESP32 come at a massive 16 bit precision (a number between 0 and 65536) it’s easy think that their analog inputs are much better than the paltry 10 bits of an Arduino (0 to 1023 reading range). But this is to confuse precision with accuracy. It’s why pure megapixels is not the best way to judge a camera. So much depends on the lens.

So, if you are trying to get decent accuracy and reproducibility from your analog readings, then you probably want to take a set of readings and average them — or use an Arduino Uno R3!

See the whole test series in the excellent post here.


[Bytewelder] fondly remembers the Palm III and Sharp HC-4500, so taking on the design of Decktility, a custom handheld cyberdeck , was a natural next step. The blog post goes into much detail about the design decisions and challenges throughout the project. The end result, though, looks great.

The device uses a Raspberry Pi CM4 and an IPS touchscreen. The bulk of the design work was to get the power system working. There is a custom FET board and an Arduino that manages charging and battery state.

The 3D-printed case is compact, and the whole thing weighs about 375 grams. You can replace the batteries after their 6-hour stint or charge them in situ via USB-C.

The battery charger is of particular interest. [Bytewelder] wanted to integrate power management but didn’t want to write custom Linux drivers. The solution was simple: have the Arduino emulate an existing power management device with Linux driver support. In this case, the power management system looks to the Raspberry Pi like an LTC294x device, so the normal Linux OS knows how to handle it.

If you are really worried about batteries, you can swap processing power for battery life. This build reminds us of some of the organizers that were popular once upon a time. We have a soft spot for decks that look like retro computers or even if they could have been.

Building The Ghostwriter AI Typewriter

This crazy AI powered interactive typewriter has been bouncing around the internet since CES recently ended. it’s a pretty great example of putting a professional finish on an interesting piece. Luckily Arvind Sanjeev, the creator, has shared a build breakdown on twitter. Be sure to go read the entire thread, it is fascinating. Arvind started […]

The post Building The Ghostwriter AI Typewriter appeared first on Make: DIY Projects and Ideas for Makers.

A blue enclosure with "IoT AI-assisted Deep Algae Bloom Detector w/Blues Wireless" written on the front. Two black cables run over a wooden desk to a cylinder with rocks on the bottom and filled with murky water. A bookshelf lurks in the background.

Harmful Algal Blooms (HABs) can have negative consequences for both marine life and human health, so it can be helpful to have early warning of when they’re on the way. Algal blooms deep below the surface can be especially difficult to detect, which is why [kutluhan_aktar] built an AI-assisted algal bloom detector.

After taking images of deep algal blooms with a boroscope, [kutluhan_aktar] trained a machine learning algorithm on them so a Raspberry Pi 4 could recognize future occurrences. For additional water quality information, the device also has an Arduino Nano connected to pH, TDS (total dissolved solids), and water temperature sensors which then are fed to the Pi via a serial connection. Once a potential bloom is spotted, the user can be notified via WhatsApp and appropriate measures taken.

If you’re looking for more environmental sensing hacks, check out the OpenCTD, this swarm of autonomous boats, or this drone buoy riding the Gulf Stream.


  • Newsletter

    Sign up for the PlanetArduino Newsletter, which delivers the most popular articles via e-mail to your inbox every week. Just fill in the information below and submit.

  • Like Us on Facebook