Posts | Comments

Planet Arduino

Archive for the ‘Software Development’ Category

Matthias Faust has created an Arduino controller for speeding up software development.

The “Maven Box” is based on an Uno and communicates with a Java program running on a desktop. The device is equipped with customizable buttons, switches and a dial, which act as physical inputs for expediting his daily routine. This enables Faust to select a branch from several GitHub projects, stash changes before pulling, pull the changes, trigger a maven build, as well as display the status of six tests on a set of notification LEDs.

Every job has it’s routine. I am a software developer who works with a Git/Maven based workspace everyday. So when I start working, my daily routine is to update and build my local workspace, pulling changes from GitHub, execute a maven build and execute the updated software. Usually I get my first coffee after that, but because I love coffee so much I thought there must be a faster way to get my system updated and running.

Whether a software developer yourself or simply a fan of awesome Arduino builds, check out the Maven Box’s Instructables page to see more!

The Arduino software environment, including the IDE, libraries, and general approach, are geared toward education. It’s meant as a way to introduce embedded development to newbies. This is a great concept but it falls short when more serious development or more advanced education is required. I keep wrestling with how to address this. One way is by using Eclipse with the Arduino Plug-in. That provides a professional development environment, at least.

The code base for the Arduino is another frustration. Bluntly, the use of setup() and loop() with main() being hidden really bugs me. The mixture of C and C++ in libraries and examples is another irritation. There is enough C++ being used that it makes sense it should be the standard. Plus a good portion of the library code could be a lot better. At this point fixing this would be a monumental task requiring many dedicated developers to do the rewrite. But there are a some things that can be done so let’s see a couple possibilities and how they would be used.

The Main Hack

As mentioned, hiding main() bugs me. It’s an inherent part of C++ which makes it an important to learning the language. Up until now I’d not considered how to address this. I knew that an Arduino main() existed from poking around in the code base – it had to be there because it is required by the C++ standard. The light dawned on me to try copying the code in the file main.cpp into my own code. It built, but how could I be sure that it was using my code and not the original from the Arduino libraries? I commented out setup() and it still built, so it had to be using my version otherwise there’d be an error about setup() being missing. You may wonder why it used my version.

When you build a program… Yes, it’s a “program” not a “sketch”, a “daughter board” not a “shield”, and a “linker” not a “combiner”! Why is everyone trying to change the language used for software development?

When you build a C++ program there are two main stages. You compile the code using the compiler. That generates a number of object files — one for each source file. The linker then combines the compiled objects to create an executable. The linker starts by looking for the C run time code (CRTC). This is the code that does some setup prior to main() being called. In the CRTC there will be external symbols, main() being one, whose code exists in other files.

The linker is going to look in two places for those missing symbols. First, it loads all the object files, sorts out the symbols from them, and builds a list of what is missing. Second, it looks through any included libraries of pre-compiled objects for the remaining symbols. If any symbols are still missing, it emits an error message.

If you look in the Arduino files you’ll find a main.cpp file that contains a main() function. That ends up in the library. When the linker starts, my version of main() is in a newly created object file. Since object files are processed first the linker uses my version of main(). The library version is ignored.

There is still something unusual about main(). Here’s the infinite for loop in main():

	for (;;) {
		loop();
		if (serialEventRun) serialEventRun();
	}

The call to loop() is as expected but why is there an if statement and serialEventRun? The function checks if serial input data is available. The if relies on a trick of the tool chain, not C++, which checks the existence of the symbol serialEventRun. When the symbol does not exist the if and its code are omitted.

Zapping setup() and loop()

Now that I have control over main() I can address my other pet peeve, the setup() and loop() functions. I can eliminate these two function by creating my own version of main(). I’m not saying the use of setup() and loop() were wrong, especially in light of the educational goal of Arduino. Using them makes it clear how to organize an embedded system. This is the same concept behind C++ constructors and member functions. Get the initialization done at the right time and place and a good chunk of software problems evaporate. But since C++ offers this automatically with classes, the next step is to utilize C++’s capabilities.

Global Instantiation

One issue with C++ is the cost of initialization of global, or file, scope class instances. There is some additional code executed before main() to handle this as we saw in the article that introduced classes. I think this overhead is small enough that it’s not a problem.

An issue that may be a problem is the order of initialization. The order is defined within a compilation unit (usually a file) from the first declaration to the last. But across compilation units the ordering is undefined. One time all the globals in file A may be initialized first and the next time those in file B might come first. The order is important when one class depends on another being initialized first. If they are in different compilation units this is impossible to ensure. One solution is to put all the globals in a single compilation unit. This may not work if a library contains global instances.

A related issue occurs on large embedded computer systems, such as a Raspberry Pi running Linux, when arguments from the command line are passed to main(). Environment variables are also a problem since they may not be available until main() executes. Global instance won’t have access to this information so cannot use it during their initialization. I ran into this problem with my robots whose control computer was a PC. I was using the robot’s network name to determine their initial behaviors. It wasn’t available until main() was entered, so it couldn’t be used to initialize global instances.

This is an issue with smaller embedded systems that don’t pass arguments or have environment values but I don’t want to focus only on them. I’m looking to address the general situation that would include larger systems so we’ll assume we don’t want global instances.

Program Class

The approach I’m taking and sharing with you is an experiment. I have done something similar in the past with a robotics project but the approach was not thoroughly analyzed. As often happens, I ran out of time so I implemented this as a quick solution. Whether this is useful in the long run we’ll have to see. If nothing else it will show you more about working with C++.

My approach is to create a Program class with a member run() function. The setup for the entire program occurs in the class constructor and the run() function handles all the processing. What would normally be global variables are data members.

Here is the declaration of a skeleton Program class and the implementation of run():

class Program {
public:
	void run();
	static Program& makeProgram() {
		static Program p;
		return p;
	}

private:
	Program() { }
	void checkSerialInput();
};

void Program::run() {
	for (;;) {
		// program code here
		checkSerialInput();
	}
}

We only want one instance of Program to exist so I’ve assured this by making the constructor private and providing the static makeProgram() function to return the static instance created the first time makeProgram() is called. The Program member function checkSerialInput() handles checking for the serial input as discussed above. In checkSerialInput() I introduced an #if block to eliminate the actual code if the program is not using serial input.

Here is how Program is used in main.cpp:


void arduino_init() {
	init();
	initVariant();
}

int main(void) {
	arduino_init();
	Program& p = Program::makeProgram();
	p.run();
	return 0;
}

The function initArduino() is inlined and handles the two initialization routines required to setup the Arduino environment.

One of the techniques for good software development is to hide complexity and provide a descriptive name for what it does. These functions hide not only the code but, in one case, the conditional compilation.

Redbot Line Follower Project

redbotThis code experiment uses a Sparkfun Redbot setup for line following. This is a two wheeled robot with 3 optical sensors to detect the line and an I2C accelerometer to sense bumping into objects. The computer is a Sparkfun Redbot Mainboard which is compatible with the Arduino Uno but provides a much different layout and includes a motor driver IC.

This robot is simple enough to make a manageable project but sufficiently complex to serve as a good test, especially when the project gets to the control system software. The basic code for handling these motors and sensors comes from Sparkfun and uses only the basic pin-level Arduino routines. I can’t possibly hack the entire Arduino code but using the Sparkfun code provides a manageable subset for experimenting.

For this article we’ll just look at the controlling the motors. Let’s start with the declaration of the Program class for testing the motor routines:

class Program {
public:
	void run();
	static Program& makeProgram() {
		static Program p;
		return p;
	}

private:
	Program() { }
	static constexpr int delay_time { 2000 };

	rm::Motor l_motor { l_motor_forward, l_motor_reverse, l_motor_pwm };
	rm::Motor r_motor { r_motor_forward, r_motor_reverse, r_motor_pwm };
	rm::Wheels wheels { l_motor, r_motor };

	void checkSerialInput();
};

There is a namespace rm enclosing the classes I’ve defined for the project, hence the rm:: prefacing the class names. On line 11 is something you may not have seen, a constexpr which is new in C++ 11 and expanded in C++14. It declares that delay_time is a true constant used during compilation and will not be allocated storage at run-time. There is a lot more to constexpr and we’ll see it more in the future. One other place I used it for this project is to define what pins to use. Here’s a sample:

constexpr int l_motor_forward = 2;
constexpr int l_motor_reverse = 4;
constexpr int l_motor_pwm = 5;
constexpr int r_motor_pwm = 6;
constexpr int r_motor_forward = 7;
constexpr int r_motor_reverse = 8;

The Motor class controls a motor. It requires two pins to control the direction and one pulse width modulation (PWM) pin to control the speed. The pins are passed via constructor and the names should be self-explanatory. The Wheels class provides coordinated movement of the robot using the Motor instances. The Motor instances are passed as references for the use of Wheels. Here are the two class declarations:

class Motor : public Device {
public:
	Motor(const int forward, const int reverse, const int pwm);

	void coast();
	void drive(const int speed);

	int speed() const {
		return mSpeed;
	}

private:
	void speed(const int speed);

	PinOut mForward;
	PinOut mReverse;
	PinOut mPwm;
	int mSpeed { };
};


class Wheels {
public:
	Wheels(Motor& left, Motor& right) :
			mLeft(left), mRight(right) {
	}

	void move(const int speed) {
		drive(speed, speed);
	}
	void pivot(const int speed) {
		drive(speed, -speed);
	}
	void stop() {
		mLeft.coast();
		mRight.coast();
	}

	void drive(const int left, const int right) {
		mLeft.drive(left);
		mRight.drive(right);
	}

private:
	Motor& mLeft;
	Motor& mRight;
};

The workhorse of Wheels is the function drive() which just calls the Motor drive() functions for each motor. Except for stop(), the other Wheels functions are utilities that use drive() and just make things easier for the developer. The compiler should convert those to a direct call to driver() since they are inline by being inside the class declaration. This is one of the interesting ways of using inline functions to enhance the utility of a class without incurring any cost in code or time.

The run() method in Program tests the motors by pivot()ing first in one direction and then the other at different speeds. A pivot() rotates the robot in place. Once the speed is set it continues until changed so the delay functions simply provide a little time for the robot to turn. Here’s the code:

void Program::run() {
	for (;;) {
		wheels.pivot(50);
		delay (delay_time);

		wheels.pivot(-100);
		delay(delay_time);

		checkSerialInput();
		if (serialEventRun) {
		}
	}
}

Wrap Up

The Redbot project is an interesting vehicle for demonstrating code techniques. The current test of the motor routines demonstrates how to override the existing Arduino main(). Even if you don’t like my approach with Program, the flexibility of using your own main() may come in handy for your own projects. The next article is going to revisit this program using templates.

THE EMBEDDING C++ PROJECT

Over at Hackaday.io, I’ve created an Embedding C++ project. The project will maintain a list of these articles in the project description as a form of Table of Contents. Each article will have a project log entry for additional discussion. Those interested can delve deeper into the topics, raise questions, and share additional findings.

The project also will serve as a place for supplementary material from myself or collaborators. For instance, someone might want to take the code and report the results for other Arduino boards or even other embedded systems. Stop by and see what’s happening.


Filed under: Arduino Hacks, Hackaday Columns, Software Development, software hacks

The language C++ is big. There is no doubting that. One reason C++ is big is to allow flexibility in the technique used to solve a problem. If you have a really small system you can stick to procedural code encapsulated by classes. A project with a number of similar but slightly different entities might be best addressed through inheritance and polymorphism.

A third technique is using generics, which are implemented in C++ using templates. Templates have some similarities with #define macros but they are a great deal safer. The compiler does not see the code inserted by a macro until after it has been inserted into the source. If the code is bad the error messages can be very confusing since all the developer sees is the macro name. A template is checked for basic syntax errors by the compiler when it is first seen, and again later when the code is instantiated. That first step eliminates a lot of confusion since error messages appear at the location of the problem.

Templates are also a lot more powerful. They actually are a Turing complete language. Entire non-trivial programs have been written using templates. All the resulting executable does is report the results with all the computation done by the compiler. Don’t worry, we aren’t going there in this article.

Template Basics

You can use templates to create both functions and classes. The way this is done is quite similar for both so let’s start with a template function example:

template<typename T, int EXP = 2>
T power(const T value, int exp = EXP) {
	T res { value };
	for (; exp > 1; --exp) {
		res *= value;
	}
	return res;
}

This is a template function for raising value by the integer exponent, exp. The keyword template is followed in angle brackets by parameters. A parameter is specified using either typename or class followed by a name, or by an integer data type followed by a name. You can also use a function or class as a template parameter but we won’t look at that usage.

The name of a parameter is used within the body of the class or function just as you would use any other type, or value. Here we use T as the type name for the input and return values of the function. The integer EXP is used to set a default value of 2 for the exponent, i.e. making power calculate the square.

When the compiler instantiates a template function or class, it creates code that is the same as a handwritten version. The data types and values are inserted as text substitutions. This creates a new version typed by the actual arguments to the parameters. Each different set of arguments creates a new function or type. For example, an instance of power() for integers is not the same as power() for floats. Similarly, as we’ll see in a moment, a class Triple for integers is not the same as one for float. Each are distinct types with separate code.

Since power() is a template function it will work directly for any numeric data type, integer or floating point. But what if you want to use it with a more complex type like the Triple class from the last article? Let’s see.

Using Templates

Here’s the declaration of Triple reduced to only what is needed for this article:

class Triple {
public:
	Triple(const int x, const int y, const int z);
	Triple& operator *=(const Triple& rhs);

	int x() const;
	int y() const;
	int z() const;

private:
	int mX { 0 };	// c++11 member initialization
	int mY { 0 };
	int mZ { 0 };
};

I switched the plus equal operator to the multiple equal operator since it is needed by the power() function.

Here is how the power() function is used for integer, float, and our Triple data types:

int p = power(2, 3);
float f = power(4.1, 2);

Triple t(2, 3, 4);
Triple res = power(t, 3);

The only requirement for using a user defined data type (UDT) like Triple with power() is the UDT must define an operator=*() member function.

Template Classes

Assume you’ve been using Triple in a project for awhile with integer values. Now a project requirement needs it for floating point values. The Triple class code is all debugged and working, and more complex than what we’ve seen here. It’s not a pleasant thought to create a new class for float. There are also hints that a long or double version might be needed.

With not much work Triple can be converted to a generic version as a template class. It’s actually fairly straightforward. Begin with the template declaration just as with the function power() and replace all the declarations of int with T. Also check member function arguments for passing parameters by value. They may need to be changed to references to more efficiently handle larger data types or UDTs. I changed the constructor parameters to references for this reason.

Here is Triple as a template class:

template<typename T>
class Triple {
public:
	Triple(const T& x, const T& y, const T& z);
	Triple& operator *=(const Triple& rhs);

	T x() const;
	T y() const;
	T z() const;

private:
	T mX { 0 };	// c++11 member initialization
	T mY { 0 };
	T mZ { 0 };
};

Not a lot of difference. Here’s how it could be used:

Triple<int> ires = power(Triple { 2, 3, 4 }, 3);
Triple fres = power(Triple(1.2F, 2.2, 3.3)); // calc square
Triple dres = power(Triple(1.2, 2.2, 3.3));// calc square
Triple lres = power(Triple(1, 2, 3.3), 2);

Unfortunately, the new flexibility comes at the cost of telling the template the data type to use for Triple. That is done by putting the data type inside brackets following the class name. If that is a hassle you can always use typedef or the new using to create an alias:

using TripleInt = Triple;
TripleInt ires = power(Triple { 2, 3, 4 }, 3);

Creating a template class like this saves debugging and maintenance costs overall. Once the code is working, it works for all related data types. If a bug is found and fixed, it’s fixed for all versions.

Template Timing and Code Size

The code generated by a template is exactly the same code as a handwritten version of the same function or class. All that changes between versions is the data type used in the instantiation. Since the code is the same as the handwritten version, the timing is going to be the same. Therefore there is no need to actually test timing. Phew!

Templates are Inline Code

Templates are inherently inline code. That means every time you use a template function or a template class member function the code is duplicated inline. Each instance with a different data type creates its own set of code, but that will be no more than if you’d written a class for each data type. There can be savings using template classes since member functions are not instantiated if they are not used. For example, if the Triple class getter functions – x(), y(), z() – are never used, their code is not instantiated. They would be for a regular class, although a smart linker might drop them from the executable.

Consider the following use of power() and Triple:

int i1 = power(2, 3);
int i2 = power(3, 3);
Triple t1 = power(Triple(1, 2, 3), 2);

This creates two inline integer versions of power even though both are instantiated for the same data type. Another instance is created for the Triple version. A single copy of the Triple class is created because the data type is always int.

Here we’re relying on implicit instantiation. That means we’re letting the compiler determine when and where the code is generated. There is also explicit instantiation that allows the developer to specify where the code is produced. This takes a little effort and knowledge of which data types are used for the templates.

Generally, implicit instantiation means inline function code with the possibility of duplication of code. Whether that matters depends on the function. When a function, not an inline function, is called there is overhead in invocation. The parameters to the function are pushed onto the stack along with the housekeeping information. When the function returns those operations are reversed. For a small function the invocation may take more code than the function’s body. In that case, inlining the function is most effective.

The power() function used here is interesting because the function’s code and the code to invoke it on an Uno are similar in size. Of course, both vary depending on the data type since large data types require more stack manipulation. On a Arduino Uno, calling power() with an int takes more code than the function. For float, the call is slightly larger. For Triple, the code to invoke is a good piece larger. On other processors the calling power() could be different. Keep in mind that power() is a really small function. Larger functions, especially member functions, are typically going to outweigh the cost to call them.

Specifying where the compiler generates the code is an explicit instantiation. This will force an out-of-line call with the associated overhead. In a source file you tell the compiler which specializations you need. For the test scenario we want them for int and Triple:

template int power(int, int);
template Triple<int> power(Triple<int>, int);

The compiler will create these in the source file. Then, as with any other function, you need to create an extern declaration. This tells the compiler to not instantiate them as inline. These declarations are just the same as above, only with extern added:

extern template int power(int, int);
extern template Triple power(Triple, int);

Scenario for Testing Code Size

It took me a bit to create a test scenario for demonstrating the code size differences between these two instantiations. The problem is the result from the power() function must be used later in the code or the compiler optimizes the call away. Adding code to use the function changes the overall code size in ways that are not relevant to the type of instantiation. That makes comparisons difficult to understand.

I finally settled on creating a class, Application, with data members initialized using the power() function. Adding data members of the same or different types causes minimal overall size changes so the total application code size closely reflects the changes only due to the type of instantiation.

Here is the declaration of Application:

struct Application {
public:
	Application(const int value, const int exp);

	static void loop() {
	}

	int i1;
	int i2;
	int i3;
	Triple t1;
	Triple t2;
	Triple t3;
};

and the implementation of the constructor:

Application::Application(int value, const int exp) :
		i1 { power(value++, exp) }, //
				i2 { power<int, 3="">(value++) }, // calcs cube
				i3 { power(value++, exp) }, //

				t1 { power(Triple(value++, 2, 3)) }, // calcs square
				t2 { power(Triple(value++, 4, 5), exp) }, //
				t3 { power(TripleInt(value++, 2, 3), exp) } //
{
}

The minimum application for an Arduino has just an empty setup and loop() functions which takes 450 bytes on a Uno. The loop() used for this test is a little more than minimum but it only creates an instance of Application and calls its loop() member function:

void loop() {
	rm::Application app(2, 3);
	rm::Application::loop();	// does nothing
}

Code Size Results

Here are the results for various combinations of implicit and explicit instantiation with different numbers of class member variables:

template code size

The first columns specify how many variables were included in the Application class. The columns under Uno and Due are the code size for those processors. They show the size for implicit instantiation, explicit instantiation of power() for just the Triple class, and explicit instantiation for both int and Triple data types.

The code sizes are dependent on a number of factors so can only provide a general idea of the changes when switching from implicit to explicit template instantiation. Actual results depend on the tool chains compiler and linker. Some of that occurs here using the Arduino’s GCC tool chain.

In all the cases with the Uno where one variable is used, the code size increases with explicit instantiation. In this case the function’s code plus the code for calling the function is, as expected, greater than the inline function’s code.

Now look at the Uno side of the table where there are 2 integers and 2 Triples, i.e. the fourth line. The first two code sizes remain the same at 928 bytes. The compiler optimized the code for the two Triples() by creating power() out-of-line without being told to do it explicitly. In the third column there is a decrease in code size when the integer version of power() is explicitly instantiated. It did the same a couple of lines below that when there are only the 2 Triples. These were verified by examing the assembly code running objdump on the ELF file.

In general, the Due’s code size did not improve with explicit instantiation. The larger word size of the Due requires less code to call a function. It would take a function larger than power() to make explicit instantiation effective in this scenario.

As I mentioned, don’t draw too many conclusions for these code sizes. I repeatedly needed to check the content of the ELF file using objdump to verify my conclusions. As a case in point, look at the Due side, with 2 integers and a Triple, with the two code sizes of 10092. They’re just coincidence. In one the integer version of power() is inlined and in the other, explicitly out-of-lined. The same occurs on the first line under Uno where there are just two integers and no Triples.

You can find other factors influencing code size. When three Triples are involved the compiler lifts the multiplication code from power(), but not the entire function. This isn’t because power() is a template function but just a general optimization, i.e. lifting code from inside a loop.

Wrap Up

Templates are a fascinating part of C++ with extremely powerful capabilities. As mentioned above, you can write an entire program in templates so the compiler actually does the computation. The reality is you probably are not going to be creating templates in every day programming. They are better suited for developing libraries and general utilities. Both power() and Triple fall into, or are close to, that category. This is why the C++ libraries consist of so many template classes. Creating a library requires attention to details beyond regular coding.

It’s important to understand templates even if you don’t write them. We’ve discussed some of the implications of usage and techniques for making optimal use of templates because they are an inherent part of the language. With them being such a huge part of C++ we’ll come back to them again to address places where they can be used.

The Embedding C++ Project

Over at Hackaday.io, I’ve created an Embedding C++project. The project will maintain a list of these articles in the project description as a form of Table of Contents. Each article will have a project log entry for additional discussion. Those interested can delve deeper into the topics, raise questions, and share additional findings.

The project also will serve as a place for supplementary material from myself or collaborators. For instance, someone might want to take the code and report the results for other Arduino boards or even other embedded systems. Stop by and see what’s happening.


Filed under: Arduino Hacks, Hackaday Columns, Software Development

For many embedded C developers the most predominate and questionable feature of C++ is the class. The concern is that classes are complex and therefore will introduce code bloat and increase runtimes in systems where timing is critical. Those concerns implicate C++ as not suitable for embedded systems. I’ll bravely assert up front that these concerns are unfounded.

When [Bjarne Stroustrup] created C++ he built it upon C to continue that language’s heritage of performance. Additionally, he added features in a way that if you don’t use them, you don’t pay for them.

Data Hiding

Prior to the object-oriented paradigm shift in, roughly, the early 90s, structured programming was the technique to use. One of the principles that came with it was data or information hiding.

A good example for C programmers is the FILE pointer (FILE*). The only thing you know about a FILE* is that it points to a data structure somewhere in a library. You can open, read, write, and otherwise manipulate a FILE* through a set of functions. The actual data about the file you’re working with is hidden. In a sense, this is a step toward object- oriented programming. The FILE* points to the object, a struct, and the functions are the class methods that operate on the object, or instance.

[Stroustrup] took C’s struct and extended it to create a class based form of object-orientation. He might have taken another approach since there are other forms of object- orientation. For instance, if you work heavily with JavaScript you’re doing prototype object- oriented development.

Let’s look at classes and their non-existent code bloat in this article. We’ll encounter some other features of C++ along the way. I’m compiling with C++11 as implemented by the GNU Project GCC compilers to obtain the latest features of the language. I chose it because it’s the compiler used by the Arduino family of boards and can be used by the Raspberry Pi. It is often available for other processors, making it well suited for the hacker community.

I’ll be compiling the code for both an Uno and a Due board to illustrate that the type of processor is irrelevant. The Uno uses an ATmega328P 8-bit processor and the Due an ATSAM3X8E ARM Cortex-M3 CPU 3- bit processor, so there is quite a difference between them.

Declaring Classes

Classes are user defined types (UDTs). In C++ classes, structs, unions, and enums are all UDTs. A UDT is the equal of the data types you are familiar with in C: integer, char, float, double, etc. UDTs act just like built in data types in C++ statements: initialization, function calls, function return values. Operations on UDTs mimic the built in operations: arithmetic operations, logical operations. It was a design goal for C++ that UDTs and regular data types operate with no noticeable differences.

[Elliot] discussed ring buffers in a recent article, Embed with Elliot: Going ‘Round with Circular Buffer, so I borrowed his C code with a few modifications and created this equivalent C++ class:

namespace had {

using uint8_t = unsigned char;
const uint8_t bufferSize = 16;

class RingBuffer {
	uint8_t data[bufferSize];
	uint8_t newest_index;
	uint8_t oldest_index;

public:
	enum BufferStatus {
		OK, EMPTY, FULL
	};

	RingBuffer();

	BufferStatus bufferWrite(const uint8_t byte);
	enum BufferStatus bufferRead(uint8_t& byte);
};
}

The first new C++ features in the code are the namespace and using keywords. They aren’t specific to classes so let me defer explaining them for a few paragraphs.

A class declaration begins with the keyword class followed by a name, just as C creates structs. In fact, struct could be used here instead of class. The difference between the two is struct, by default, provides public access to data and member functions while a class restricts access by default.

The next three lines declare data members of the class exactly as you would do with a struct in C. Since this is a class the members are private and cannot be accessed from outside the class. This is how C++ supports and stringently enforces data hiding.

The public keyword says the following lines are openly available. These can be accessed outside the class. You can also use private in the same way as public to make the following lines not accessible. A third access keyword is protected but it is used for class inheritance, a more advanced discussion, and we’ll ignore it for now. These access control keywords can be mixed as you wish in a class.

Next an enum is specified. Here it works just like a C enum.

The next line declares the class constructor. The purpose of a constructor is, in my vernacular, to make the class sane when it is created. It should set all the variables in the class to default starting values and contain code that sets up the class for proper operation. That may mean allocating dynamic memory for the class to use. For instance, RingBuffer could be setup to handle buffers of a chosen length instead of a globally defined fixed length. The length would be passed as an argument to the constructor and used to size the dynamically allocate memory.

The next two lines are member functions for writing and reading bytes of data to and from the buffer, the array data, in the class. There is no difference between these declarations and similar ones in C, except for one more C++ feature that is again not specific to classes, the & in the parameter declaration for bufferRead(uint8_t& byte). The & indicates the parameter is passed by reference. We’ll add that to the list of additional features to discuss below.

These are the basics for classes as UDTs. There are a lot of details about their design and implementation but those are beyond the scope of this article. A key point is that a class encapsulates within it all the capabilities you would provide for a data structure in C.

Using the Class

The code using RingBuffer is just a skeleton to illustrate how classes are used:

had::RingBuffer r_buffer;

void setup() {
}

void loop() {
	uint8_t tempCharStorage;
	// Fill the buffer
	for (int i = 0; r_buffer.bufferWrite('A' + i) == had::RingBuffer::OK; i++) {
	}
	// Read the buffer
	while (r_buffer.bufferRead(tempCharStorage) == had::RingBuffer::OK) {
	}
}

Line 1 of the code is the definition of a RingBuffer variable. The had:: is a scoping operation that tells the compiler to use the RingBuffer declared in the had namespace. Similarly, on lines 9 and 12, the enums OK are scoped in had.

Calls to class member functions use the same dot-notation that C uses for accessing members of structs. The calls are just r_buffer.bufferWrite and r_buffer.bufferRead. If you want to call a class member function from a pointer to a variable the arrow-notation is used. Except for that adaptation, member functions calls are the same as C calls.

Behind the scenes, the compiler is passing r_buffer as a hidden parameter to the member functions. It is passed as a pointer and within the functions is accessed by the name this. You can access the member data using the this pointer like this->newest_index but it is typically unnecessary. There are situations where it is used.

C Version of Code

For completeness let’s look at the C version of the code. It’s remarkably similar. Here are the declarations:

typedef unsigned char uint8_t;

enum BufferStatus {BUFFER_OK, BUFFER_EMPTY, BUFFER_FULL};
#define BUFFER_SIZE 16

struct LifoBuffer {
	uint8_t data[BUFFER_SIZE];
	uint8_t newest_index;
	uint8_t oldest_index;
};

void initBuffer(struct LifoBuffer* buffer);
enum BufferStatus bufferWrite(struct LifoBuffer* buffer, uint8_t byte);
enum BufferStatus bufferRead(struct LifoBuffer* buffer, uint8_t *byte);

We’ve got a typedef instead of the using, and a define instead of a const. After that LifoBuffer defines the same data, and the function declarations are about the same. The initBuffer serves basically the same purpose as the constructor. And we see a pointer instead of a reference.

One difference is the explicit passing of the pointer to the data structure. That is the same as the hidden this that C++ passes to member functions.

The calling routines look very similar also:

struct LifoBuffer buffer;

void setup() {
	initBuffer(&buffer);
}

void loop() {
	uint8_t tempCharStorage;
	// Fill the buffer
	uint8_t i = 0;
	for (; bufferWrite(&buffer, 'A' + i) == BUFFER_OK; i++) {
	}
	// Read the buffer
	while (bufferRead(&buffer, &tempCharStorage) == BUFFER_OK) {
	}
}

Source Files

Sorry to disappoint, but I’m not going to post the complete source files. You wouldn’t see any more difference than in the calling routines. But here is a snippet from each to satisfy your curiosity. I’ll show the bufferRead function so you can see how the reference parameter is handled. First the C++:

RingBuffer::BufferStatus RingBuffer::bufferRead(uint8_t byte) {
	if (newest_index == oldest_index) {
		return EMPTY;
	}

	byte = data[oldest_index];
	oldest_index = nextIndex(oldest_index);

	return OK;
}

Now the C version:

enum BufferStatus bufferRead(struct LifoBuffer* buffer, uint8_t *byte) {
	if (buffer->newest_index == buffer->;oldest_index) {
		return BUFFER_EMPTY;
	}

	*byte = buffer->data[buffer>oldest_index];
	buffer->oldest_index = nextIndex(buffer->oldest_index);

	return BUFFER_OK;
}

The major difference is the C++ version looks cleaner without the pointer dereferencing operators needed in C to access the buffer data structure. The parameter byte, the reference, also is accessed more easily. The main drawback with the C++ version is the need for the scoping operator, the ::, necessary to tell the compiler the functions and enums are part of the RingBuffer class.

There are two advantages to having the BufferStatus enum within the class RingBuffer that make using the scoping operator worth the effort. First, the enum names are shortened by having the buffer_ prefix removed. The scoping operator tells the developer and the compiler when these status values are valid. Second, it avoids name conflicts that can cause confusion. You might have other classes that use a status of OK or FAIL. Those may not use the same underlying values. If those classes are buried in a library you have no way of changing their values. One may say OK‘s value is 1, and the other 4. The scoping operator sorts out that problem, and the compiler enforces it by refusing to allow an enum from one class to be used with another.

Additional C++ Features

Let’s back up and look at the additional features of C++ we’ve encountered: namespaces, using, and references.

Namespaces

I didn’t intend to introduce namespaces in this article but the need to use them came up when I compiled the C++ code for the Due. I’d been compiling for the Uno without any problems; but when I switched to the Due, the compiler generated errors that it took me a few moments to understand: my RingBuffer class name was clashing with a RingBuffer class name used by the Due for serial communications.

Name clashes amongst libraries and user code is exactly the reason for having namespaces. I could have changed the name of my class to FifoBuffer which is actually a better name because it describes the usage while RingBuffer describes the implementation. Another name, more Computer Science oriented, is queue. I didn’t use it because the C++ standard library implementation of a FIFO is named queue. I left it at RingBuffer so I could discuss namespaces.

Creating a namespace is easy:

namespace <name> { 
// some code }

So is using one:

using namespace <name> {
// some code
}

I wrapped the entire header file, RingBuffer.h, and the source file, RingBuffer.cpp, in the namespace had, for HackADay.

In the Application.cpp file where I used the RingBuffer class I needed to qualify the constructor and the uses of the BufferStatus enums with the had namespace so the compiler knew I wanted them, not the ones from the library.

Aliases: Using and References

Both the using keyword and references create aliases. The ability to create aliases is a general feature of C++ that was extended and improved in C++11. For the most part, aliases allow the use of simpler names to refer to more complex expressions.

Using

The using keyword creates an alias for a complex data type. Here the type unsigned char is given the alias uint8_t. This usage replaces the use of typedef, which still available to not break legacy code. If this simple example doesn’t impress you how about having an alias to simplify const unsigned long int* const or a pointer to a function with a large number of parameters.

Here are the two lines of code from above:

using uint8_t = unsigned char;
const uint8_t  bufferSize = 16;

Notice how the statements are similar. The second line creates the variable bufferSize and initializes it to the value 16. The first line creates the name uint8_t and sets it to the data type unsigned char. This parallelism of the constructs is why using was introduced. A big effort in C++11 was the standardizing of expression forms along these lines.

References

References are a feature of C++ that appear in many places. Since this is not a tutorial on C++ I won’t elaborate beyond their use as a function parameter.

Function arguments can be passed in multiple ways. One way is by value. This is the usual way in C/C++ for arguments: a copy of the value from the argument variable is passed. Any operations within the function modify the local value but have no affect on the argument variable.

C/C++ can also pass arguments by pointer, which is a form of reference passing. Operations affect the original value. We know that pointers are dangerous so C++ wanted to minimize their use.

A reference is an alias of the argument variable. Just as with a pointer the address of the argument variable is passed. The big difference is you cannot manipulate this address since it is not exposed as with a pointer. The original value of the argument variable is affected by any operations in the function.

Cost of Classes

I teased above about showing that there is no cost to using classes. This is 99.9999%, or something around there, true. In this article I’m only going to look at code size because someone looking at C++ classes and seeing their additional complexity expects there has to be a cost.

I used Eclipse with the Arduino plugin mentioned in Code Craft: Using Eclipse For Arduino Development to compile the code for the Arduino Uno and Due. Here are the results:

code bloat

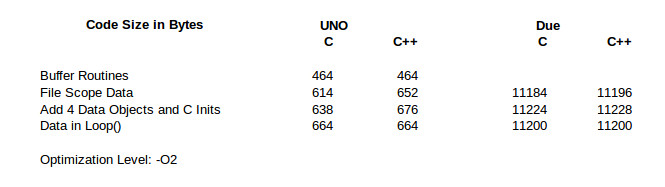
Clearly there is no major code bloat when using C++ on either processor. Let’s walk through the table first for the Uno and then come back to look at the Due results.

The line Buffer Routines is the code size for just the FIFO buffer code and empty Arduino setup() and loop() routines. I did this only for the Uno because I was too lazy to go back and strip the Due version down to the minimum. As we’ll see, it doesn’t matter.

The next line, File Scope Data, has the definitions of the data structures at file scope in the Application source file. The C++ code is 38 bytes larger because the class constructor is called. In order to call the constructor additional code is executed before main() is called. In any C/C++ application there is system specific initialization code executed to setup the application. C++ just adds a little more to call all the file scope constructors.

The next line shows that it is the initialization code as I suggested. An additional 4 data structures were added to both programs, with calls to their initialization inserted in the C version. The difference between the two versions remains at 38. That is a fixed overhead you’ll see on an Uno for using C++.

In the final line, I moved the definition of the data structure, and initialization for the C version, into loop(). That takes them out of file scope which means the C++ special initialization code is not needed. Now both versions have the same code size.

So, at least for the Uno, I rest my case. C++ classes do not cause code bloat.

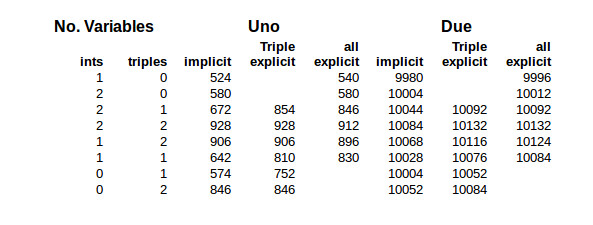
The results for the Due are identical except for the case with multiple data structures at file scope. There is a 12 byte overhead for having a single data structure at file scope. Okay,I assumed that’s the C++ pre-main() initialization code. But that overhead reduced to only 4 bytes when the additional 3 data structures were added. What? This deserved additional investigation.

I went back to having one data structure at file scope then added more one at a time, recording the increase in code size. The C version alternately increases by 8 and 16 bytes. The C++ version increases by 16 bytes for the second data structure and by 8 bytes for each one after that. I could generate some guesses on this but frankly it’s not worth the effort since these differences are small.

As with the Uno, the final line demonstrates there is no code bloat. This is when the data structures and initialization are moved to within loop().

There it is. No code bloat from using classes in embedded systems.

Wrap Up

I just scratched the surface explaining classes in this article. I wanted to provide enough explanation so C developers would understand the concepts sufficiently to accept classes are not going to increase code size. More details would just be confusing, and there are a lot more details. I also don’t want to play language lawyer so the presentation is pragmatic, not pedantic.

Software development is a complex process. A continuing goal for language developers has been to provide a tool that is efficient to use both in writing and executing code. C++ classes not only are efficient in code size but they help avoid common errors made during development. One measure of development is that rate at which bugs are fixed. Even better is preventing bugs from occurring.

The class constructor is a bug preventor. When you instantiate a class the constructor is going to be called to initialize the variable. Consider the situation with the C code where I created FifoBuffer a number of times. For each of those variables I needed to add the call to init(). It’s very easy to forget that initialization, especially if you create the variable in a file other than where the initialization is to take place, like the setup() in an Arduino application.

The Embedding C++ Project

Over at Hackaday.io, I’ve created an Embedding C++ project. The project will maintain a list of these articles in the project description as a form of Table of Contents. Each article will have a project log entry for additional discussion. Those interested can delve deeper into the topics, raise questions, and share additional findings.

The project also will serve as a place for supplementary material from myself or collaborators. For instance, someone might want to take the code and report the results for other Arduino boards or even other embedded systems. Stop by and see what’s happening.


Filed under: Arduino Hacks, Hackaday Columns, Raspberry Pi, Software Development

As we work on projects we’re frequently upgrading our tools. That basic soldering iron gives way to one with temperature control. The introductory 3D printer yields to one faster and more capable. One reason for this is we don’t really understand the restrictions of the introductory level tools. Sometimes we realize this directly when the tool fails in a task. Other times we see another hacker using a better tool and realize we must have one!.

The same occurs with software tools. The Arduino IDE is a nice tool for starting out. It is easy to use which is great if you have never previously written software. The libraries and the way it ties nicely into the hardware ecosystem is a boon.

When you start on larger projects, say you upgrade to a Due or Teensy for more code or memory space, the Arduino IDE can hamper your productivity. Moving beyond these limitations requires a new, better tool.

Where do we find a better tool? To begin, recognize, as [Elliot] points out that There is no Arduino “Language”, we’re actually programming in C or C++. We chose which language through the extension on the file, ‘c’ for C and ‘cpp’ for C++. An Arduino support library may be written in C or C++ depending on the developer’s preference. It’s all mix ‘n match.

Potentially any environment that supports C/C++ can replace the Arduino IDE. Unfortunately, this is not easy to do, at least for inexperienced developers, because it means setting up the language tool chain and tools for uploading to the board. A developer with that much experience might eschew an integrated development environment altogether, going directly to using makefiles as [Joshua] describes in Arduino Development; There’s a Makefile for That.

The reality is the Arduino IDE is not much more than a text editor with the ability to invoke the tools needed to compile and download the code to the Arduino. A professional IDE not only handles those details but provides additional capabilities that make the software development process easier.

Eclipse CDT & Arduino Plug-In

Eclipse IDE

An alternative to the Arduino IDE is Eclipse, a development environment used by professional and hobby developers. It’s open-source software and extensible via plugins. Many developers have contributed to its development, including some with corporate support.

Eclipse based Arduino development uses two additions to the basic Eclipse IDE. One is the C/C++ Development Tooling (CDT). The CDT not only adds the C/C++ development capability but tools for automatic code completion and insertion, and also some code refactoring. Trust me, once you understand how to use these capabilities you’ll miss them dearly when not available.

The other addition is a plug-in developed by [Jantje Baeyens]. The plug-in is free and open-source.

This setup works in combination with the build environment for the Arduino IDE. You still need the IDE installed; you just don’t have to use it.

Earlier this year I installed Eclipse Luna with the plug-in and the Arduino 1.6.0 IDE while running Ubuntu 14.04. I just followed the installation directions on the Eclipse and plug-in sites and it went smoothly. Since then [Jantze] released a version of Eclipse Luna with the latest version of the plug-in pre-installed. I downloaded it and the 1.6.5r5 Arduino IDE recently. It works fine and installing updates for the plug-in is handled automatically by Eclipse.

When making a switch like this you need to know both where the current tool is inadequate, how the new tool addresses those limitations, and what additional benefits will accrue. We’ll address the limitations and how they are addressed first, and then the added benefits.

Arduino IDE Limitations


Editor Tabs

When projects get larger they obviously have more lines of code. Having hundreds or thousands of lines of code in a single file is a nightmare. Scrolling through that large a file to find a single line of code is time consuming. That is why compilers support splitting code into multiple files. Moving between editor windows is far easier than scrolling.

The Arduino IDE supports multiple files by adding more tabs. If you use INO files you’re only adding one at a time, but if you use C/C++ header and source files it’s two at time. With the Arduino IDE all the files have to be in open windows in order to be processed by the compiler. Sooner or later you run out of space across the top of the screen for more tabs.

eclipse project explorer
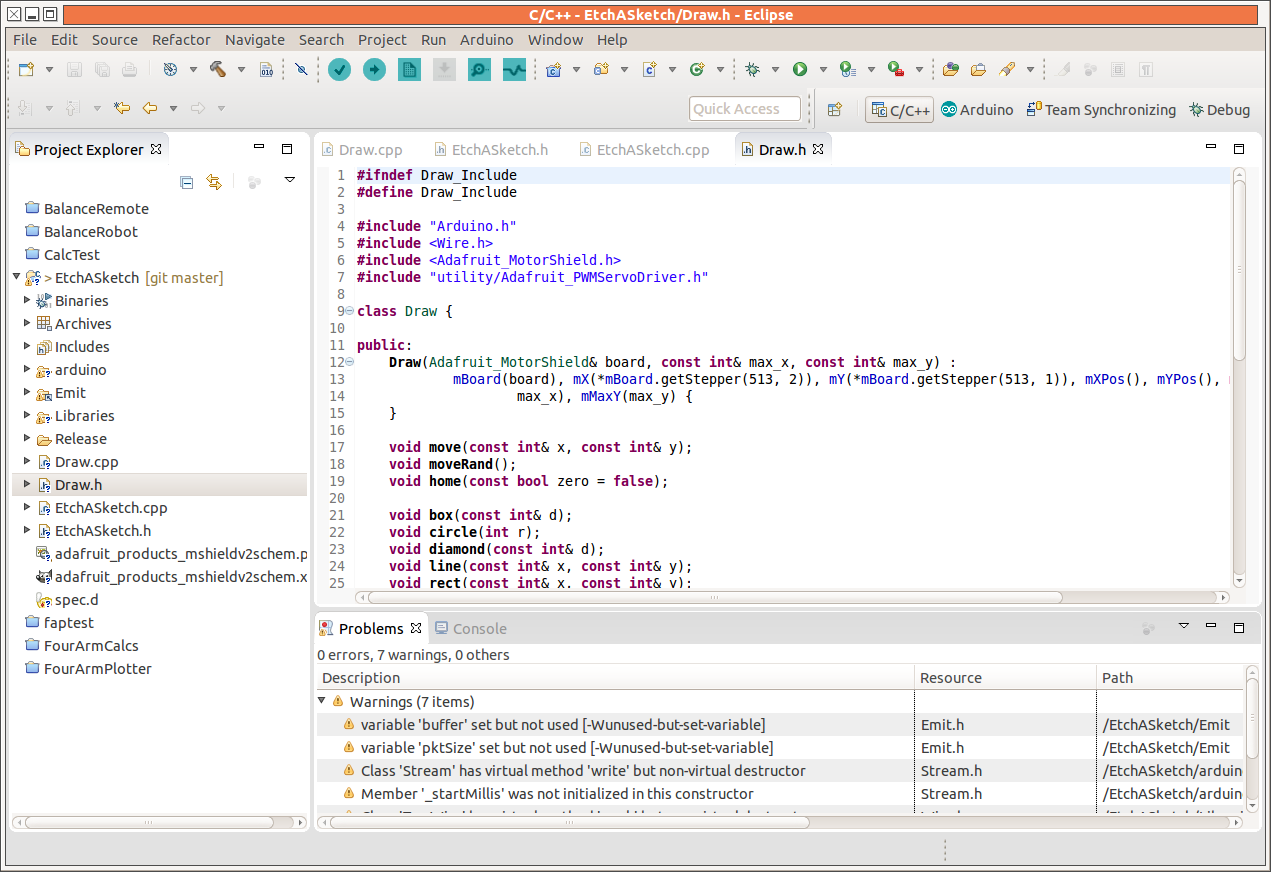
My 23″ monitor supports around 18 tabs and my 19″ side monitor about a dozen. Tabs for additional files scroll off to the right. They can be reached using Ctrl-ALT-Right, or through a drop down list on the right, which is cumbersome to use. To add insult, on my Ubuntu system the Ctrl-ALT-Right is used for changing workspaces so cannot be used for changing tabs.

Eclipse also uses tabs but they are only involved with editing. The files for a project are listed in a Project Explorer sub-window. Any file can be opened in the editor and closed when the editing or viewing is done. Having only the files open pertinent to your current activity reduces distractions. Eclipse also allows access to multiple projects to be available at the same time. This is useful if you want to get code snippets for your current project from an older one, or if you are working on two Arduinos that cooperate with one another.

Compilation Speed

The Arduino IDE copies every file to a temporary directory as an early step in the build process. This forces the build environment to see every file as changed, which in turn means the files are all compiled.

Under Eclipse the build does not move the files. The tool chain recognizes that once a file is compiled it does not need to be compiled again until a change is made in the source. In extremely large commercial projects this can literally save hours of time. Even in large hobby projects the time savings can be substantial.

Hunting for Errors

The console at the bottom of the Arduino IDE displays the compilation process and the errors that occur. The errors are listed with the file, line number, and the column of the error:

somefile.cpp:11:3: error: expected '}' before 'else'

To fix the error you need to find the file – ouch! if it’s on the drop down list – and then find the line in the file. This is time consuming.

Eclipse reports errors in two ways. The first is a console window similar to the one for the Arduino. The difference is you can click on an error and be taken to the line of code. Eclipse will even open the file if it’s not currently active in an editor. A real time saver.

The second is a list of errors in a “Problems” window stripped of all the compiler gobbledygook. Reading this list is much quicker than either IDE’s console window. By scanning the list you may see that the reported error is not the error that needs to be fixed. Sometimes errors, typos for example, are reported in multiple locations but the correction is elsewhere. The console window is still important because it provides the additional information that is sometimes needed to understand exactly what is causing the problem.

problem window

Terminal Annoyance

An annoyance with the Arduino IDE is the need to shut down the serial port terminal when you want to upload new code. The Eclipse solution manages this while keeping the terminal window open.

Note: This appears to have changed from the 1.60 to the 1.6.5 version of the Arduino IDE. If you are working with an older version and sticking with the Arduino IDE you should upgrade to the latest.

Eclipse Enhancements

Eclipse provides enhancements in addition to the improvements discussed above. Some of these are capabilities you don’t realize you need, but will love once you have them.

new class dialogCode completion is a simple enhancement that saves keystrokes and prevents errors by adding closing braces, quotes, brackets, parentheses, etc. This reduces errors due to omissions, and helps keep code better organized. (You do put braces around your if-clauses, don’t you? Apple didn’t, which created a security hole in their SSL processing, although there were a number of other problems with that code.)

As you’re working you often realize the name of a function, variable, or class is not exactly right. It needs to change. Hunting down a name in multiple files is daunting so you just let it go. Eclipse allows you to select a name, tell it to make the change, and all the occurrences will be changed.

Adding a new class requires creating new header and source files. A wizard does this for you. You enter the class name, a base class name if needed, and select if you want the constructor and destructor created. The files are created with skeleton source code and added to the project.

Wizards also can create new source or header files.

Creating the body of a function or class member is also automated once the function is declared. You first create the declaration in the header file:

 int something(const int a); 

and then you right click, select ‘Source’ and ‘Implement Method’. A skeleton definition is inserted into the source file:

int something(const int a) {
}

This is especially handy when the function has a long list of parameters.

Often you realize that some lines of code would be better as a new function. This may be so they can be reused in other locations, or just to simplify the flow in the current location. Lifting the code into a new function just requires selecting the code, right clicking, selecting ‘Refactor’, and ‘Extract Function’. A wizard opens for you to approve the new functions parameter list and when you accept this a call to the function replaces the lines and the new function is created.

To illustrate, one set of the duplicated code in loop() can be extracted into a function, outPins, and the duplicate code can be manually replaced with a call to the new function. Not an earth shaking example, admittedly, but it demonstrates the possibilities. The code starts as:

void loop() {
	static unsigned char cnt = 0;
	static bool state = false;

	analogWrite(pin09, cnt);
        
	// code to extract to make new function
	digitalWrite(pin11, state);
	digitalWrite(pin13, state);
	delay(blink_time);

	state = !state;

	// duplicate code
	digitalWrite(pin11, state);
	digitalWrite(pin13, state);
	delay(blink_time);
}

and after the refactoring becomes:

void loop() {
	static unsigned char cnt = 0;
	static bool state = false;

	analogWrite(pin09, cnt);

	outPins(state);
	state = !state;
	// replace next three lines with outPins(state);
	digitalWrite(pin11, state);
	digitalWrite(pin13, state);
	delay(blink_time);
}

and after a little cut and paste loop() becomes much simpler and maintenance of the lines now in outPins() is easier:

 
void loop() {
	static unsigned char cnt = 0;
	static bool state = false;

	analogWrite(pin09, cnt);
	outPins(state);
	state = !state;
	outPins(state);
}

Many of these capabilities are refactoring of code, a complex topic that is well worth studying if you will be working on larger projects. The techniques involved improve your code organization without changing the operation.

Caution: Eclipse will make the change you ask for so be sure you have it right. Fixing a massive automatic change can be a nightmare. Been there, done that.

This is just an overview of the advantages of using Eclipse in larger projects. If you are familiar with Eclipse chime in with other capabilities in the comments.

Plug-in Niceties

plugin dialogAll the above is what Eclipse brings. The Arduino plugin also provides a dialog that gives you control over the development parameters by replacing the Arduino IDE drop down menus. You no longer have to go to the menu to first select the board and then go back up to select the port. Also, the dialog allows you to specify compiler options that are buried down in a configuration file with the Arduino IDE. For instance, you can change from the standard optimizing for space to optimizing for speed.

An addition the plug-in brings is an ‘oscilloscope’ graphing window that displays properly formatted data as a curve. This is good for seeing how sensors are reacting to the environment.

Wrap Up

I’ve switched completely to using Eclipse for my Arduino projects. I was already comfortable with Eclipse for other projects so it felt good returning to it for the Arduino. The refactoring and auto-code completion were sorely missed and the other features are icing on the cake.


Filed under: Arduino Hacks, Hackaday Columns, Raspberry Pi, Software Development

pixel

[Ben] has written all sorts of code and algorithms to filter, sort, and convolute images, and also a few gadgets that were meant to be photographed. One project that hasn’t added a notch to his soldering iron was a camera. The easiest way to go about resolving this problem would be to find some cardboard and duct tape and built a pinhole camera. [Ben] wanted a digital camera. Not any digital camera, but a color digital camera, and didn’t want to deal with pixel arrays or lenses. Impossible, you say? Not when you have a bunch of integral transforms in your tool belt.

[Ben] is only using a single light sensor that outputs RGB values for his camera – no lenses are found anywhere. If, however, you scan a scene multiple times with this sensor, each time blocking a portion of the sensor’s field of view, you could reconstruct a rudimentary, low-resolution image from just a single light sensor. If you scan and rotate this ‘blocking arm’ across the sensor’s field of view, reconstructing the image is called a Radon transform, something [Ben] has used a few times in his studies.

camera [Ben]‘s camera consists of the Adafruit RGB light sensor, an Arduino, a microSD card, a few servos, and a bunch of printed parts. The servos are used to scan and rotate the ‘blocking arm’ across the sensor for each image. The output of the sensor is saved to the SD card and moved over to the computer for post-processing.

After getting all the pixel data to his laptop, [Ben] plotted the raw data. The first few pictures were of a point source of light – a lamp in his workspace. This resulted in exactly what he expected, a wave-like line on an otherwise blank field. The resulting transformation kinda looked like the reference picture, but for better results, [Ben] turned his camera to more natural scenes. Pointing his single pixel camera out the window resulted in an image that looked like it was taken underwater, through a piece of glass smeared with Vaseline. Still, it worked remarkably well for a single pixel camera. Taking his camera to the great outdoors provided an even better reconstructed scene, due in no small part to the great landscapes [Ben] has access to.


Filed under: Arduino Hacks, digital cameras hacks, Software Development
Jan
01

An Arduino With Better Speech Recognition Than Siri

arduino hacks, AVR, Software Development, speech recognition, uSpeech Comments Off on An Arduino With Better Speech Recognition Than Siri 

uSpeech

The lowly Arduino, an 8-bit AVR microcontroller with a pitiful amount of RAM, terribly small Flash storage space, and effectively no peripherals to speak of, has better speech recognition capabilities than your Android or iDevice.  Eighty percent accuracy, compared to Siri’s sixty.Here’s the video to prove it.

This uSpeech library created by [Arjo Chakravarty] uses a Goertzel algorithm to turn input from a microphone connected to one of the Arduino’s analog pins into phonemes. From there, it’s relatively easy to turn these captured phonemes into function calls for lighting a LED, turning a servo, or even replicating the Siri, the modern-day version of the Microsoft paperclip.

There is one caveat for the uSpeech library: it will only respond to predefined phrases and not normal speech. Still, that’s an extremely impressive accomplishment for a simple microcontroller.

This isn’t the first time we’ve seen [Arjo]‘s uSpeech library, but it is the first time we’ve seen it in action. When this was posted months and months ago, [Arjo] was behind the Great Firewall of China and couldn’t post a proper demo. Since this the uSpeech library is a spectacular achievement we asked for a few videos showing off a few applications. No one made the effort, so [Arjo] decided to make use of his new VPN and show off his work to the world.

Video below.


Filed under: Arduino Hacks, Software Development
Oct
22

Giving the Arduino deques, vectors and streams with the standard template library

arduino, arduino hacks, AVR, C, object oriented, Software Development, standard template library Comments Off on Giving the Arduino deques, vectors and streams with the standard template library 

The Arduino IDE is extremely similar to C++, but judging from the sketches you can find on the Internet, you’d never know it. Simpler Arduino projects can make do with just toggling IO pins, reading values, and sending serial data between two points. More complex builds fall into the category of real software development, and this is where the standard Arduino IDE falls miserably short.

[Andy] saw this lack of proper libraries for more complicated pieces of software as a terrible situation and decided to do something about it. He ported the SGI Standard Template Library to bring all those fun algorithms and data structures to any AVR chip, including the Arduino.

Going over what’s included in [Andy]‘s port reads just like a syllabus for an object-oriented programming class. Stacks, queues, and lists make the cut, as do strings and vectors. Also included is just about everything in the   and headers along with a few Arduino-oriented additions like a hardware serial and liquid crystal streams.

With all these objects floating around, [Andy] says it will make an impact on Flash and SRAM usage in an AVR. Still, with all the hullabaloo over faster and larger ARM micros, it’s nice to see the classic 8-bit microcontroller becoming a bit more refined.


Filed under: arduino hacks, Software Development


  • Newsletter

    Sign up for the PlanetArduino Newsletter, which delivers the most popular articles via e-mail to your inbox every week. Just fill in the information below and submit.

  • Like Us on Facebook