Posts | Comments

Planet Arduino

Archive for the ‘restoration’ Category

It’s always good to see old hardware saved from the junk pile, especially when the end result is as impressive as this analog gauge weather display put together by [Build Comics]. It ended up being a truly multidisciplinary project, combing not only restoration work and modern microcontroller trickery, but a dash of woodworking for good measure.

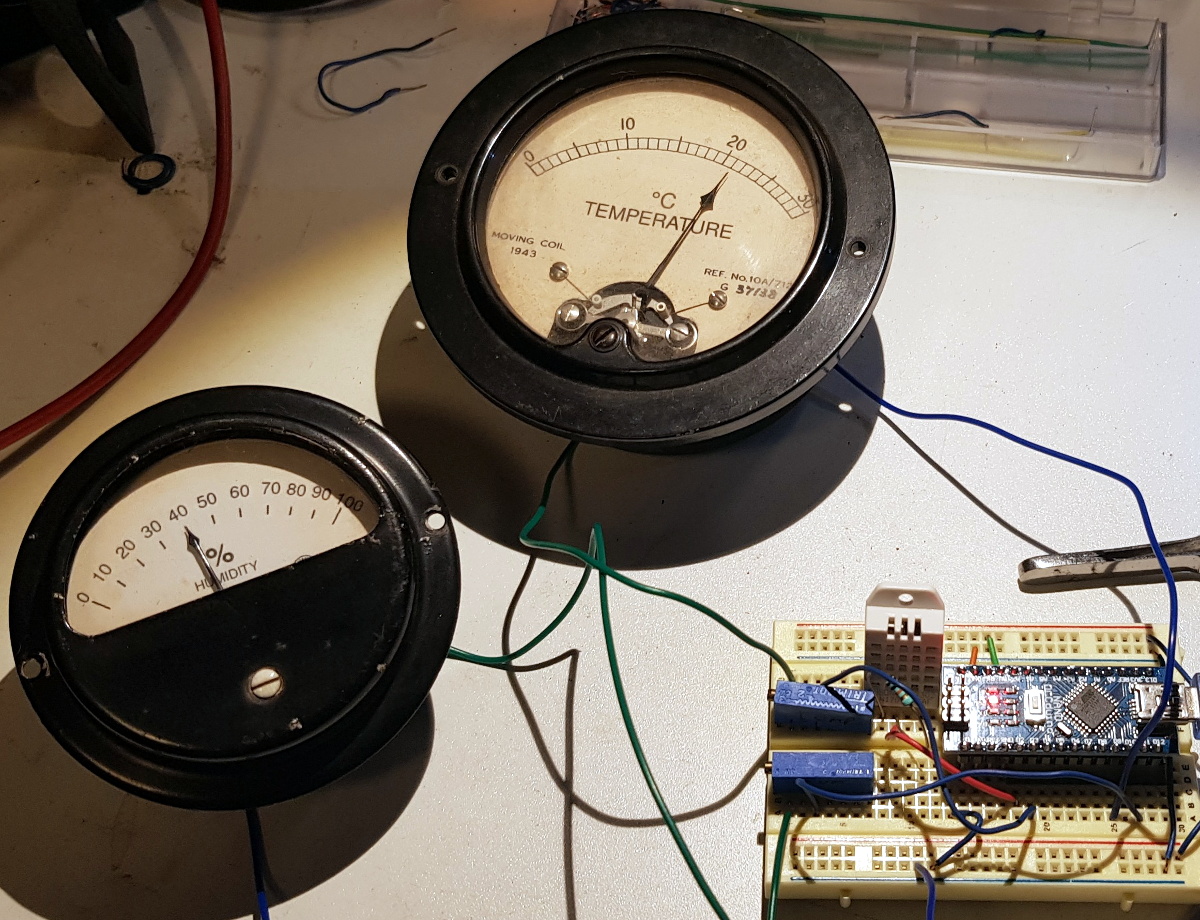
Naturally, the gauges themselves are the real stars of the show. They started out with rusted internals and broken glass, but parts from a sacrificial donor and some TLC from [Build Comics] got them back in working order. We especially like the effort that was put into making the scale markings look authentic, with scans of the originals modified in GIMP to indicate temperature and humidity while retaining the period appropriate details.

To drive the 1940s era indicators, [Build Comics] is using an Arduino Nano and a DHT22 sensor that can detect temperature and humidity. A couple of trimmer pots are included for fine tuning the gauges, and everything is mounted to a small scrap of perfboard hidden inside of the custom-made pine enclosure.

This is hardly the first time we’ve seen analog gauges hooked up to modern electronics, but most of the projects are just that: modern. While the end look might be somewhat polarizing, we think maintaining the hardware’s classic style was the right call.

Some people have all the luck. [MakerMan] writes in to gloat tell us about a recent trip to the junkyard where he scored a rather serious looking laser cutter. This is no desktop-sized K40 we’re talking about here; it weighs in at just under 800 pounds (350 Kg), and took a crane to deliver the beast to his house. But his luck only took him so far, as closer inspection of the machine revealed it was missing nearly all of its internal components. Still, he had the frame, working motors, and laser optics, which is a lot more than we’ve ever found in the garbage.

After a whirlwind session with his wire cutters, [MakerMan] stripped away most of the existing wiring and the original control board inside the electronics bay. Replacing the original controller is an Arduino Nano running Grbl, likely giving this revived laser cutter better compatibility with popular open source tools than it had originally. Even though the laser cutter was missing a significant amount of hardware, he did luck out that both the motor drivers were still there (and working) as well as the dual power supplies to run everything.

After a successful motion test, [MakerMan] then goes on to install a new 90W laser tube. Supporting the tube is a rigged up water cooling system using a plastic jug and a cheap bilge pump. He also added an air assist system, complete with side mounted compressor. This pushes air over the laser aperture, helping to keep smoke and debris away from the beam. Finally, a blower was installed in the bottom of the machine with flexible ducting leading outside to vent out the smoke and fumes that are produced when the laser is in operation.

This machine is a considerable upgrade from the previous laser [MakerMan] built, and as impressive as this rebuild is so far, we’re interested in seeing where it goes from here. If you ask us, this thing is begging for an embedded LaserWeb server.

What do you do when someone gives you a Wurlitzer 3100 jukebox from 1969, but keeps all the records? If you are like [Tijuana Rick], you grab an Arduino and a Rasberry Pi and turn it into a really awesome digital music player.

We’ll grant you, making a music player out of a Raspberry Pi isn’t all that cutting edge, but restoration and integration work is really impressive. The machine had many broken switches that had been hastily repaired, so [Rick] had to learn to create silicone molds and cast resin to create replacements. You can see and hear the end result in the video below.

[Rick] was frustrated with jukebox software he could find, until he found some Python code from [Thomas Sprinkmeier]. [Rick] used that code as a base and customized it for his needs.

There’s not much “how to” detail about the castings for the switches, but there are lots of photos and the results were great. We wondered if he considered putting fake 45s in the machine so it at least looked like it was playing vinyl.

Of course, you don’t need an old piece of hardware to make a jukebox. Or, you can compromise and build out a replica.


Filed under: Arduino Hacks, Raspberry Pi


  • Newsletter

    Sign up for the PlanetArduino Newsletter, which delivers the most popular articles via e-mail to your inbox every week. Just fill in the information below and submit.

  • Like Us on Facebook