Posts | Comments

Planet Arduino

Archive for the ‘HID keyboard’ Category

A couple of joysticks wired up to a Teensy for prototyping.

Over the last two years, [benkster] has been perfecting their ideal flight controller. Like many people, they started out with a keyboard and mouse and eventually moved on to a joystick. While a HOTAS (hands on throttle-and-stick — e.g. a yoke controller with inputs right there on the sides) might have been the next logical step, those things cost too much. Naturally, the answer is to build one, ideally for less money. Hey, it could happen.

The design went from just an idea to a cardboard prototype, and then to a wooden enclosure and later, a 3D-printed case. Since [benkster] learned a great deal along the way, they want to give back to the community with a comprehensive joystick design/build guide so that others don’t have to start from zero, overwhelmed with information.

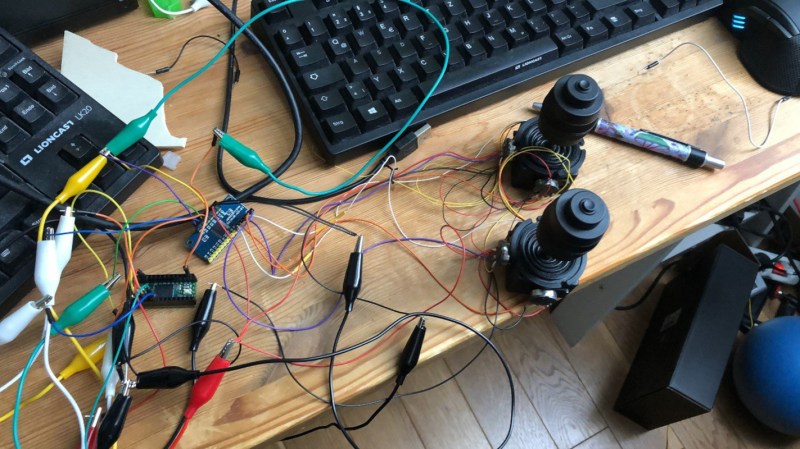
[benkster] wanted three joysticks, a bunch of big buttons, a throttle, a display to show component status (as in, is joystick #3 a joystick right now or a WASD keyboard?), and immersive details everywhere — you know, a million buttons and switches to give it that cockpit feel. [benkster] is using a Teensy 4 to control two 3-axis joysticks and one 2-axis stick. Since this adds up to too many axes for Windows/DirectX to read in, the 2-axis stick is used as a WASD keyboard.

This guide is a great place to start, especially for folks who may be newer to electronics. There are nice introductions to many types of components and tidbits that are relevant outside the world of joysticks.

You want immersive flight simulation away from the PC? Here’s a printable flexure-based ‘stick that snaps right on your Xbox controller and pushes the buttons.

When [easyjo] picked up this late ’80s Marconi mil-spec keyboard for cheap, he knew it wouldn’t be easy to convert it to USB — just that it would be worth it. Spoiler alert: those LEDs aren’t a mod, they’re native. They get their interesting shape from the key traces, which are in the four corners.

Despite having way-cool buttons such as WPNS HOLD, and the fact that Control is on the home row where it belongs, this keyboard does not look fun to type on at all for any length of time. Of course, the point of this keyboard is not comfort, but a reliable input device that keeps out dust, sweat, liquids, and the enemy.

This is probably why the controller is embedded into the underside of the key switch PCB instead of living on its own board.  [easyjo] tried to analyze the signals from the existing 26-pin connector, but it didn’t work out.

So once he was able to decode the matrix, he removed the controller chip and wired the rows and columns directly to an Arduino Leonardo. Fortunately, the LEDs were just a matter of powering their columns from the front side of the board.

The availability of certain kinds of military surplus can make for really interesting modernization projects, like adding POTS to a field telephone.

Via r/duino

Sometimes we see projects whose name describes very well what is being achieved, without conveying the extra useful dimension they also deliver. So it is with [Prasanth KS]’s Windows PC Lock/Unlock Using RFID. On the face of it this is a project for unlocking a Windows PC, but when you sit down and read through it you discover a rather useful primer for complete RFID newbies on how to put together an RFID project. Even the target doesn’t do it justice, there is no reason why this couldn’t be used with any other of the popular PC operating systems besides Windows.

The project takes an MRFC-522 RFID module and explains how to interface it to an Arduino. In this case the Arduino in question is an Arduino Pro Micro chosen for its ability to be a USB host. The supplied code behaves as a keyboard, sending the keystroke sequence to the computer required to unlock it. The whole is mounted in what seems to be a 3D printed enclosure, and for ease of use the guts of the RFID tag have been mounted in a ring.

As we said above though, the point of this project stretches beyond a mere PC unlocker. Any straightforward RFID task could use this as a basis, and if USB is not a requirement then it could easily use a more run-of-the-mill Arduino. If you’re an RFID newbie, give it a read.

Plenty of RFID projects have made it here before, such as this door lock. And we’ve had another tag in a ring, too.


Filed under: Arduino Hacks, The Hackaday Prize


  • Newsletter

    Sign up for the PlanetArduino Newsletter, which delivers the most popular articles via e-mail to your inbox every week. Just fill in the information below and submit.

  • Like Us on Facebook