Posts | Comments

Planet Arduino

Archive for the ‘beer’ Category

It’s the end of the academic semester for many students around the globe, so here comes the flurry of DIY projects. Always a great time to check out all the cool hacks from our readers all over the world. One project that piques our interest comes courtesy of [Jason Ummel] and his Auto-Bartender.
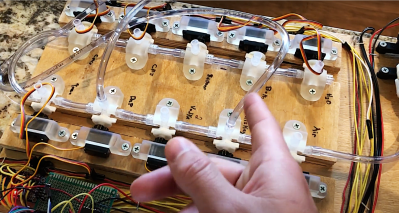
[Jason] developed this project as a part of his robotics class taught by Professor Martinez, one of our friends at FlexiLab. Powered by one of our favorite microcontrollers, the ATmega328, the Auto-Bartender is driven by a single 12 V motor coupled with 10 individual valves for separate drinks. Drinks are pumped into a cup sitting on top of a scale, allowing the device to know how much of each drink has been dispensed. The entire setup is controlled using a smartphone application developed in MIT App Inventor, a super-easy way to prototype Android applications.
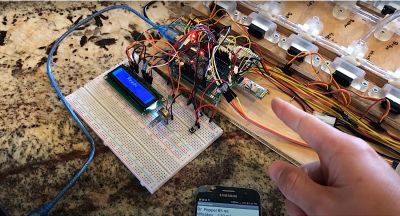
Furthermore, [Jason] incorporated a number of user-centered design considerations into his project. These include an LCD to display updates, a green LED to indicate the device is in progress, and a buzzer to let the user know the drink is complete.

We really like the combination of craftsmanship, electronics hardware design, and software development that [Jason] put into his project. It’s the kind of project we know our readers will enjoy.

It looks like Jason substituted tap water for Whiskey and Dr. Pepper for his demo. Not exactly what we had in mind, but I guess he still has exams to finish.

Cool project [Jason]! We can’t wait to see Auto-Bartender on Hackaday.io.

Bottoms up!

Usually, when we are talking about homebrew around here, we mean building your own equipment. However, most other people probably mean brewing beer, something that’s become increasingly popular as one goes from microbreweries to home kitchen breweries. People have been making beer for centuries so you can imagine it doesn’t take sophisticated equipment, but a little automation can go a long way to making it easier. When [LeapingLamb] made a batch using only a cooler, a stock pot, and a propane burner, he knew he had to do something better. That’s how Brew|LOGIC was born.

There are many ways to make beer, but Brew|LOGIC focuses on a single vessel process and [LeapingLamb] mentions that the system is akin to a sous vide cooker, keeping the contents of the pot at a specific temperature.

Honestly, though, we think he’s selling himself a bit short. The system has a remote application for control and is well-constructed. This isn’t just a temperature controller thrown into a pot. There’s also a pump for recirculation.

The common stock pot gets some serious modifications to hold the heating element and temperature probe. It also gets some spring-loaded clamps to hold the lid down. Expect to do a lot of drilling.

The electronics uses an Arduino, a Bluetooth board, and some relays (including a solid state relay). The finished system can brew between 5 and 15 gallons of beer at a time. While the system seems pretty good to us, he did list some ideas he has for future expansion, including valves, sensors for water level and specific gravity, and some software changes.

After reading that the system was similar to a sous vide cooker, we wondered if you could use a standard one. Turns out, you can. If you want to make better beer without electronic hacking, there’s always the genetic kind.

Oct
16

Goldilocks Climate Box Keeps Lager Fermentation Environment Just Right

arduino hacks, beer, beer hacks, brewing, fermentation, lager, maltbolche, mondo spider, peltier Comments Off on Goldilocks Climate Box Keeps Lager Fermentation Environment Just Right 

Climate box for lager brewingSeptember was warmish in many places around the world including [Ole]‘s native Denmark. But that did not stop him from brewing lager flavored with plums from his own garden, and neither did his indifference to lagers in general.
Lager fermentation requires a consistent, low temperature. While many homebrewers might modify an electric refrigerator, [Ole] wasn’t interested in the cost of running a second one just for brewing beer. Instead, he built a climate box to work with the cool temperature in his garage. Starting with scrap wood from other projects, he lined the walls with polystyrene and put a layer of wood on the floor to help support the fermentation bucket.

Maintaining a consistent temperature in the box called for both heating and cooling. He pulled the Peltier from a 12V cooler meant to run off a car’s cigarette lighter, and used a spare ceramic heater that was lying around in case his primary reptile warmer went on the fritz.

An Arduino and a custom shield drive separate PID controllers for the Peltier and the heater. The shield has a temperature probe, and he extended the USB outside the climate box so the PIDs can be adjusted without disturbing the inside temperature. The schematic, board file, and code are all available in a zip you can get from his post.

The Peltier couldn’t quite compensate for the overly warm weather and the heat caused by the fermentation, but it was stable enough to produce a nice, plum-flavored lager he has dubbed Lektor Blom­mes malt­bol­che, which is a triple Danish pun he explains in the write-up.


Filed under: Arduino Hacks, Beer Hacks
Sep
08

End Table Kegerator Hides the Tap when You’re Not Looking

arduino, arduino hacks, beer, beer hacks, Furniture, kegerator, LCD, refrigerator, table, temperature Comments Off on End Table Kegerator Hides the Tap when You’re Not Looking 

kegerator

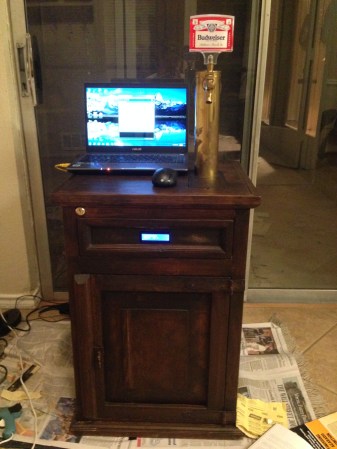
What’s better than an ordinary end table? How about an end table that can serve you beer? [Sam] had this exact idea and used his skills to make it a reality. The first step of the build was to acquire an end table that was big enough to hold all of the components for a functional kegerator. This proved to be a bit tricky, but [Sam] got lucky and scored a proper end table from a garage sale for only $5.00.

Next, [Sam] used bathroom sealant to seal up all of the cracks in the end table. This step is important to keep the inside cold. Good insulation will keep the beer colder, while using less electricity. Next, a hole was cut into the top of the table for the draft tower.

The draft tower is mounted to a couple of drawer slides. This allows the tower to raise up and down, keeping it out of sight when you don’t want it. The tower raises and lowers using a simple pulley system. A thin, high strength rope is attached to the tower. The other end is attached to a spool and a small motor. The motor can wind or unwind the spool in order to raise and lower the tower.

The table houses an Arduino, which controls the motor via a homemade H bridge. The Arduino is hooked up to a temperature sensor and a small LCD screen. This way, the users can see how cold their beer will be before they drink it.

To actually keep the beer cold, [Sam] ripped apart a mini fridge. He moved the compressor and condenser coils to the new table. He had to bend the coils to fit, taking care not to kink them. Finally he threw in the small keg, co2 tank and regulator. The final product is a livingroom gem that provides beer on demand.

Demo video (which is going the wrong way) can be found after the break.


Filed under: Arduino Hacks, Beer Hacks
Aug
15

Coleman cooler robot opens and delivers cold beverages on-demand

arduino, beer, Robotics Comments Off on Coleman cooler robot opens and delivers cold beverages on-demand 

Bruce Strauss’ Colebot robotic cooler will open and deliver your favorite bottled beveragesThe robot is one part cooler and multiple parts robot, controlled by an RC controller. Bruce Strauss’ Colebot robotic cooler uses an Arduino as the brains for serving drinks and sits on a RC wheelchair platform for maneuverability.

Read more on MAKE

Mar
28

Arduino Controlled Cooling/Heating System for Beer Fermentation

arduino, ArduinoD14, beer, fermentation, Food & Beverage, homebrewing, tec, temperature-control Comments Off on Arduino Controlled Cooling/Heating System for Beer Fermentation 

FermentingTemperature control during fermentation is a key factor for the perfect homebrew—and is something that is mandatory if you would like to brew like a pro—and that's a perfect fit for the Arduino.

Read more on MAKE

Mar
28

Homebrewing and Arduino: the perfect recipe

arduino, ArduinoD14, beer, brewing, fermentation, Food & Beverage, homebrewing Comments Off on Homebrewing and Arduino: the perfect recipe 

Open Ardbir display menuOne of the common past times in the home-brewing community is the self-building and DIY of the equipment need for beer production in all steps. All that needs is some added Arduino.

Read more on MAKE

Mar
24

New Project: KegDuino: Arduino Meets Kegerator

arduino, ArduinoD14, beer, brewing, DIY Projects, Food & Beverage, Hacks, Kegduino, Marc Young Comments Off on New Project: KegDuino: Arduino Meets Kegerator 

IMG_0692Beer here: A simple, cost-effective DIY solution to brew storage.

Read more on MAKE

Nov
19

Arduino Beer Keyboard

arduino, beer, gallery, Raspberry Pi, romania Comments Off on Arduino Beer Keyboard 

image

Our friends from Romania send us this:

Do you know what you get if you combine 44 beer cans with an Arduino board and a Raspberry PI ? I tell you : fantastic user engagement!

It happened at Webstock, event which took place in Bucharest this month. Staropramen, one of the sponsors of the event asked us for an innovative way to offer a trip to Prague to one of the event’s guests.

So, we came up with a keyboard made out of 44 Staropramen beer cans. Each beer can was a key, and whenever someone touched it, the corresponding letter appeared on a large plasma screen (just like any regular computer keyboard).

And the surprise was fantastic! The user experience and engagement overcame any expectation. Every single person who attended Webstock tried the keyboard and participated to the contest.

Behind the scene, the system is built around an Arduino board and a few capacitive controllers (just like the ones which are inside smartphones’ touch screens), connected to a Raspberry PI board which controls the plasma screen display.

Other hardware we used was the Sparkfun MPR121 Capacitive Touch Sensor Breakout Board (4 of them, each controlling 11 beer cans) and one Sparkfun MP3 Trigger Board which controls the sound effects.

A movie and some photos took during the event can be found on the [website]
(feel free to use them if you want, or download directly the photos as a zip archive).

[Webstock] is the biggest blogging and social media event in Romania.

[Robofun Create] is a Romanian company specialised in creating cool on-demand technology products.


Nov
08

KegDroid makes drinking beer more fun

Android, android hacks, arduino, arduino hacks, beer, beer hacks, kegdroid Comments Off on KegDroid makes drinking beer more fun 

KegDroid beer arduino

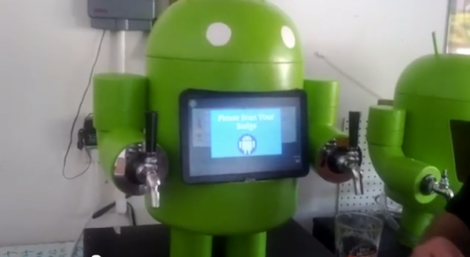
Are you bored with just drinking beer? Are your friends constantly sneaking into your house and stealing your sacred beverages? If so, perhaps you need KegDroid – the Android controlled beer tap created by [Paul Carff].

Looking for a way to add more excitement to drinking his beer, [Paul] spiced up his tap with a little extra technology. He added an Android tablet for touchscreen navigation of the menus, an Arduino to control the flow sensors and solenoid valves, and an NFC reader to act as security for restricted access.  Users must be authenticated before they are allowed to pour any alcohol.

Your name and photo are pulled from your Google+ account as you’re logged in, then you simply select your beverage of choice, and if you’d like a one, eight, or twelve ounce pour. Flow sensors automatically shut off when you have the desired quantity.

Seems like you get more foam than beer, but all in all it’s a cool bar top app.

Check out the video after the break.


Filed under: android hacks, arduino hacks, beer hacks


  • Newsletter

    Sign up for the PlanetArduino Newsletter, which delivers the most popular articles via e-mail to your inbox every week. Just fill in the information below and submit.

  • Like Us on Facebook