Posts | Comments

Planet Arduino

Archive for the ‘weather’ Category

A tiny TV that shows weather, news, and the classic test pattern.

Once upon a time, we would run home from the bus stop to watch Gargoyles and Brady Bunch reruns on the family TV, a late-1970s console Magnavox number that sat on the floor and was about 50% more cabinet than CRT. The old TV, a streamlined white Zenith at least ten years older, had been relegated to the man cave in the basement. It looked so mod compared to the “new” TV, but that’s not the aesthetic my folks were after. They wanted their electronics to double as furniture.

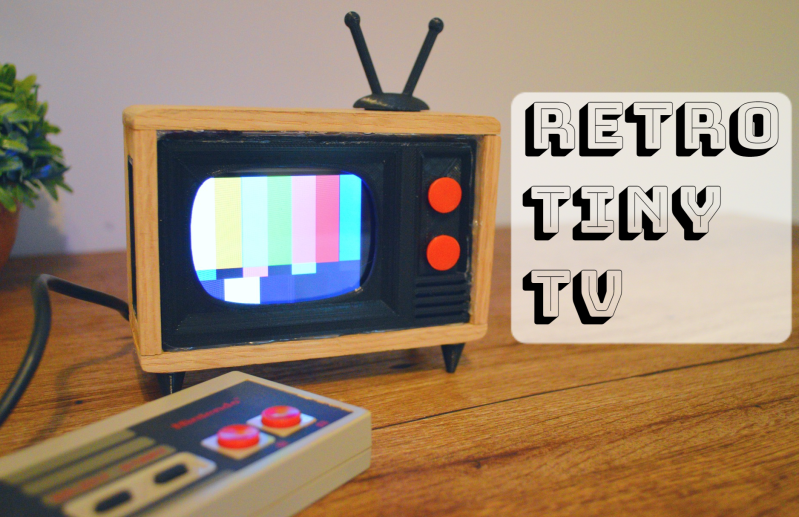
This little TV is a happy medium between the two styles, and for us, it’s all about those feet. But instead of cartoons, it switches between showing the current weather and the top news headlines. Inside that classy oak cabinet is an LCD, an ESP32, and an SD card module. The TV uses OpenWeatherMap and pulls the corresponding weather image from the SD card based on time of day — light images for day, and dark images for night.

We love that it shows the SMPTE color bars, aka the standard American TV test pattern as it switches between weather and news. After showing the top headlines, it automatically switches back to the weather channel. Be sure to check out the short demo video after the break.

Do you like your tiny televisions in strange places? Here’s one you can use to trim your tree this year.

For those of us old enough to remember the VCR (and the difficulty of programming one), the ubiquitous vacuum fluorescent display, or VFD, is burned into our memories, mostly because of their brightness and contrast when compared to the superficially-similar LCD. These displays are incredibly common even apart from VCRs, though, and it’s easy to find them for next to no cost, but figuring out how to drive one if you just pulled it out of a 30-year-old VCR is going to take some effort. In this build, [mircemk] shows us how he drives unknown VFD displays using an Arduino in order to build his own weather forecasting station.

For this demonstration [mircemk] decided to turn a VFD into a weather forecasting station. First of all, though, he had to get the VFD up and running. For this unit, which came from a point-of-sale (POS) terminal, simply connecting power to the device turned on a demo mode for the display which let him know some information about it. From there, and with the knowledge that most POS terminals use RS232 to communicate, he was able to zero in on the Rx and Tx pins on the on-board microcontroller and interface them with an Arduino. From there it’s a short step to being able to output whatever he wanted to this display.

For this project, [mircemk] wanted the display to output information about weather, but rather than simply pull data from some weather API he is actually using a sensor suite connected to the Arduino to measure things like barometric pressure in order to make a 12-hour forecast. The design is inspired by old Zambretti weather forecasters which used analog wheels to input local weather data. It’s an interesting build not only for the VFD implementation but also for attempting to forecast the weather directly with just a tiny sensor set instead of downloading a forecast to display. To do any better with your own forecasts, you’d likely need your own weather station.

For most of us, getting weather information is as trivial as unlocking a smartphone or turning on a computer and pointing an app or browser at one’s weather site of choice. This is all well and good, but it lacks a certain panache that old weather stations had with their analog dials and stained wood cases. The weather station that [BuildComics] created marries both this antique aesthetic with modern weather data availability, and then dials it up a notch for this enormous analog weather station build.

The weather station uses 16 discrete dials, each modified with a different label for the specific type of data displayed. Some of them needed new glass, and others also needed coils to be modified to be driven with a lower current than they were designed as well, since each would be driven by one of two Arduinos in this project. Each are tied to a microcontroller output via a potentiometer which controls the needle’s position for the wildly different designs of meter. The microcontrollers themselves get weather information via the internet, which allows for about as up-to-date information about the weather as one could gather first-hand.

The amount of customization of these old meters is impressive, and what’s even more impressive is the project’s final weight. [BuildComics] reports that it took two people just to lift it onto the wall mount, which is not surprising given the amount of iron in some of these old analog meters. And, although not as common in the real world anymore, these old antique meters have plenty of repurposed uses beyond weather stations as well.

Unless you live in a special, unique place like Hawaii or Costa Rica it’s unlikely you’ll be able to surf every day. It’s not easy to plan surf sessions or even surf trips to most locations because the weather conditions will need to be just right. Not only the wave height (swell) but also the wind speed and direction, tide, water and air temperature, and even amount and type of marine life present can all impact your surf session. You’ll want something which can easily tell you right away if conditions are good.

This project from [luke] is called the Surf Window shows the surf conditions at the local beach with just one glance. Made out of various pieces of wood, each part represents one of the weather conditions at the beach. A rotating seagull gives the wind direction, for example, and the wave height is represented by 3D, moving waves. All of the parts are connected with various motors and linkages to an Arduino Mega +WiFi R3 which grabs all of its information from Magicseaweed, a surf forecasting site.

The Surf Window can show the current conditions at virtually any surfable beach in the world, so if you really want to know how Jaws, Mavericks, or even Reef Road is breaking right now, you could use this to give you a more nuanced look. Don’t forget to take the correct board for the conditions!

We admit, we see a lot of weather stations. What makes [Mike Diamond’s] take on this old favorite interesting is that it is tiny enough to carry with you, and uses your cell phone as a hotspot to deliver its data. Of course, that assumes you have a phone that can act as a hotspot.

The parts are straightforward, a power supply, an ESP8266, and a weather sensor board. It looks as though you could easily slip the whole affair into a tube or maybe a 3D printed enclosure. We were a little concerned about the bare wire used, but as [Mike] points out you can use insulated wire if you like, and we’d encourage you to do so.

There are some modifications required including removing the pin headers. [Mike] uses the old trick of smacking your hand on the table after melting the pins. You can also heat up each pin and pull it out with pliers. Or, if you have a hot air gun, get all the pins molten at once — just don’t heat up more of the board than you need.

On the data end, the ESP8266 uses Cayenne to transmit data which is the same kind of IoT backend we see a lot lately. On the one hand, this allows you to distribute it without developing a phone application. On the other hand, we would have been tempted to just make the ESP8266 a web server and populate a simple web page. Of course, you could still do that if you wanted to.

We’ve seen plenty of weather stations, but a lot of them are not nearly as compact. If you want to go old school, there’s always the TI 99/4A weather station.

Whether you’re lodged in an apartment with a poor view of the sky like [Becky Stern] or are looking for an at-a-glance report of the current weather, you might consider this minimalist weather display instead of checking your computer or your phone every time you’re headed out the door.

The first order of business was to set up her Feather Huzzah ESP8266 module. [Becky] started with a blink test to ensure it was working properly. Once that was out of the way, she moved on to installing a few libraries. Temperature data fetched by an IFTTT feed is displayed on a seven-segment display, while additional feeds separately retrieve information for each basic weather type: sunny, overcast, rain, snow.

All it took to create the sleek display effect was a few pieces of cardboard inside a shadow box frame, a sheet of paper as a diffuser, and twelve Neopixel RGB LEDs hidden inside. Trimming and securing everything in place as well as notching out the back of the frame for the power cable finished the assembly. Check out the build video after the break.

Pair this weather frame with a shoe rack that spotlights the appropriate footwear depending on the weather to really streamline your exit.


Filed under: Arduino Hacks, misc hacks
Aquesta és la pàgina amb les instruccions d'instal·lació, pas a pas, de l'estació meteorològica:

https://www.raspberrypi.org/learning/weather-station-guide/


1. Muntatge
2. Instal·lació del programari
3. Instal·lació a l'exterior
Aquesta és la pàgina amb les instruccions d'instal·lació, pas a pas, de l'estació meteorològica:

https://www.raspberrypi.org/learning/weather-station-guide/


1. Muntatge
2. Instal·lació del programari
3. Instal·lació a l'exterior

AWS_1An easy to set up and program digital weather station you can build for around $50

Read more on MAKE

The post Build Your Own Arduino Weather Station appeared first on Make: DIY Projects, How-Tos, Electronics, Crafts and Ideas for Makers.

IMG_6322 (Large)Riffing off of the word clock idea, this Maker created a backlit display for the local weather forecast.

Read more on MAKE

The post This Backlit Display is Like a Word Clock for Weather appeared first on Make: DIY Projects, How-Tos, Electronics, Crafts and Ideas for Makers.


  • Newsletter

    Sign up for the PlanetArduino Newsletter, which delivers the most popular articles via e-mail to your inbox every week. Just fill in the information below and submit.

  • Like Us on Facebook