Posts | Comments

Planet Arduino

Archive for the ‘weather’ Category

[Yveaux] had a problem. The transmitter on his outdoor weather station had broken, rendering the inside display useless. He didn’t want to buy a new one, so, like the freelance embedded software designer that he is, he decided to reverse engineer the protocol that the transmitter uses and build his own. He didn’t just replace the transmitter module, though, he decided to create an entire system that integrated the weather system into a sensor network controlled by a Raspberry Pi. That’s a far more substantial project, but it gave him the ability to customize the display and add more features, such as synching the timer in the display with a network clock and storing the data in an online database.

Fortunately for [Yveaux], the transmitter itself was fairly easy to replace. The weather station he had, like most, transmitted on the 868MHz frequency, which is a license-free ISM (Industrial, Scientific and Monitoring) spot on the spectrum. After some poking around, he was able to figure out the protocol and teach the Pi to speak it. He then added a Moteino and an nRF2401+ transmitter to the weather station, so it can send data to the Pi, which then sends it to the display. It is a more complicated setup, but it is also much more flexible. He’s had it running for a couple of years now and has collected more than a million sensor readings.


Filed under: Arduino Hacks, wireless hacks

wetterhaus

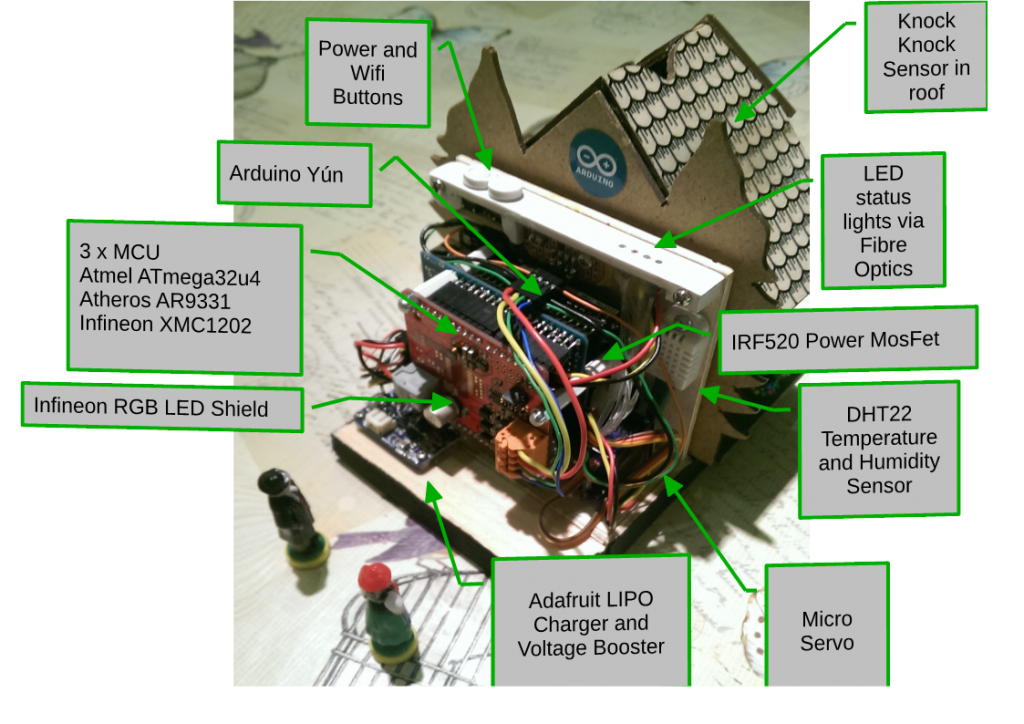
The “Enchanted Cottage” is a project by Andy Clark with the aim of upgrading a traditional  german “wetter haus”  with a new mechanism and electronics running on Arduino Yún:

The mechanics were replaced with a servo and 3D printed parts designed to make the movement linear rather than arcing as in the traditional approach. The figures were fitted with magnets so that they could move without any obvious form of propulsion.
The electronics were based on an Arduino Yún, custom prototyping shield and an Infineon RGB LED driver shield. The whole thing is powered by a rechargable LiPo battery and a module from AdaFruit. Because the Arduino was deep in the middle of the house, I used fibre optics to bring the light to the top panel. A sensor was added into the roof so you could simply tap it to get it to update the forecast for you.

The project was build over a period of 16 weeks, the mechanical aspects were completed first and the 3D printing took several goes to get it right. The electronics build was fairly straightforward but fitting everything onto the proto shield was challenging and the high clearance for the Yún was also a challenge. The software was written as I went along with demo programs created to test each part. Getting the Yún to work on low power was fairly straightforward but getting a secure and validated HTTPS connection took a few attempts. tried to put as much of the processing into the Python script so that the C++ code was just handling the control. All in all a challenging project that pushed the Yún to it’s limits.

Learn more about the project on Andy’s blog.

Infomatic-1024x724

May
23

Mini weather station

arduino, Humidity, temperature, weather, wireless Comments Off on Mini weather station 

FDVH1IXI9YBYAL5.MEDIUM

by indigod0g @ instructables.com:

In this project, we will be making a mini weather station that measures temperature and humidity and transmits them wirelessly to a ground station, which displays the readings on an LCD display!

It’s a fairly easy project and can be used either on its own or part of something bigger.

Mini weather station – [Link]

Jan
24

Decoding Weather Radio messages with Arduino

arduino, Library, radio, weather Comments Off on Decoding Weather Radio messages with Arduino 

WeatherRadio

Arduino user Vogel1230 wrote us:

I’ve been involved with NOAA Weather Radio for some time and Arduino is a recent passion of mine over the last couple of years. When I found out about the Silicon Labs Si4707 Weather Band IC, it only made sense that I try to use my hardware knowledge and try and come up with a breakout board to make this capability available to the public.

I teamed up with Ray Dees who had done a lot of work with decoding weather radio messages using a different architecture. After a few months of collaboration on software we were able to build a very strong library that enables even the beginner to use all the features of the iC and modify as they see fit for their application. The code is currently optimized for UNO and Mega2560 use.


Learn how to connect your Arduino to the outside world via Ethernet

This is chapter sixteen of our huge Arduino tutorial seriesUpdated 06/12/2013

In this chapter we will introduce and examine the use of Ethernet networking with Arduino over local networks and the greater Internet. It will be assumed that you have a basic understanding of computer networking, such as the knowledge of how to connect computers to a hub/router with RJ45 cables, what an IP and MAC address is, and so on. Furthermore, here is a good quick rundown about Ethernet.

Getting Started

You will need an Arduino Uno or compatible board with an Ethernet shield that uses the W5100 Ethernet controller IC (pretty much all of them):

Arduino Ethernet shield

…or consider using a Freetronics EtherTen – as it has everything all on the one board, plus some extras:

Freetronics EtherTen

Furthermore you will need to power the board via the external DC socket – the W5100 IC uses more current than the USB power can supply. A 9V 1A plug pack/wall wart will suffice. Finally it does get hot – so be careful not to touch the W5100 after extended use. In case you’re not sure – this is the W5100 IC:

Wiznet W5100

Once you have your Ethernet-enabled Arduino, and have the external power connected – it’s a good idea to check it all works. Open the Arduino IDE and selectFile > Examples > Ethernet > Webserver. This loads a simple sketch which will display data gathered from the analogue inputs on a web browser. However don’t upload it yet, it needs a slight modification.

You need to specify the IP address of the Ethernet shield – which is done inside the sketch. This is simple, go to the line:

IPAddress ip(192,168,1, 177);

And alter it to match your own setup. For example, in my home the router’s IP address is 10.1.1.1, the printer is 10.1.1.50 and all PCs are below …50. So I will set my shield IP to 10.1.1.77 by altering the line to:

IPAddress ip(10,1,1,77);

You also have the opportunity to change your MAC address. Each piece of networking equipment has a unique serial number to identify itself over a network, and this is normall hard-programmed into the equipments’ firmware. However with Arduino we can define the MAC address ourselves.

If you are running more than one Ethernet shield on your network, ensure they have different MAC addresses by altering the hexadecimal values in the line:

byte mac[] = { 0xDE, 0xAD, 0xBE, 0xEF, 0xFE, 0xED };

However if you only have one shield just leave it be. There may be the very, very, statistically rare chance of having a MAC address the same as your existing hardware, so that would be another time to change it.

Once you have made your alterations, save and upload the sketch. Now open a web browser and navigate to the IP address you entered in the sketch, and you should be presented with something similar to the following:

 Arduino webserver example sketch

What’s happening? The Arduino has been programmed to offer a simple web page with the values measured by the analogue inputs. You can refresh the browser to get updated values.

At this point – please note that the Ethernet shields use digital pins 10~13, so you can’t use those for anything else. Some Arduino Ethernet shields may also have a microSD card socket, which also uses another digital pin – so check with the documentation to find out which one.

Nevertheless, now that we can see the Ethernet shield is working we can move on to something more useful. Let’s dissect the previous example in a simple way, and see how we can distribute and display more interesting data over the network. For reference, all of the Ethernet-related functions are handled by the Ethernet Arduino library. If you examine the previous sketch we just used, the section that will be of interest is:

 for (int analogChannel = 0; analogChannel < 6; analogChannel++) 
          {
            int sensorReading = analogRead(analogChannel);
            client.print("analog input ");
            client.print(analogChannel);
            client.print(" is ");
            client.print(sensorReading);
            client.println("<br />");       
          }
          client.println("</html>");

Hopefully this section of the sketch should be familiar – remember how we have used serial.print(); in the past when sending data to the serial monitor box? Well now we can do the same thing, but sending data from our Ethernet shield back to a web browser – on other words, a very basic type of web page.

However there is something you may or may not want to  learn in order to format the output in a readable format – HTML code. I am not a website developer (!) so will not delve into HTML too much.

However if you wish to serve up nicely formatted web pages with your Arduino and so on, here would be a good start. In the interests of simplicity, the following two functions will be the most useful:

client.print(" is ");

Client.print (); allows us to send text or data back to the web page. It works in the same way as serial.print(), so nothing new there. You can also specify the data type in the same way as with serial.print(). Naturally you can also use it to send data back as well. The other useful line is:

client.println("<br />");

which sends the HTML code back to the web browser telling it to start a new line. The part that actually causes the carriage return/new line is the <br /> which is an HTML code (or “tag”) for a new line. So if you are creating more elaborate web page displays, you can just insert other HTML tags in the client.print(); statement. If you want to learn more about HTML commands, here’s a good tutorial site. Finally – note that the sketch will only send the data when it has been requested, that is when it has received a request from the web browser.

Accessing your Arduino over the Internet

So far – so good. But what if you want to access your Arduino from outside the local network?

You will need a static IP address – that is, the IP address your internet service provider assigns to your connection needs to stay the same. If you don’t have a static IP, as long as you leave your modem/router permanently swiched on your IP shouldn’t change. However that isn’t an optimal solution.

If your ISP cannot offer you a static IP at all, you can still move forward with the project by using an organisation that offers a Dynamic DNS. These organisations offer you your own static IP host name (e.g. mojo.monkeynuts.com) instead of a number, keep track of your changing IP address and linking it to the new host name. From what I can gather, your modem needs to support (have an in-built client for…) these DDNS services. As an example, two companies are No-IP andDynDNS.com. Please note that I haven’t used those two, they are just offered as examples.

Now, to find your IP address… usually this can be found by logging into your router’s administration page – it is usually 192.168.0.1 but could be different. Check with your supplier or ISP if they supplied the hardware. For this example, if I enter 10.1.1.1 in a web browser, and after entering my modem administration password, the following screen is presented:

WAN IP address router

What you are looking for is your WAN IP address, as you can see in the image above. To keep the pranksters away, I have blacked out some of my address.

The next thing to do is turn on port-forwarding. This tells the router where to redirect incoming requests from the outside world. When the modem receives such a request, we want to send that request to the port number of our Ethernet shield. Using the:

EthernetServer server(125);

function in our sketch has set the port number to 125. Each modem’s configuration screen will look different, but as an example here is one:

Arduino router port forwarding

So you can see from the line number one in the image above, the inbound port numbers have been set to 125, and the IP address of the Ethernet shield has been set to 10.1.1.77 – the same as in the sketch.

After saving the settings, we’re all set. The external address of my Ethernet shield will be the WAN:125, so to access the Arduino I will type my WAN address with :125 at the end into the browser of the remote web device, which will contact the lonely Ethernet hardware back home.

Furthermore, you may need to alter your modem’s firewall settings, to allow the port 125 to be “open” to incoming requests. Please check your modem documentation for more information on how to do this.

Now from basically any Internet connected device in the free world, I can enter my WAN and port number into the URL field and receive the results. For example, from a phone when it is connected to the Internet via LTE mobile data:

Arduino webserver example cellular

So at this stage you can now display data on a simple web page created by your Arduino and access it from anywhere with unrestricted Internet access. With your previous Arduino knowledge (well, this is chapter sixteen) you can now use data from sensors or other parts of a sketch and display it for retrieval.

Displaying sensor data on a web page

As an example of displaying sensor data on a web page, let’s use an inexpensive and popular temperature and humidity sensor – the DHT22. You will need to install the DHT22 Arduino library which can be found on this page. If this is your first time with the DHT22, experiment with the example sketch that’s included with the library so you understand how it works.

Connect the DHT22 with the data pin to Arduino D2, Vin to the 5V pin and GND to … GND:

arduino ethernet freetronics etherten dht22 humid

Now for our sketch – to display the temperature and humidity on a web page. If you’re not up on HTML you can use online services such as this to generate the code, which you can then modify to use in the sketch.

In the example below, the temperature and humidity data from the DHT22 is served in a simple web page:

#include <SPI.h>
#include <Ethernet.h>

// for DHT22 sensor
#include "DHT.h"
#define DHTPIN 2
#define DHTTYPE DHT22

// Enter a MAC address and IP address for your controller below.
// The IP address will be dependent on your local network:
byte mac[] = {   0xDE, 0xAD, 0xBE, 0xEF, 0xFE, 0xED };
IPAddress ip(10,1,1,77);

// Initialize the Ethernet server library
// with the IP address and port you want to use 
// (port 80 is default for HTTP):
EthernetServer server(125);
DHT dht(DHTPIN, DHTTYPE);

void setup() 
{
  dht.begin();
 // Open serial communications and wait for port to open:
  Serial.begin(9600);
   while (!Serial) {
    ; // wait for serial port to connect. Needed for Leonardo only
  }
  // start the Ethernet connection and the server:
  Ethernet.begin(mac, ip);
  server.begin();
  Serial.print("server is at ");
  Serial.println(Ethernet.localIP());
}

void loop() 
{
  // listen for incoming clients
  EthernetClient client = server.available();
  if (client) {
    Serial.println("new client");
    // an http request ends with a blank line
    boolean currentLineIsBlank = true;
    while (client.connected()) {
      if (client.available()) {
        char c = client.read();
        Serial.write(c);
        // if you've gotten to the end of the line (received a newline
        // character) and the line is blank, the http request has ended,
        // so you can send a reply
        if (c == 'n' && currentLineIsBlank) 
        {
          // send a standard http response header
          client.println("HTTP/1.1 200 OK");
          client.println("Content-Type: text/html");
          client.println("Connection: close");  // the connection will be closed after completion of the response
	  client.println("Refresh: 30");  // refresh the page automatically every 30 sec
          client.println();
          client.println("<!DOCTYPE HTML>");
          client.println("<html>");

          // get data from DHT22 sensor
          float h = dht.readHumidity();
          float t = dht.readTemperature();
          Serial.println(t);
          Serial.println(h);

          // from here we can enter our own HTML code to create the web page
          client.print("<head><title>Office Weather</title></head><body><h1>Office Temperature</h1><p>Temperature - ");
          client.print(t);
          client.print(" degrees Celsius</p>");
          client.print("<p>Humidity - ");
          client.print(h);
          client.print(" percent</p>");
          client.print("<p><em>Page refreshes every 30 seconds.</em></p></body></html>");
          break;
        }
        if (c == 'n') {
          // you're starting a new line
          currentLineIsBlank = true;
        } 
        else if (c != 'r') {
          // you've gotten a character on the current line
          currentLineIsBlank = false;
        }
      }
    }
    // give the web browser time to receive the data
    delay(1);
    // close the connection:
    client.stop();
    Serial.println("client disonnected");
  }
}

It is a modification of the IDE’s webserver example sketch that we used previously – with a few modifications. First, the webpage will automatically refresh every 30 seconds – this parameter is set in the line:

client.println("Refresh: 30");  // refresh the page automatically every 30 sec

… and the custom HTML for our web page starts below the line:

// from here we can enter our own HTML code to create the web page

You can then simply insert the required HTML inside client.print() functions to create the layout you need.

Finally – here’s an example screen shot of the example sketch at work:

arduino ethernet freetronics etherten dht22 humid cellular

You now have the framework to create your own web pages that can display various data processed with your Arduino.

Remote control your Arduino from afar

We have a separate tutorial on this topic, that uses the teleduino system.

Conclusion

So there you have it, another useful way to have your Arduino interact with the outside world. Stay tuned for upcoming Arduino tutorials by subscribing to the blog, RSS feed (top-right), twitter or joining our Google Group. And if you enjoyed the tutorial, or want to introduce someone else to the interesting world of Arduino – check out my book (now in a third printing!) “Arduino Workshop” from No Starch Press.

tronixstuff

Sep
05

Make a WiFi Weather Station With Arduino and Adafruit’s CC3000 breakout

arduino, CC3000, Humidity, temperature, Test/Measurements, weather, wifi Comments Off on Make a WiFi Weather Station With Arduino and Adafruit’s CC3000 breakout 

cc3000_small

Make a WiFi Weather Station With Arduino and Adafruit’s CC3000 breakout.

As open-source hardware users and makers, we love playing with new chips, boards and tools. And there is one chip which is quite popular these days: the CC3000 WiFi chip from TI. This chip comes with many promises: cheap (around $10), easy to use, low-power … It was featured in many articles around the web, but somehow it was quite hard to use with Arduino as there was no breakout board or library available. Luckily, Adafruit solved that for us with a nice breakout board and a working library for Arduino. In this article, I will show you how to use this chip for home automation purposes. Remember that weather station project? We are going to do the same: measure the temperature and the humidity. But this time we won’t display the information on an LCD screen. Instead, we will transmit the data wirelessly via WiFi to your computer and display it there. Excited ? Let’s get started!

Make a WiFi Weather Station With Arduino and Adafruit’s CC3000 breakout - [Link]

Nov
15

tempescope_in_bookshelf

Most home weather displays use an LED screen or other moderately interesting methods of showing you what’s going on outside. The [Tempescope], however, takes an entirely different route, actually recreating a tiny weather environment on your bookshelf!

This active weather device is controlled via an Arduino as well as a pump, ultrasound diffuser, and other assorted components connected to a computer. It was originally meant to display, or more accurately recreate (precreate?) tomorrow’s weather. What is even more interesting is that using [World Weather] software, it’s able to simulate the weather on any place on earth.

Early in this article [Ken] lists the art of [bonsai] as one of his inspirations. He’s open to suggestions as to how to expand this device, which can be seen after the break. We (I at least) would think it was awesome if there was actually a bonsai tree in the environment in keeping with its influences. Certainly our readers can give him some feedback as well!


Filed under: arduino hacks, Featured, software hacks
Oct
08

Sensor based dehumidifier system for your home

arduino hacks, Home automation, home hacks, weather Comments Off on Sensor based dehumidifier system for your home 

The apartment [Angus] lives in must be sealed up pretty tight. It was so humid during the winter that there was a mold issue. We usually have the opposite problem, needing to add humidity to the air in the colder months. To combat the issue he bought a small dehumidifier, but wanted to automate the system a bit more than what was built into its meager controls. He combined a set of wireless sensors and remote control outlets to switch the dehumidifier automatically.

The sensors are from a weather station he bought on eBay. It came with a base station and three remote units, all of which monitor both temperature and humidity. He wanted a system that could compare temperature with dew point and make decisions based on a simple look-up table. An Arduino with a custom milled shield reads these measurements from the sensors and feeds them to a router which is running a cron job script every minute. When that script judges the time and weather conditions warrant a change it tells the Arduino to switch the wireless outlet to which the dehumidifier is connected.


Filed under: arduino hacks, home hacks


  • Newsletter

    Sign up for the PlanetArduino Newsletter, which delivers the most popular articles via e-mail to your inbox every week. Just fill in the information below and submit.

  • Like Us on Facebook