Posts | Comments

Planet Arduino

Archive for the ‘Gateron’ Category

Media keyboards are nice in theory. But in practice they never have all the keys you want, and they almost always have a few you don’t. Sure, you could maybe reassign the ones you don’t use, but then the caps are wrong, and it’s a whole thing. So really, the only winning move is to make a micro macro keyboard as [littleSilvr] did to make all your shortcuts one-button accessible.

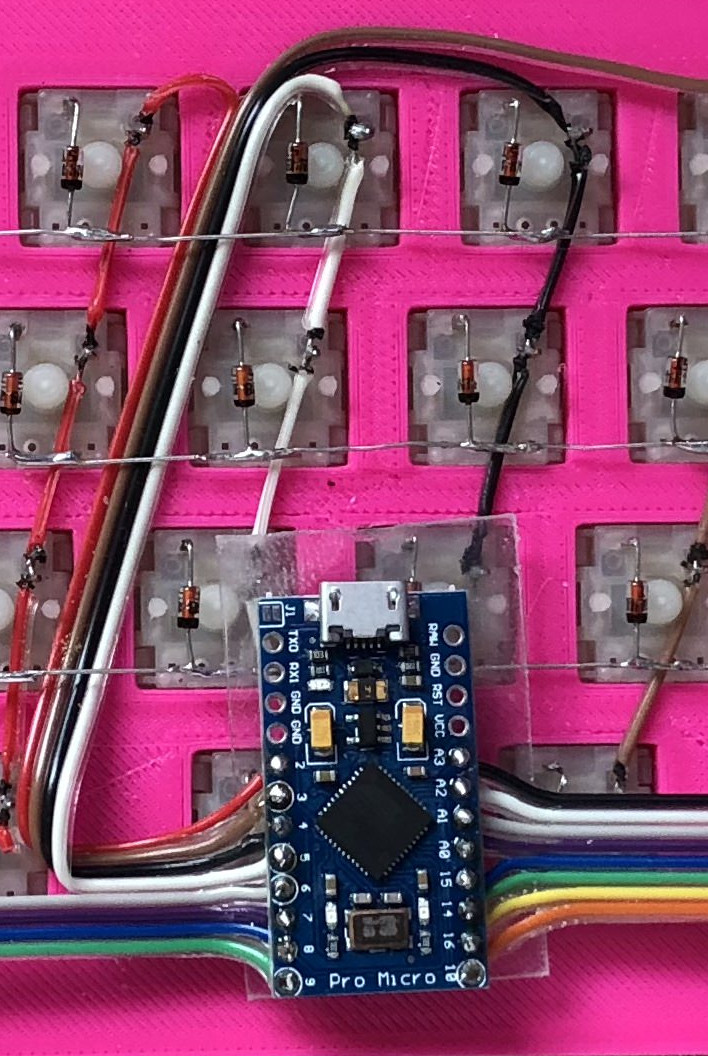
This lovely input has an Arduino Pro Micro for a brain, and Gateron browns for brawn. That knob there is a rotary encoder, not a potentiometer, because endless volume knob twiddling is just so much nicer. In case you’re wondering, those shortcuts open Fusion 360 and Cura, but we’re still not sure what the hyphen does.

Can we talk about those keycaps, though? [littleSilvr] used [Make Anything]’s process of of printing in multi-color with a single extruder. The technique involves building a vector for each color, each of which gets its own STL file. Then you add retraction as you go up through the layers, slow the print speed, change filament colors while the nozzle and bed are still warm, and voila, a vibrant canvas of colors.

If you don’t have a printer and you don’t mind a bit of compromise on the number of inputs, try basing your build on an existing input, like an old rotary telephone dialer.

Via r/duino

In the heat of the moment, gamers live and die by the speed and user-friendliness of their input mechanisms. If you’re team PC, you have two controllers to worry about. Lots of times, players will choose a separate gaming keyboard over the all-purpose 104-banger type.

When [John Silvia]’s beloved Fang game pad went to that LAN party in the sky, he saw the opportunity to create a custom replacement exactly as he wanted it. Also, he couldn’t find one with his desired layout. Mechanical switches were a must, and he went with those Cherry MX-like Gaterons we keep seeing lately.

This 37-key game pad, which [John] named Eyetooth in homage to the Fang, has a couple of standout features. For one, any key can be reprogrammed key directly from the keypad itself, thanks to built-in macro commands. It’s keyboard-ception!

One of the macros toggles an optional auto-repeat feature. [John] says this is not for cheating, though you could totally use it for that if you were so inclined. He is physically unable to spam keys fast enough to satisfy some single-player games, so he designed this as a workaround. The auto-repeat’s frequency is adjustable in 5-millisecond increments using the up /down macros. There’s a lot more information about the macros on the project’s GitHub.

Eyetooth runs on an Arduino Pro Micro, so you can either use [John]’s code or something like QMK firmware. This baby is so open source that [John] even has a hot tip for getting quality grippy feet on the cheap: go to the dollar store and look for rubber heel grippers meant to keep feet from sliding around inside shoes.

If [John] finds himself doing a lot of reprogramming, adding a screen with a layout map could help him keep track of the key assignments.

While the vast majority of us are content to plod along with the squishy chiclet keyboards on our laptops, or the cheapest USB membrane keyboard we could find on Amazon, there’s a special breed out there who demand something more. To them, nothing beats a good old-fashioned mechanical keyboard, where each key-press sounds like a footfall of Zeus himself. They are truly the “Chad” of the input device world.

But what if even the most high end of mechanical keyboards doesn’t quench your thirst for spring-loaded perfection? In that case, the only thing left to do is design and build your own. [Matthew Cordier] recently unveiled the custom mechanical keyboard he’s been working on, and to say it’s an elegant piece of engineering is something of an understatement. It may even better inside than it does on the outside.

The keyboard, which he is calling z.48, is based around the Arduino Pro Micro running a firmware generated on kbfirmware.com, and features some absolutely fantastic hand-wiring. No PCBs here, just a rainbow assortment of wire and the patience of a Buddhist monk. The particularly attentive reader may notice that [Matthew] used his soldering iron to melt away the insulation on his wires where they meet up with the keys, giving the final wiring job a very clean look.

Speaking of the keys, they are Gateron switches with DSA Hana caps. If none of those words mean anything to you, don’t worry. We’re through the Looking Glass and into the world of the keyboard aficionado now.

Finally, the case itself is printed on a CR-10 with a 0.3 mm nozzle and 0.2 mm layers giving it a very fine finish. At 70% infill, we imagine it’s got a good deal of heft as well. [Matthew] mentions that a production case and a PCB are in the cards for the future as he hopes to do a small commercial run of these boards. In the meantime we can all bask in the glory of what passes for a prototype in his world.

We’ve seen some exceptionally impressive mechanical keyboards over the years, including the occasional oddity like the fully 3D printed one and even one that inexplicably moves around. But this build by [Matthew] has to be one of the most elegant we’ve ever come across.

[Thanks to DarkSim905 for the tip]


  • Newsletter

    Sign up for the PlanetArduino Newsletter, which delivers the most popular articles via e-mail to your inbox every week. Just fill in the information below and submit.

  • Like Us on Facebook