Posts | Comments

Planet Arduino

Archive for the ‘ultrasonic transducer’ Category

Infrared certainly has its uses, but if you’re trying to locate objects, ultrasonic detection is far superior. It’s contact-less, undetectable to the human ear, and it isn’t affected by smoke, dust, ambient light, or Silly String.

If you have one ultrasonic sensor and a microcontroller, you can detect plenty of useful things, like the water level in a rain barrel or the distance traveled by a tablet along a rail. If you have two sensors and a microcontroller, you can pinpoint any object within a defined range using trigonometry.

[lingib]’s dual sensor echo locator uses two HY-SRF05s, but the cheap and plentiful HC-SR04s will work, too. Both sensors are arranged for maximum beam overlap and wired up to an Arduino Uno. One sensor’s emitter is blocked with masking tape, so all it does is listen.

When the system registers the object, it shows up as a red dot on a grid inside a Processing sketch along with a bunch of details like the object’s coordinates, its distance from each sensor, and the area of the triangle formed by the two sensors and the object. [lingib] reports that the system is quite accurate and will work for much larger playgrounds than the 1 meter square in the demo after the break.

Don’t want to detect objects? Ultrasonic sensors are cheap enough to hack into other things, like this one-way data communications module.

Thanks for the tip, [Setvir].

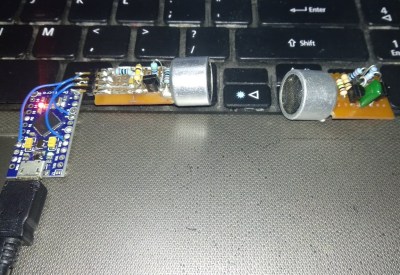
Most often ultrasonic transducers are used for distance measurements, and in the DIY world, usually as a way for robots to detect obstacles. But for a weekend project, [Vinod.S] took the ultrasonic transmitter and receiver from a distance-meter module and used amplitude modulation to send music ultrasonically from his laptop to a speaker, essentially transmitting and receiving silent, modulated sounds waves.

The transmitter and receiver

For the transmitter, he turned an Arduino Pro Micro into a USB sound card which he could plug into his laptop. That outputs both the audio signal and a 40 kHz carrier signal, implemented using the Arduino’s Timer1. Those go to a circuit board he designed which modulates the carrier with the audio signal using a single transistor and then sends the result out the ultrasonic transmitter.

He took care to transmit a clear signal by watching the modulated wave on an oscilloscope, looking for over-modulation and clipping while adjusting the values of resistors located between the transistor, a 5 V from the Arduino and the transmitter.

He designed the receiver side with equal care. Conceptually the circuit there is simple, consisting of the ultrasonic receiver, followed by a transistor amplifier for the modulated wave, then a diode for demodulation, another transistor amplifier, and lastly a class-D amplifier before going to a speaker.

Due to the low 40 kHz carrier frequency, the sound lacks the higher audio frequencies. But as a result of the effort he put into tuning the circuits, the sound is loud and clear. Check out the video below for an overview and to listen to the sound for yourself. Warning: Before there’s a storm of comments, yes the video’s shaky, but we think the quality of the hack more than makes up for it.

What else can you do with the ultrasonic transducers? You could wire a bunch of them to a Raspberry Pi to make a piano interface. Or you could use a larger transducer to make an affordable ultrasonic soldering iron.


  • Newsletter

    Sign up for the PlanetArduino Newsletter, which delivers the most popular articles via e-mail to your inbox every week. Just fill in the information below and submit.

  • Like Us on Facebook