Posts | Comments

Planet Arduino

Archive for the ‘VGA’ Category

We’re big fans of the Arduboy here at Hackaday, but we’ll admit its tiny screen isn’t exactly ideal for long gaming sessions. There are some DIY builds of the open source handheld that use a larger SPI OLED display, though you’re relatively limited on what kind of changes can be made to the hardware before the games start balking. But as [Nick Bild] shows with his Arduboy home console, hacking the core system library opens up a lot of interesting possibilities.

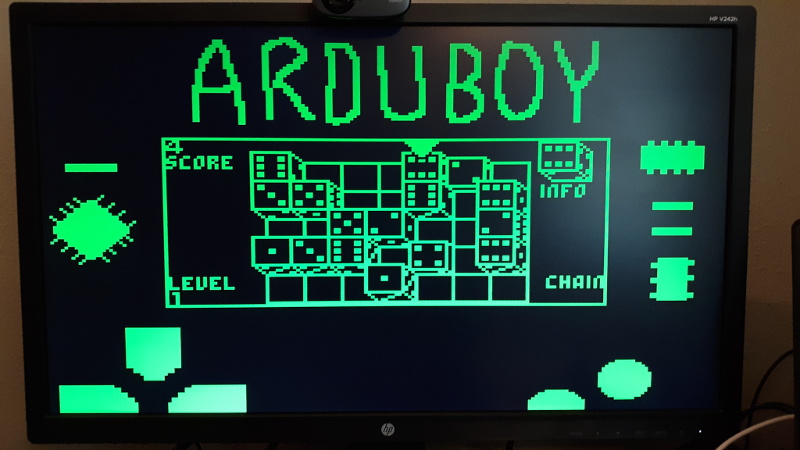
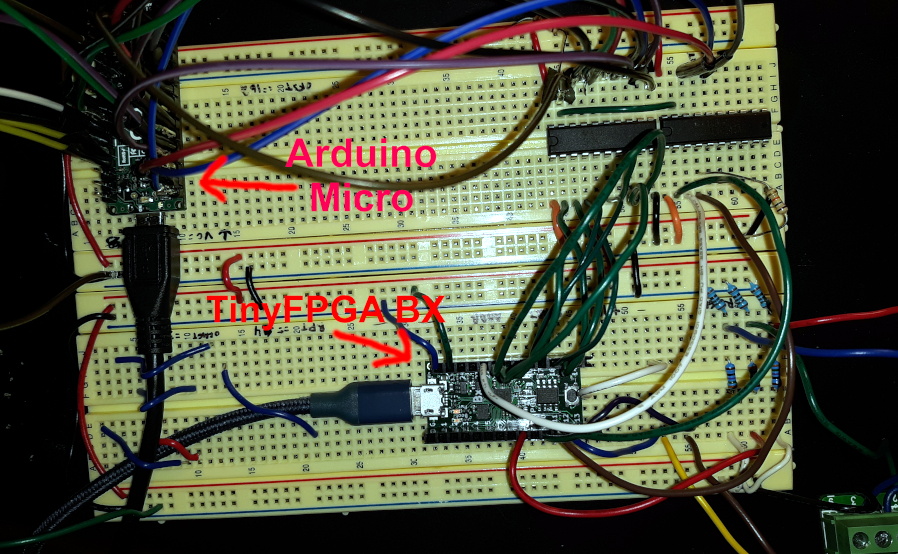
Games written for the Arduboy make use of a common library that handles all the low-level hardware stuff, which includes a display() function to push the graphical data out to an SPI-connected OLED display. What [Nick] has done is re-write that function to instead output to a custom VGA generator running on the TinyFPGA BX. He had to delete support for the Arduboy’s RGB LEDs because he needed the extra pins, but that shouldn’t cause much of a problem in terms of software support.

This does mean that games need to be recompiled against the modified library to work on his hardware, but as the vast majority of Arduboy software is open source anyway, that’s not much of a problem. We particularly like the Super Game Boy style border  you get around the display at no extra cost.

At this point the hardware looks less like a console and more like a breadboard filled with jumpers, so we’re interested in seeing this project taken to its logical conclusion. A custom PCB, enclosure, and possibly even support for using the original NES controllers would turn this into proper system worthy of any hacker’s game room. You could even put the games on custom cartridges if you wanted, though a flash chip that holds the system’s entire library would be quite a bit more convenient.

We hate to break it to [Rob Cai], but he’s built a VGA drawing toy, not an Etch-a-Sketch. How do we know? Simple, Etch-a-Sketch is a registered trademark. Regardless, his project shows how an Arduino can drive a VGA monitor using the VGAx library. Sure, you can only do four colors with a 120×60 resolution, but on the other hand, it requires almost no hardware other than the Arduino (you do need four resistors).

The hardware includes two pots and with the right firmware, it can also play pong, if you don’t want to give bent your artistic side. You can see videos of both the art toy and the pong game, below.

Because the device started as a pong game, [Rob’s] version has two boxes, each with a pot and a button. Of course, if you were really building it just for the drawing toy, you’d probably put it all in a box. Maybe even a red box. If we were building it, we’d be tempted to put a tilt sensor or an accelerometer in the box so you could shake it to erase the picture. Just saying.

If you want 640×480 resolution from an Arduino, it can be done, but it takes more hardware. If you were trying to get a kid interested in Arduino, you could do worse than start with two projects with video that are fun, use a handful of easy-to-source parts, and shares hardware. Then again, if you are in the “go big or go home” camp, we’d redirect to this pong game, instead.


Filed under: Arduino Hacks

pong

Everyone knows Pong, the first commercially successful arcade video game machine  originally release by Atari in 1972. In those years the game helped to establish the video game industry and nowadays is often used by makers to experiment with creating game consoles with Arduino.

Roberto Melzi recently shared on the Arduino forum a new version of Pong made with Arduino Uno:

Thanks to the VGAx library done by Smaffer, based on the previous work done by Nick Gammon, I have done a little color game for an Arduino Uno working for a VGA monitor. See for details here:

The target was to use an Arduino Uno board without special shields and supporting IC.
the fundamental components are a button, a potentiometer, few resistors and DSUB15 connector.

vga_pong_on_arduino_uno__youtube

Tale a look at the video to see it in action:

pongschematic

Follow the step-by-step guide on Instructables to build one yourself.

Jun
11

How to Produce 640×480 Color VGA Video From an 8-Bit Arduino

640x480, 8-bit, arduino, VGA Comments Off on How to Produce 640×480 Color VGA Video From an 8-Bit Arduino 

PK @ dqydj.net writes:

Let me set this up for you: most 8-bit AVRs in the wild (I happened to use an Arduino Nano for this project) are running at 16 MHz. That’s 16,000,000 calculations per second… a very respectable number for most embedded applications.

The VGA industry standard, which is pretty much the default case “we-can-always-fallback-to-this” video standard (640 pixels wide by 480 pixels tall by 60 frames per second), requires pixels to be clocked out at 25.175 MHz:

25,175,000 > 16,000,000.

And that was just one of the barriers to pulling off this silly project. And, yes, with the hack I told you about last time (Please see my notes below), more is possible without overclocking the Arduino – roughly 800 or so pixels wide in 4 bit color should be doable with a 16MHz part, and, probably 1024 pixels in 4 bit color are in reach for 20 MHz clocked parts. (If you’re willing to drop to 2 or 1 bit color and spend a ton on ICs that can handle even faster clocks, you can hit HD resolutions – but I think you’ll run into financial constraints before you max out on the technical side)

How to Produce 640×480 Color VGA Video From an 8-Bit Arduino - [Link]

Jun
11

VGA
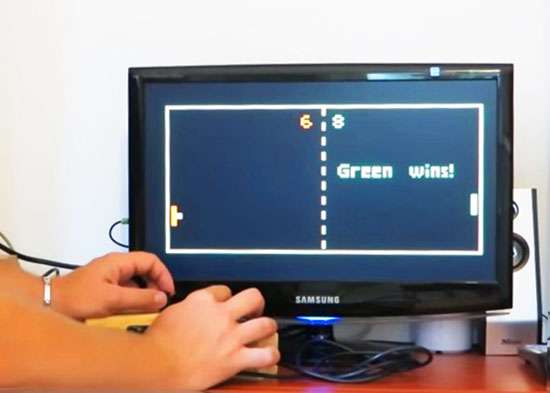
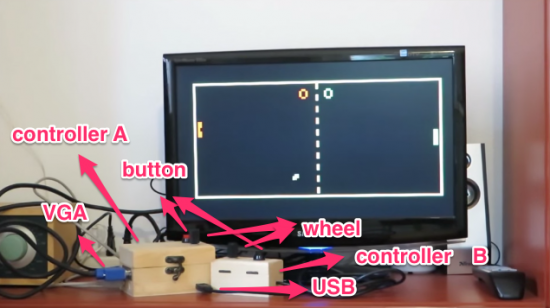
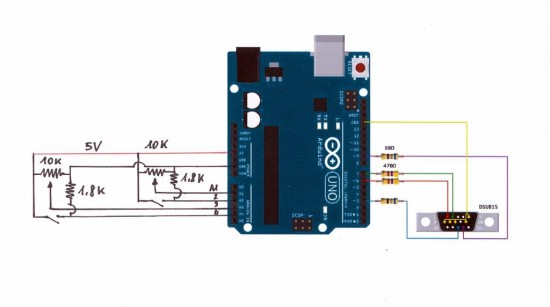
There are dozens, if not hundreds of examples around the Intertubes of an Arduino generating a VGA video output. The Arduino isn’t the fastest chip by far, and so far, all of these VGA generation techniques have peaked out at lower resolutions if you want to control individual pixels.[PK] has an interesting technique to generate 640×480 VGA at 60 frames per second without overclocking. It’s hacky, it’s ugly, but surprisingly, it actually works.

The VGA standard of 640×480 @ 60 fps requires pixels to be clocked out at 25.175 MHz, and the ATMega chips found in Arduinos top out at 20 MHz. [PK] wanted to generate VGA signals without overclocking, He did this by doubling the clock frequency with digital logic. The ATMega generates a clock, an inverter delays that clock so it is 90 degrees out of phase, and the two clocks are XORed, doubling clock output of the micro. It produces a very ugly square wave at 32 MHz – an error of 27% compared to the VGA spec. Somehow it still works.

With a hilariously out of spec clock, the rest of the project was pulled together from [Nick Gammon]‘s VGA library, a 16×16 font set, and a project from [lft]. Video below.


Filed under: Arduino Hacks
Apr
29
Close-up of the Default ConfigurationAndrew Rossignol decided to implement a window manager to run on an ATmega1284p micro-controller using the uVGA-II VGA controller.

Read the full article on MAKE

Nov
05

Arduino Due VGA Signal Out

arduino, arduino due, DUE, Hardware, Image(s), inspiration, VGA, Visualising Data Comments Off on Arduino Due VGA Signal Out 

Photo credit: [Stimmer] on the Arduino Forum

[Stimmer] on the Arduino Forum hardcoded a way to display 160×240 (320×240 after some posts) VGA signal.

After working out how to do a timer interrupt I’ve had a go at making a VGA framebuffer. It is rather low-res at present(160×240) and fuzzy but I hope to be able to improve that. It has 8-bit colour (RRRGGGBB).
I cannot get Eagle to run right now so will have to describe the schematic in text:
Due pin 2 -> VGA pin 13 (HSync)
Due pin 3 -> VGA pin 14 (VSync)

Due pin 25 -> 820R resistor -> VGA pin 3 (blue)
Due pin 26 -> 390R resistor -> VGA pin 3 (blue)

Due pin 27 -> 2k2 resistor -> VGA pin 2 (green)
Due pin 28 -> 1k resistor -> VGA pin 2 (green)
Due pin 14 -> 470R resistor -> VGA pin 2 (green)

Due pin 15 -> 2k2 resistor -> VGA pin 1 (red)
Due pin 29 -> 1k resistor -> VGA pin 1 (red)
Due pin 11 -> 470R resistor -> VGA pin 1(red)

Due pin GND -> VGA pins 5,6,7,8,10

Via [Arduino Forum]

Sep
19

Basic Arduino VGA

arduino, VGA Comments Off on Basic Arduino VGA 

This project uses an Arduino UNO to create the proper timing signals for 800×600 VGA output. The output is a standard red/green/blue pattern. Not particularly exhilarating but a great starting point for any Arduino lover curious about generating VGA signals.

Basic Arduino VGA - [Link]


  • Newsletter

    Sign up for the PlanetArduino Newsletter, which delivers the most popular articles via e-mail to your inbox every week. Just fill in the information below and submit.

  • Like Us on Facebook