Posts | Comments

Planet Arduino

Archive for the ‘Actuators’ Category

Getting started with electronics and sensing the world around you is now easier than ever with the new all-in-one Arduino Sensor Kit from Arduino, in partnership with Seeed.   

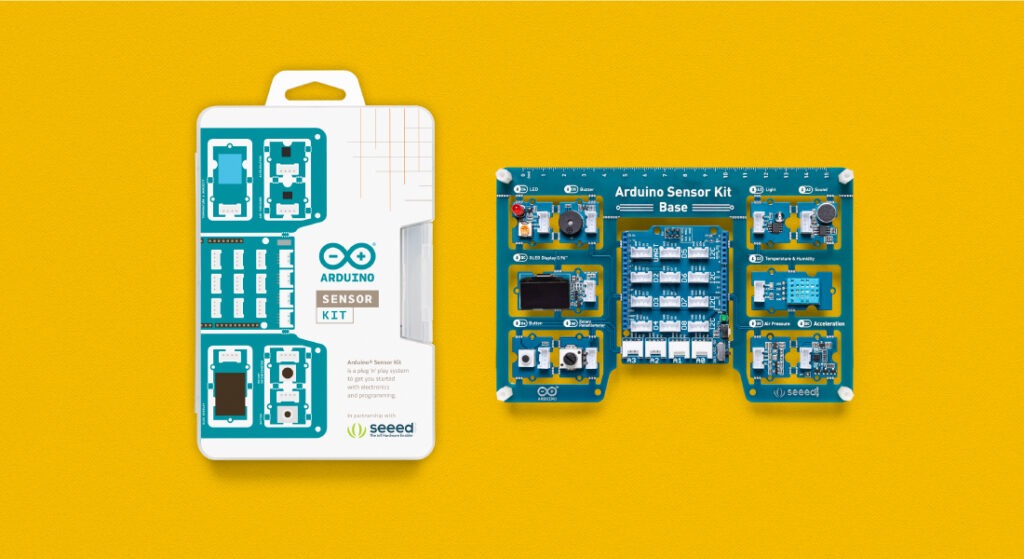
The 10 most popular modules and sensors for your Arduino UNO have been integrated onto a single board to provide plug-and-play convenience without the need for any soldering or wiring! Combining basic Grove sensors and actuators for the Arduino UNO, the kit contains a base shield featuring the following modules that can be connected either through the digital, analog or I2C connectors:

  • An OLED screen
  • 4 digital modules (LED, button, buzzer and potentiometer)
  • 5 sensors (Light, sound, air pressure, temperature, and accelerometer)

Just plug the Arduino Sensor Kit into the Arduino UNO board, then you’re ready to follow the  Plug, Sketch & Play online lessons that make getting started a breeze.

The kit is equipped with 16 Grove connectors, which when placed on the board, offer functionality to the various pins. With seven digital connections, four analog connections, four I2C connections, and a UART connection, the base shield can be easily mounted onto an Arduino UNO board and programmed through the Arduino IDE. 

Now available from the Arduino Store, the Arduino Sensor Kit comes as a standalone kit for only €23.00 / US$23.00, or can be purchased with the Arduino UNO Rev3 board as a great value bundle for €38.70 / US$38.70. For more details, check out our website here.

Shape-shifting interfaces, which could be deployed to create dynamic furniture, structures or VR environments, have great potential; however, creating them is often quite difficult. To simplify things, researchers from the University of Colorado Boulder have developed “LiftTiles,” modular blocks that raise to the desired height (between 15 and 150 centimeters) via air pressure and then collapse under spring force when needed.

Each pneumatic tile costs under $10 USD, weighs only 10kg each, and supports up to 10kg of weight. To demonstrate their design, the team used solenoid valves to inflate blocks and servo motors to open release valves that allow the blocks deflate and compress. 

The system is based on an Arduino Mega board, along with an SR300 depth camera to measure the height of each section and client software running on a control computer. 

More details can be found in the project’s research paper.

Engineers at the University of California San Diego have come up with a way to build soft robots that are compact, portable and multifunctional without the requirement for compressed air. 

Instead, they’re using a system of tubular actuators made out of heat-sensitive liquid crystal elastomer sheets. Heating elements are placed between two layers of elastomer, which is then rolled up into a cylinder, allowing the tubular digit to bend and contract.

With this novel method, they’ve been able to build a three-jaw gripper, as well as a robot that walks independently with four legs under Arduino control. While the grippers are slow at this point, taking 30 seconds to bend and minutes to return to their original position, the eventual goal is to have them react at the speed of human muscles.

Photo by Hep SvadjaUse an Arduino and an H-bridge motor circuit to build an automatic can crusher

Read more on MAKE

The post Crush Cans Effortlessly with an Arduino-Powered Arm appeared first on Make: DIY Projects and Ideas for Makers.

Oct
31

Control Large DC Motors with Arduino

Actuators, arduino, arduino uno, dc, Featured, motor, Motors, tutorial, video Comments Off on Control Large DC Motors with Arduino 

dcmotors

Arduino boards are able to control small motors very easily and it’s just as easy when you have to deal with controlling large motors. In the following video tutorial by NYC CNC you’ll see two examples. In the first you’ll learn how to get up and running, to start, stop, control direction and speed of a large motor with Arduino Uno. In the second example, how to use two proximity sensors as limit switches and two potentiometers to allow on-the-fly speed adjustment.

Mar
06

Upcycling Umbrellas into a Blinky Bike Bag with Lilypad

Actuators, arduino, bag, bike, leds, Lilypad, tutorial, tutorials, Wearables Comments Off on Upcycling Umbrellas into a Blinky Bike Bag with Lilypad 

UmbrellaBag lilypad

Agy used for the first time Lilypad Arduino and LEDs on a textile project called Blinky Bike Bag, combining her expertise in fabric hacking with electronics:

The bike bag is made from umbrella material to make it waterproof, and I made it with safety features using the Lilypad light sensor and LEDs. My husband always forgets his reflectors but with the bikebag always being on the bike, he’ll have no excuse not to be a safe cyclist!

UmbrellaBag Lilypad

Follow the step-by-step tutorial on her website!

Nov
06

Weird Eye Robot with the Arduino Starter Kit

Actuators, arduino, inspiration, Robot, StarterKit Comments Off on Weird Eye Robot with the Arduino Starter Kit 

[Robotgrrl] made a nice project with the Arduino Starter Kit: The Eye Robot.

It reacts differently when you ‘pet’ it and ‘poke’ it. Beware when it ruffles its brow! It enjoys singing short jingles. Rumour has it that the light up googely eye can peer into your soul.

source [Robotgrrl]


  • Newsletter

    Sign up for the PlanetArduino Newsletter, which delivers the most popular articles via e-mail to your inbox every week. Just fill in the information below and submit.

  • Like Us on Facebook