Posts | Comments

Planet Arduino

Archive for the ‘NEMA17’ Category

There’s nothing quite like building something to your own personal specifications. It’s why desktop 3D printers are such a powerful tool, and why this scalable plotter from the [Lost Projects Office] is so appealing. You just print out the end pieces and then pair it with rods of your desired length. If you’ve got some unusually large computer-controlled scribbling in mind, this is the project for you.

The design, which the team calls the Deep Ink Diver (d.i.d) is inspired by another plotter that [JuanGg] created. While the fundamentals are the same, d.i.d admittedly looks quite a bit more polished. In fact, if your 3D printed parts look good enough, this could probably pass for a commercial product.

For the electronics, the plotter uses an Arduino Uno and a matching CNC Shield. Two NEMA 17 stepper motors are used for motion: one to spin the rod that advances the paper, and the other connected to a standard GT2 belt and pulley to move the pen back and forth.

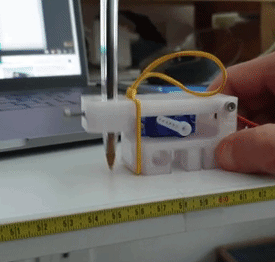
We particularly like the way [Lost Projects Office] handled lifting the pen off the paper. In the original design a solenoid was used, which took a bit of extra circuitry to drive from the CNC Shield. But for the d.i.d, a standard SG90 servo is used to lift up the arm that the pen is attached to. A small piece of elastic puts tension on the assembly so it will drop back down when the servo releases.

If this plotter isn’t quite what you’re after, don’t worry. There’s more where that came from. We’ve seen a number of very interesting 3D printed plotters that are just begging for a spot in your OctoPrint queue.

It’s fair to say that building electronic gadgets is easier now than it ever has been in the past. With low-cost modular components, there’s often just a couple dozen lines of code and a few jumper wires standing between your idea and a functioning prototype. Driving stepper motors is a perfect example: you can grab a cheap controller board, hook it up to a microcontroller, and the rest is essentially just software. But recently [mechatronicsguy] wondered if even that was more hardware than was technically necessary to get the job done.

It’s not that he was intentionally looking to make things more complicated for himself, of course. His rationale was entirely economic; if you’re looking to drive a dozen or more stepper motors, even the “cheap” controllers can add up. So he started to wonder if he could skip the controller entirely and connect the stepper motor directly to the digital pins of an Arduino. Generally speaking this is a bad idea, but if you’re careful and are willing to take the risk, [mechatronicsguy] is living proof it’s possible

So what’s the trick to running a whopping seventeen individual stepper motors directly from the digital pins of an Arduino Mega? Well, to start with you’re not going to be running the beefy NEMA 17 motors like you might find in a 3D printer. [mechatronicsguy] is using the diminutive (and dirt cheap) 28BYJ-48, a light duty stepper used in many consumer products. Even with this relatively tiny motor, you need to crack open the case and cut a trace on the PCB to switch it from unipolar to bipolar.

Beyond that, you need to be careful. [mechatronicsguy] reports he’s had success running as many as ten of them at once, but realistically the fewer operating simultaneously the better. This is actually made easier due to the relatively poor specs of the 28BYJ-48 motor; its huge eleven degree step size means its not really susceptible to the same kind of slippage you’d get on a NEMA 17 when powered down. This means you can cut power to all but the actively moving motor and be fairly sure they’ll all stay where you left them.

With as popular as the 28BYJ-48 stepper is, there are several projects this “quick and dirty” method of interfacing could potentially work with. This small “barn door” star tracker is an obvious example, but we’ve also seen some very nice robotic arms built with these low-cost motors which could benefit from the technique.

Lab equipment is often expensive, but budgets can be tight and not always up to getting small labs or researchers what they need. That’s why [akshay_d21] designed an Open Source Lab Rocker with a modular tray that uses commonly available hardware and 3D printed parts. The device generates precisely controlled, smooth motion to perform automated mild to moderately aggressive mixing of samples by tilting the attached tray in a see-saw motion. It can accommodate either a beaker or test tubes, but since the tray is modular, different trays can be designed to fit specific needs.

Source code and schematics are available from [akshay_d21]’s Google Drive and the 3D models are also available from the National Institute of Health’s 3D Print Exchange. A demonstration video is embedded below, in which you can see how smooth and controlled the motions are.

DIY lab equipment really benefits from the recent growth in desktop manufacturing and part availability; this one is in good company along with the DIY Laboratory Dry Bath and this DIY Syringe Pump.


  • Newsletter

    Sign up for the PlanetArduino Newsletter, which delivers the most popular articles via e-mail to your inbox every week. Just fill in the information below and submit.

  • Like Us on Facebook