Posts | Comments

Planet Arduino

Archive for the ‘7-Segment Display Clock’ Category

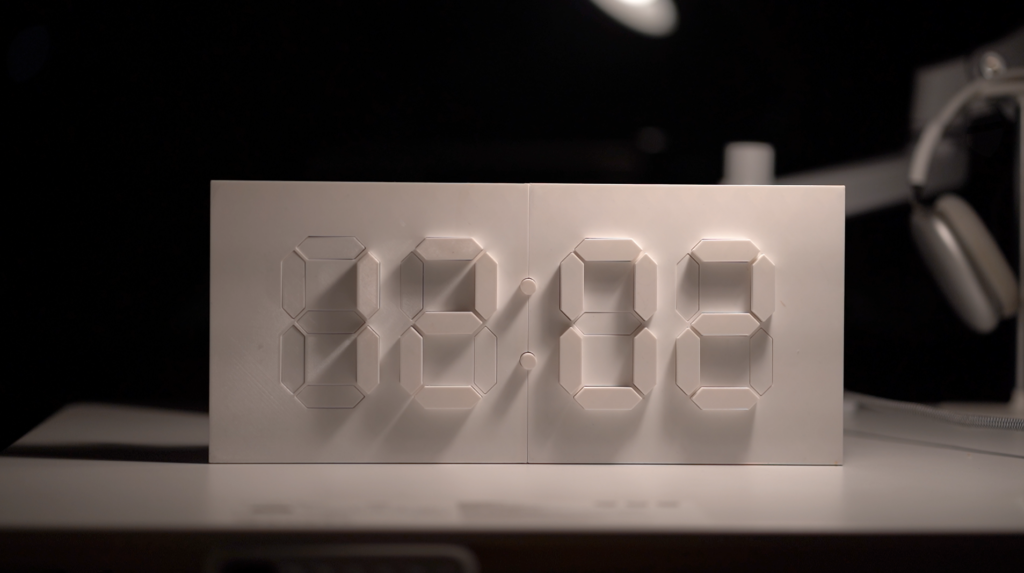
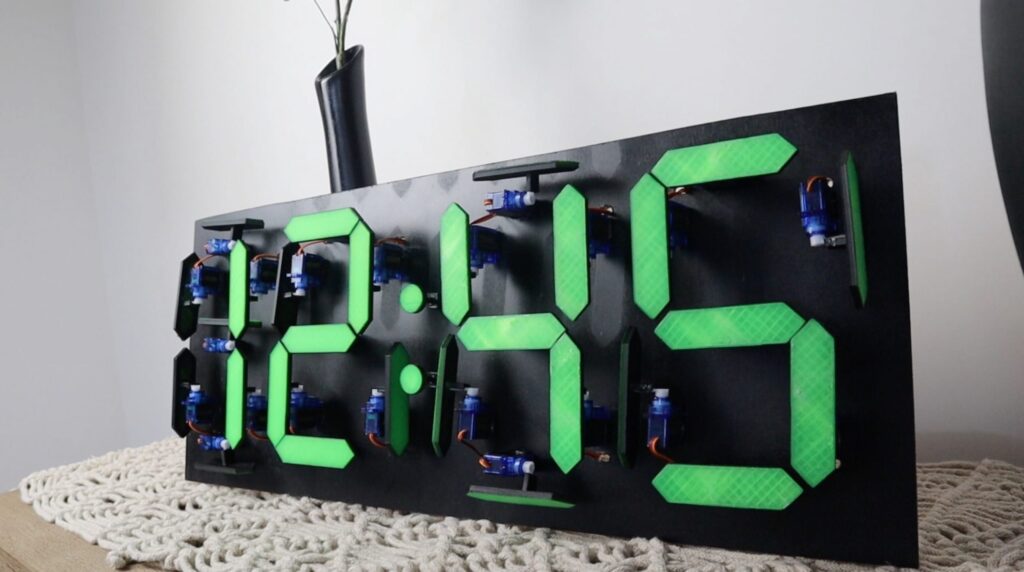
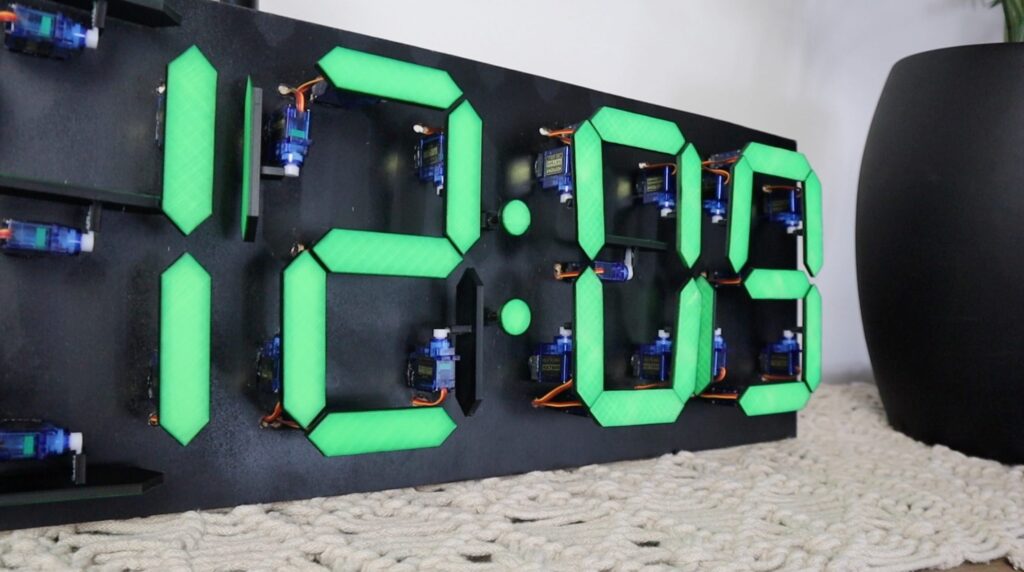
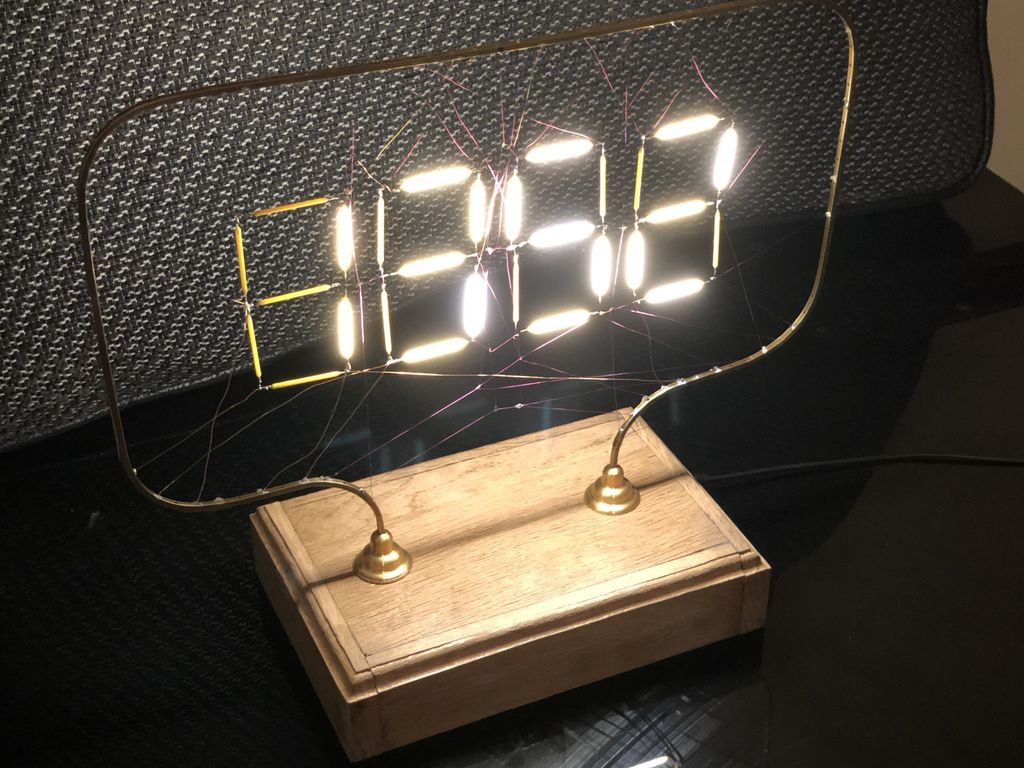
Seven-segment displays have been around for ages, and they have a really cool retro aesthetic about them. Over on Instructables, user alstroemeria (known as Jacky Mok in real life) decided to build a different kind of display that utilizes individual servo motors to slide the segments out, thus creating a 3D clock. The main board in this project was the Arduino Mega, which was selected due to its large number of digital GPIO pins that can set all 28 of the servos to the correct positions. 

The current time was tracked using the DS3231 RTC module that stores the time and can keep it even if power is removed. The program Mok wrote first initializes the servos and sets them in the “off” position. Within the main loop, the time is retrieved from the RTC module and converted into digits. From here each digit is mapped to a series of segments which are then moved into the correct spot with the corresponding motor. 

The clock enclosure Mok designed is quite elegant and captures the feeling of a classic seven-segment display. As seen in the accompanying video, watching the digits slowly move and morph into various shapes can be mesmerizing. More details on the concept and its construction can be found on Instructables

The post Kinetic digital clock takes 7-segment displays to another dimension appeared first on Arduino Blog.

Digital clocks are often made out of a series of 7-segment displays, which light up to represent the needed numbers. Michael Klements’ electromechanical project, however, doesn’t use LEDs, but instead physically flips 3D-printed segments into view with 28 micro servos. 

When in use, each segment’s bright green surface is clearly visible. When “off,” they’re turned to reveal a slim black edge that goes largely unnoticed.

The device is powered by an Arduino Uno, along with a DS1302 RTC module. Two PCA9685 16-channel PWM drivers control the motors directly, and as they run off of I2C, more servos/digits could even be added if needed. 

You can see it all in action below and read more about the timepiece in Klements’ blog post.  

Using 7-segment displays to make a clock is nothing new, but what if you combined 144 of them together to create an epic LED timepiece? That’s exactly how this project was made, allowing it to show surprisingly smooth mega-numbers and a colon set at an angle.

The build itself is controlled by an Arduino Nano, along with an RTC module for timekeeping and 18 MAX7219 drivers to activate over a thousand (1,008) individual segments. 

One could see this used for a variety of purposes, perhaps as a scoreboard for sporting events, a scrolling display, or even as 36 little clocks, which can actually be seen below.

Alarm clocks of old—and certainly many of those today—require several button pushes to set things up properly. Maker Michael Wessel, however, decided to implement his own take on a more intuitive clock, creating a device that features three separate eight-digit seven-segment LED panels. Eight buttons allow for direct manipulation of each of the digits, with their own dedicated LEDs.

The info on display includes time and date, as well as temperature, and it can even show how many days, hours, or minutes have passed since a special pre-programmed day. Up to seven audible alarms are available, which can be silenced by a loud noise (e.g. clapping your hands) via a sound sensor. 

The clock is controlled via an Arduino Mega, along with an RTC module to keep things accurate.

I remember I always had to set all digital clocks for my grandparents in the ’80s — these clocks and watches always required some complicated button juggling! So, here it is: a DIY LED alarm clock that my grandparents would have been able to set and use without my help! 

An Arduino-based LED clock with 7 individual alarms, highly intuitive user interface, temperature display, and display of days / hours / minutes passed since a special date, e.g., your birthday. An active / ringing alarm can be disabled by making a loud noise, e.g., by clapping your hands. Timer-based PWM sound output for alarm melodies. 

The Arduino’s EEPROM is being used to store the alarms of course, and the DS3231 RTC is battery backed up, so it survives a temporary power outage and you won’t be late for work the next morning. 

This was put together rather quickly, thanks to off the shelf components, Velcro and existing Arduino libraries for them! The clock can be built for about $30 – 40. 

Flament bulbs, commonly known as Edison bulbs, contain a variety of interesting LED lights. So interesting, in fact, that maker Andy Pugh decided to take these individual components up and turn them into a 7-segment display clock.

While making a clock isn’t an uncommon hacker pursuit, this Arduino-controlled device uses a series of wires to both power and support the clock’s four digits from a bent brass frame. This gives it a decidedly web-like appearance, so much so that Pugh notes it’s reminiscent of the cobweb writing in the book Charlotte’s Web. 

The clock also features the ability to sync the time via radio signals, though this functionality appears to still be in the experimental phase. 

Code for the build can be found here, and you can see it cycling through numbers in the video below.


  • Newsletter

    Sign up for the PlanetArduino Newsletter, which delivers the most popular articles via e-mail to your inbox every week. Just fill in the information below and submit.

  • Like Us on Facebook