Posts | Comments

Planet Arduino

Archive for the ‘Home automation’ Category

Humans have domesticated animals since the dawn of time. Dogs (our oldest furry friends) were owned by humans as far back as 30,000 years ago, and since then we’ve formed bonds with all kinds of different creatures.

It was only in the last century, though, that we started to actually build our own pets. The history of robot pets is a short but fascinating one, going from barely recognisable gadgets to incredibly sophisticated devices in just a few decades.

In this article, we’ll look at some of the biggest milestones in the evolution of robotic pets, and show you a few neat examples from the Arduino Project Hub.

A history of robot pets

The Phony Pony

Built in 1968 at the University of Southern California, the Phony Pony marked the beginning of a new era. As the first ever autonomous quadrupedal robot, it is the common ancestor to which all of today’s robot dogs and cats can be traced back (despite being named after a different species).

By today’s standards, the Pony wasn’t all that sophisticated. It featured four legs, each with its own hip and knee joint, attached to a frame. But, it worked — the Pony was able to walk around at various slow speeds. It wasn’t wireless but, come on, it was the ‘60s.
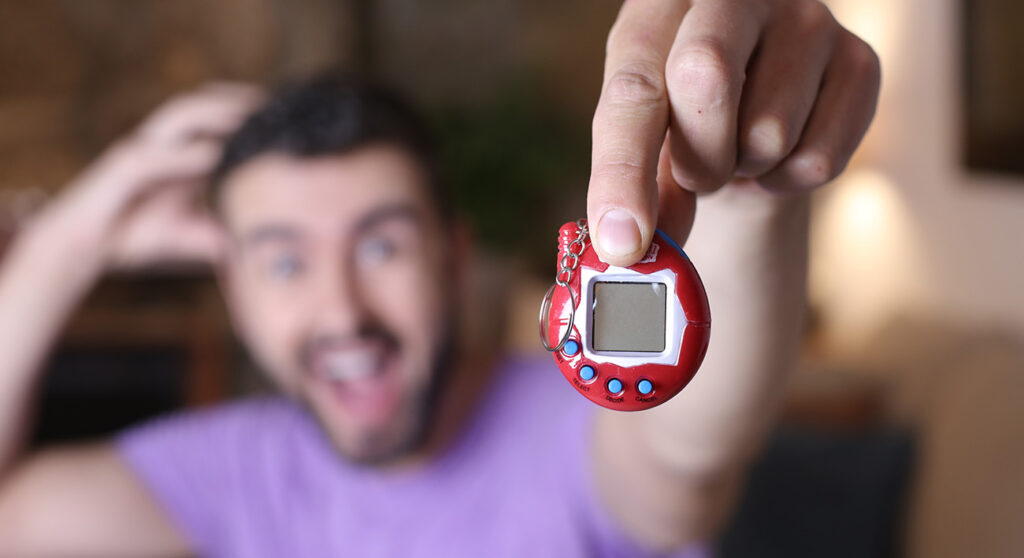
The Tamagotchi

Here’s one for the ‘90s kids. The Tamagotchi, released in 1996 in Japan by Bandai, soon made its way to the rest of the world. This simple, handheld device containing an animated pet which needed to be fed, watered, and cared for like any living animal soon became a smash hit — selling over 80 million units to date.

Anyone who has been through the traumatizing experience of losing their Tamagotchi will testify that these bundles of pixels can inspire surprising amounts of love and devotion from their owners.

The Furby

Another ‘90s classic here — the robotic, furry Furbies were popular throughout the world and sold more than 40 million units. While they weren’t the pinnacle of sophistication in terms of what they could actually do, it’s clear that people enjoyed the novelty of a robotic pet that was, in some small way, kind of alive.

BigDog

Released in 2005, the BigDog was the debut project of the now-famous robotics company Boston Dynamics. The BigDog was designed to be used in the military, and is equipped to do tasks like move easily over challenging terrain and carry up to 154 kg of weight.

Unfortunately, in spite of its physical prowess, the BigDog never quite made the cut, as its engine was deemed to be too noisy to be effectively used in combat situations. However, since then Boston Dynamics have been refining and optimizing their robot war dogs, and the latest iterations look very fearsome indeed.

Pleo the Dinosaur

UGOBE, based in California, set out to build a robotic creature that was also imbued with its own operating system, giving it an uncanny resemblance to a living thing. The result was Pleo — a pet dinosaur that uses cutting-edge research in fields like robotics, sociology, and even philosophy to appear very life-like indeed.

ANYmal Robotic Dog

Developed by Swiss robotics company ANYbotics, the ANYmal Robotic Dog was designed to safely inspect unsafe industrial environments. It comes equipped with an arsenal of tools like laser inspection sensors and the ability to autonomously navigate through different environments, collecting and sharing an impressive amount of data.

Make your own

Inspired by the idea of building your very own robotic pet? The Arduino Project Hub has a number of examples from people who have tried their hands at just that. Let’s take a look at a few.

The Nerd

Built in the same mold as the Tamagotchi, The Nerd is an electronic pet that lives in your pocket (or wherever you put it down) and survives by eating WiFi SSIDs (it also needs rest and sunlight).

To properly care for your Nerd, you need to make sure it has just the right balance of offline and online mode, along with sufficient levels of light and darkness. If it’s disconnected from that tasty WiFi for too long, The Nerd will emit a desperate plea in Morse code, 

You can build your own Nerd using the Arduino MKR IoT Bundle, a few other components like an RGB LED, phototransistor, and buzzer, and some code. Just make sure it doesn’t go too hungry — The Nerd makes a lot of noise when it dies.
And you can now create your own Nerd with just one click with the ready-to-use The Nerd Arduino Cloud template. Read the full tutorial to learn more about how to use it.

Roger Bot

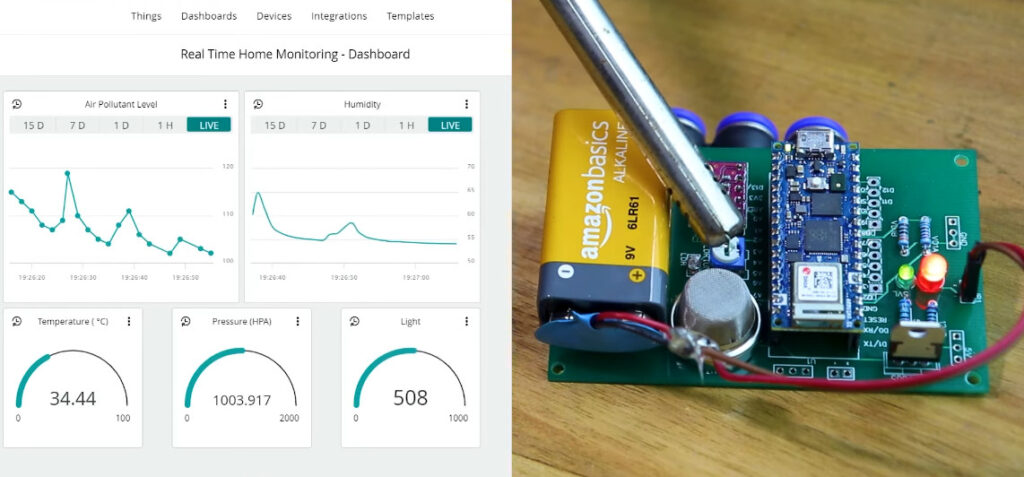
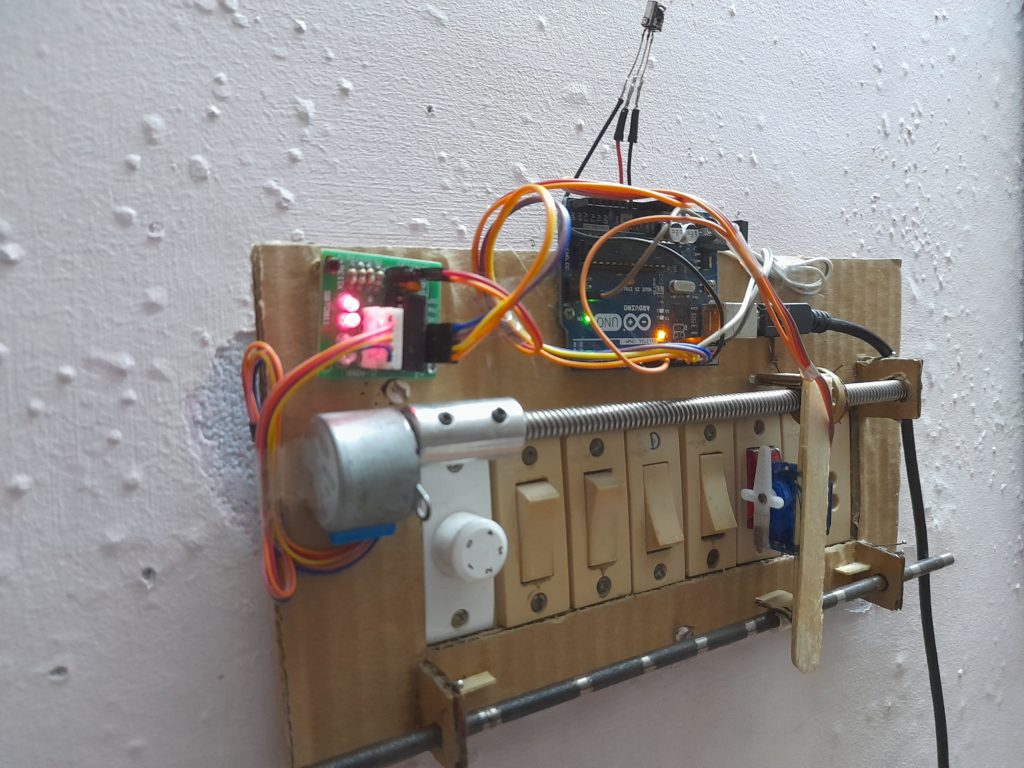
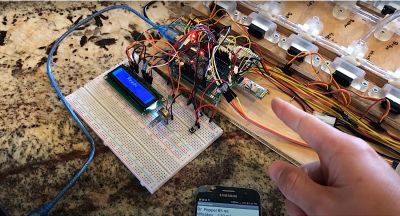
Arduino user hannu_hell built the Roger Bot in their very own home using an Arduino and a few other components. The Roger Bot features a robotic arm and the ability to move around on flat surfaces. It also contains built-in sensors that collect sensory data and display them on an LCD screen.

While it isn’t well-equipped to handle uneven or challenging terrain just now, this is something hannu_hell is working on for the future. 

Build your own with Arduino

With an Arduino, a few simple components, and a free subscription to the Arduino Cloud, you too can create your very own robotic pet. Add to the ranks of historical robotic companions and gain a faithful and useful friend. And who knows… with the way AI is developing, maybe a truly autonomous robot pet is only just around the corner.

Check out the Arduino Cloud homepage to learn more and find your inspiration.

The post A history of robotic pets (and how to make your own) appeared first on Arduino Blog.

Get More Out of Your Smartphone with Arduino

Our smartphones go pretty much everywhere with us, and we use them for more things than we even realize. From literally the very moment we’re startled into life in the morning, until the one final doom scroll through social media before bed, our phones are with us.

It makes sense, then, to think about ways to connect your smartphone to your Arduino projects, adding another layer of user-friendliness and convenience. In this article, we’ll take a look at some of the best tips and hacks for bringing your phone and your home automation projects closer together, and we’ll share some examples from the Arduino community.
Arduino Cloud is the perfect companion for building automated projects, and the IoT Cloud Remote mobile app makes things a lot easier. In this article we’ll see some companion apps and you can check out more compatible projects in our Home Automation website.

Use the iRobbie app

The iRobbie app is designed specifically to connect your smartphone to your Arduino projects. It’s actually a fairly simple concept, using Bluetooth to connect your phone to the Arduino board. Once connected, you can access a ton of features like object recognition and tracking, all via the phone’s camera. iRobbie allows your Arduino projects to recognise and track over 60 objects.

Other features include:

You can learn more about iRobbie and how to get started with it here.

Notification IoT Using NeoPixel and Smartphone

If there’s one thing phones are good for, it’s receiving updates. But what about when you miss important updates? What about when your phone is on the other side of the room, or the TV is playing loud, or you just missed that vibration?

Speaking of vibrations, wouldn’t it be cool if there were a slightly less annoying way to get notifications from your phone?

Well, step forward Arduino user notiduin, who used NeoPixel and Arduino to find a solution. This project allows you to get notifications in the form of LED lights of different colours. By combining HC-06 Bluetooth, Arduino Uno, Neo Pixel and an Android App, it’s possible to have all your phone’s notifications sent to an Arduino where they can turn on different colours of LED.

You can even assign a certain colour to each type of notification. For example, a Facebook notification can light up the blue LED, an SMS message can trigger the yellow light, and a new email can cause the red light to flash — it’s entirely up to you. The project works with any of the apps on your smartphone.

Check out the full project description here.

More user projects

3D printed smartphone camera slider

Getting the perfect smartphone photo can be a tougher task than it first appears. Stores across the world now have their shelves lined with tripods, stands, and other gadgets to make snapping that perfect shot more manageable than ever… but sometimes you just need to take matters into your own hands.

That’s what Reddit user u/careyi4 did. He 3D-printed his very own smartphone camera slider, powered by an Arduino, to make it easier than ever to line up pro-level smartphone photoshoots. Check out the video for more information.

Make any Arduino smartphone-controlled with just a few lines of code

You don’t need to be a programming genius to make your own Arduino projects smartphone-controlled. Reddit user u/TylerTimoj used just a few lines of simple code to make their projects easily controlled from their smartphone, and anyone can emulate it.

You can check out the full project here, along with a video where u/TylerTimoj shows you how it’s done.

Did you know that your phone is an IoT device?

The Arduino IoT Remote app (available for Android and iOS) was created to enable you to remotely manage and monitor your devices through the Arduino Cloud dashboards, offering complete control at your fingertips from anywhere you are. Arduino has gone a BIG step further and enabled you to use the app as an IoT device, utilizing some of the sensors in your mobile phone such as accelerometer, GPS, microphone, compass or barometer to collect data and transmit it to the Arduino Cloud. This feature automatically creates in the Arduino Cloud everything needed to monitor the sensors (the Device, the Thing and a dashboard) and share the data with other devices.

Starting to play with real hardware can be tricky for non-experienced users, so this feature enables users to get familiar with the Arduino Cloud device management environment using their own phone. Easy, right?

But you can also use the data from your phone sensors in your projects. Imagine the endless possibilities using that information. For instance, you can use virtual geographic boundaries for geofencing to initiate actions based on your location. You can also automate home-based tasks such as turning off lights when you depart and turning them on when you return, securing doors, and adjusting home climate control. Moreover, you can track your loved ones with geofencing and receive immediate notifications if they leave a designated area. The accelerometer in your phone can also be utilized to detect accidents or falls, and you can even use your phone as a remote control for games or robots. 

Only your imagination sets the boundaries of what you can do with this new feature.

If you want to learn more about the “Phone as Device” feature, don’t miss this article on the documentation.

Unlock a whole new side to your smartphone

With Arduino, a few basic components, and a bit of knowledge, anyone can bring entirely new capabilities to their smartphone and start doing a whole range of new tasks with it. I mean, if it’s going to be with you all day, you might as well get as much out of it as possible, right?

Check out the Arduino Home Automation page to learn more and get started with your own projects.

The post Get More Out of Your Smartphone with Arduino appeared first on Arduino Blog.

Plant watering kit to set up an automated irrigation system for your plants

Love your plants, but also have a life? If you work long hours, travel often or just can’t be tied down to a regular schedule, Plant Watering Kit is for you.

It’s a complete kit with all the components you need to set up an automated mini-irrigation system that will unfailingly water your favorite potus, spider plant or monstera on a regular schedule. 

There’s more: the humidity sensor in the kit connects to the Cloud so you can monitor soil moisture on-the-go from your computer or phone, via a custom dashboard.

This means you can trigger manual watering on a particularly hot day or skip a routine activation if not needed. Over time, you might even gain useful insight about your plants’ water requirements and fine-tune the best schedule for each one, from cacti to ferns. 

The whole project is simple to put together and easy to use: a perfect solution to make your plants happy and feel empowered at the same time.

Plant Watering Kit might be your first taste of home automation, leading to more ambitious projects – why not connect all of your plants, create a smart greenhouse, or explore other areas of the house where IoT can make your life easier? 

Whether you want plants off your mind or wish they could just tell you exactly how much water they need, check out the new kit in our Store.

The post Home automation blossoms with Arduino’s Plant Watering Kit appeared first on Arduino Blog.

Why using 3D printing in your smart home is so useful

3D printing, the stuff of science fiction only a few short years ago, is becoming more widely available all the time. Buying your own 3D printer to keep in your home is now fairly accessible, with entry-level printers available for just a few hundred dollars.

But why would you buy one? It’s easy to think 3D printers are still a niche toy, exciting for a few enthusiasts but largely useless for the general population. But this couldn’t be more wrong — 3D printers have a wide range of very practical uses for everyday households.

In this article, we’ll take a look at why 3D printing is so useful and some of the many reasons to consider adding a 3D printer to your own smart home.

Why 3D printing is so useful

  • It’s fast and convenient. With a 3D printer, you can produce simple objects, creations, and components for existing items in a fairly short amount of time — much quicker than ordering the same things online or heading to a local store.
  • You get a ton of control over what you print. Need a very specific shaped object to repair a broken item in your home? It may be impossible to buy what you need anywhere, but a 3D printer allows you to create exactly the right size and shape you need.
  • It’s relatively affordable. As mentioned, basic 3D printers can be had for fairly cheap nowadays, and printing — for smaller objects, at least — costs very little.
  • It’s sustainable. It’s much more sustainable to print your own things than order them across large distances, and this is especially true for niche items that might need to be shipped across the globe to reach you.

Using 3D printing in your smart home

So what can you use a 3D printer for? There are many potential uses for a 3D printer in your smart home, and they range from practical tasks like repairing broken furniture to more creative hobbies. Let’s take a look at some of the main reasons to own a 3D printer.

Create useful items for your home

3D printers are perfect for creating small, useful items to use around the home. Some examples are coasters, decorations, lampshades, stationery, and small kitchen tools. This is a great way to combine practical use with a fun creative hobby, putting your own personal spin on the little items you use every day.

Repair items

You know that table you have that just never sits right? The door handle that doesn’t quite match the others in the house? The light switch that doesn’t fit exactly flush with the wall?

3D printing is the perfect solution to many of these small defects and faults. Because you have so much control over what you print — 3D printers can print according to virtually any instructions — it’s easy to create components to fix and spruce up the objects and appliances around your smart home.

Education

3D printers aren’t a regular fixture in classrooms around the world just yet, but it’s only a matter of time. These machines allow students to take a more hands-on and creative approach to their learning. Some examples could be:

  • Science projects like creating models of the solar system of the structure of an atom
  • Geography work like printing detailed models of mountains or volcanoes
  • All kinds of product design work
  • Creative work like art

Arts and creative projects

Creative projects aren’t just for the classroom — many people own 3D printers purely for their own artistic work. There’s almost no limit to what a 3D printer can do in this area, and with a little experience, it’s possible to create truly beautiful and incredibly detailed works of art at home.

Build your own smart home with Arduino

3D printing is just one aspect of a smart home. There’s an almost endless list of things you can do with the right home automation tools — from growing a smart garden to keeping your pets entertained and fed.

Check out Arduino Project Hub for inspiration on projects you can build with Arduino’s tools, or visit our homepage for more information.

The post Why using 3D printing in your smart home is so useful appeared first on Arduino Blog.

Host the best BBQs ever with home automation

Everybody loves a good BBQ. Getting your family and friends together on a long summer day and evening, cooking delicious food and having a great time as smoke drifts through the air — it’s the perfect weekend activity.

BBQs can also be stressful, however. Anyone who has ever tried to host one will know the challenges of managing multiple meats at once, trying to avoid any overcooking (or undercooking) disasters, and keeping track of all that equipment.

Automation can help run your BBQ much more smoothly, minimizing any mishaps and making sure everyone has the best experience possible. In this article, we’ll look at how home automation can improve the BBQ experience and share some examples from Arduino’s Project Hub.

How home automation improves BBQs

  • Keep track of different items. Automation makes it easier to manage multiple meats and other food items at the same time, notifying you when something is ready so you don’t get overwhelmed by tasks and neglect any of your cooking.
  • Stay on top of temperature by measuring each piece of food and ensuring it’s at the perfect point.
  • Create a more welcoming outdoor area with things like automated lighting, heaters, and even a smart garden.
  • Easy cleanup with robots and other tools to leave your grill and other tools sparkling clean.

Some project examples from Arduino

Temperature Controled Charcoal Smoker

Arduino community member Duncan Barbee knew that the most flavorful way to grill is to use charcoal to heat your smokers. While propane and electric smokers give you better temperature control, they lose that unique and delicious charcoal flavor.

But charcoal heaters present many challenges. You need to constantly stay on top of the temperature, adjusting the vents on a regular basis to make sure everything is just right as the charcoal level changes in the smoker.

Barbee wanted to build a project that gave him the best of both worlds — the tasty charcoal flavor with the ease and convenience of an electric or propane smoker. He developed a controller that monitors the temperature in the smoker and automatically adjusts the airflow to the charcoal to maintain the correct temperature at all times, allowing him to sit back and relax as the perfect charcoal-based BBQ unfolds.

Smokerduino

Robert Korn had already created a sous vide controller using Arduino and a handful of other components, with great success. He chose to apply the same model to a smoker and devised the Smokerduino, which ensures perfectly cooked meat every time with minimal effort from the chef.

Alexa BBQ/Kitchen Thermometer with IoT Arduino and ePaper

Roger Theriault and his wife enjoy making cheese and yogurt at home, but this is a long process involving a thermometer and lots of waiting around. To cut some steps out, he built his own smart thermometer to monitor the temperature of the food and beep when a specific temperature was reached and it was time for the next step.

However, when the device stopped working, Theriault decided to upgrade it instead of simply fixing it. The new iteration of the thermometer uses Alexa devices too, enabling him to easily monitor and control everything cooking in the kitchen or outside in the smoker.

The way it works is fairly straightforward — just give Alexa an instruction and it will find the recipe and instruct the given device to start from step one of that recipe. It also draws on the data from the recipe to monitor the temperature and make any notifications or adjustments needed.

Better BBQs with Arduino

Monitoring and controlling cooking is one of the most useful and rewarding use cases for home automation. Arduino’s products make it possible to assemble detailed and advanced projects to take your BBQs to the next level.

Check out the project hub for some more inspiration or visit the home page to learn more about how Arduino works.

The post Host the best BBQs ever with home automation appeared first on Arduino Blog.

Humidify the Air Around You with Home Automation

Keeping the air in your home in the right condition is incredibly important. Your home is your safe haven from the outside world, a place where you can control your environment and enjoy the comfort and peace of a secure space.

Humidifiers are an excellent way to keep the atmosphere of your home in exactly the right balance for your health and enjoyment. Traditional humidifiers work well, but automated humidifiers can work even better.

In this article, we’ll look at why humidifiers are so useful and how you can use home automation to create your own smart home humidifiers.

Why home humidification is important

  • Stay moisturized. Humidifiers keep the air in your home sufficiently full of moisture, which helps counteract the effects of artificial heating systems. This prevents dry skin — especially on the lips and hands — as a result of dry indoor air.
  • Keep your sinuses in good condition. Dry air, over time, can cause your sinuses to become irritated. It’s a feeling most people are aware of and can result in discomfort, headaches, and even nosebleeds. A good humidifier helps avoid this, ensuring your sinuses are lubricated and healthy at all times.
  • Make it easier to recover from illness. The right humidifier can ease the path to recovery from illnesses like the flu or a cold by helping your sinuses recover.
  • Minimise snoring. A noisy bed partner, over many months, can be the source of much stress and frustration. Snoring is a complex issue that can be difficult to solve, but a good humidifier can often ease the problem significantly by providing enough moisture to keep the throat and nose clear. 

Examples of projects

Automatic Humidifier

Living in Boston, Arduino user chenwei19940207 found that the air was so dry, especially in the evening, that a solution was needed. As a result, they decided to develop their own humidifier to turn on and off automatically, ensuring a consistent level of humidity in the air all year round and all day long.

Smart Humidifier

Healthy air has three components — be fresh, clean, and the right humidity. The third factor is important because humans use evaporative cooling (sweating) to rid our bodies of excess heat. This is why humans can be comfortable and safe within a fairly wide range of humidity — between 30 to 70 percent at a push.

But we still struggle at lower levels of humidity. It can result in great discomfort, trouble breathing, and aggravated allergies, and anything below 20% humidity is especially difficult. As a result, it’s best to keep our homes at the right level of humidity.

Recognizing this, Arduino member Md. Khairul Alam developed a project to keep the home sufficiently humidified year round. His device senses the temperature and humidity in your home, checks if it is in the ideal humidity range, and turns on the humidifier to ensure you stay in the right zone.

Arduino Humidifier Control

Arduino “having11” Guy developed this project to regulate the humidity of their home. It involves attaching a dht11 temperature and humidity sensor to an Arduino, letting you modify your humidifier in a way that allows you to automatically turn the device on whenever the humidity in your home drops below a set level, for example 30%.

You also have the ability to set a “cooling down” period, avoiding the humidifier becoming overheated.

NOTE: It’s worth noting that this project uses high voltage and amperage, and doing any of these steps incorrectly could result in serious injury or even death. So be careful and don’t attempt this without any prior experience or skill!

Build a healthier smart home with Arduino

With Arduino, controlling the humidity of your home is just the beginning. Our Project Hub is filled with examples of home automation projects, using all kinds of technology to make their homes smarter, safer, and easier to live in.

Check out our site to find out more uses for Arduino and how you can get started with your own home automation projects.

The post Humidify the air around you with home automation appeared first on Arduino Blog.

Being able to design your own custom smart home device is a great way to both have fun experimenting with various hardware/software and to escape the walled IoT device ecosystems that so many users find themselves trapped within. One maker who goes by mrdesha came up with a smart heater solution that utilizes the new Arduino Oplà IoT Kit to provide voice functionality to their room heater. 

In terms of hardware, mrdesha’s project is quite simple as it just needs a few parts to function. The main component is the MKR IoT Carrier board from the Oplà Kit, along with the MKR WiFi 1010 that fits into it. Because the Oplà has two relays onboard, a pair of buttons on the heater’s remote were connected to the common (COM) and normally closed (NC) terminals, allowing for a single GPIO pin to digitally “press” each button. 

Over in the Arduino Cloud, three variables were created that control various aspects of the heater, including on/off, set high-power mode, and set low-power mode. These variables are also all compatible with the Alexa integration, meaning that a user can simply tell their smart home speaker to adjust the heater automatically. 

For more details about the project, you can view mrdesha’s write-up here and a demo of it in the video below.

The post Connect your space heater to the Arduino Cloud and control it via Alexa appeared first on Arduino Blog.

Home monitoring gas sensor light temperature Arduino Cloud Nano RP2040 Connect

Home monitoring is a big part of home automation, but it’s often overshadowed. Our attention tends to get hijacked by cool projects that perform physical actions. Whether it’s turning the lights on, changing their color, running a robot vacuum cleaner, pulling on the blinds or watering the garden. All these actions are very cool and very visible. Which makes it easy to ignore the background tasks that are the backbone of great home automation.

YouTuber and robotics maker RootSaid has been giving this a lot of thought. He’s put together an excellent tutorial on creating a self contained, real-time home monitoring module. It’s built around the excellent Nano RP2040 Connect, and sends everything to Arduino Cloud.

Home Monitoring for You, and Your Family

His objective was to create a compact bundle of sensors to keep an eye on various conditions around the home. This battery powered system can then be positioned anywhere, and monitored from Arduino Cloud. His idea is to install the module in an elderly relative’s home. That way, he can keep an eye on their environment from anywhere.

Of course, this doesn’t have to be used purely as a care system. That’s a great application for his environment monitoring platform, but it’s just as useful for your own home automation system. Too often, sensors (temperature, for example) are physically connected to other automation devices, like Wi-Fi mains switches. But chances are you want to know the temperature over by your sofa. Not down the back of the TV cabinet.

RootSaid to the rescue.

A Compact Home Automation Sensor Module

Let’s take a look at the sensors bundled into this compact package.

He’s got an LDR in there to monitor the light levels. This is perfect for bigger home automation projects, as it can trigger lights all around the house. Even outdoor lighting, if you wanted.

There’s a Bosch BME280 to keep an eye on the environment. This is becoming a popular device among the home automation crowd. It’s small, very low power, cheap, accurate, and gives you temperature, humidity and air pressure data.

Finally we have a gas sensor, which is a really interesting addition. Especially as part of his original brief for monitoring an elderly relative’s environment. It keeps a check on air quality, but being able to get alerts for gas leaks or rising carbon monoxide levels could be life saving.

Home monitoring gas sensor Arduino Cloud Nano RP2040 Connect

Home Monitoring in Arduino Cloud, for Free

Finally he takes you through the Arduino Cloud set up, including a monitoring dashboard. Which is more good news, since all this is running from a single Nano RP2040 Connect. That means you’re only adding one Thing (with five variables), so the free tier is a practical option. If you want to begin comparing the data the module collects over time, you can then easily bump up to a subscription for longer data retention options.

Because he’s collecting data through Arduino Cloud, he’s automatically got smartphone access to it, as well. Or, if he wanted to share the data with members of the family or household, it only takes a click.

Although RootSaid is running his module from a 9V battery, there’s nothing to stop you using other power sources. The Nano RP2040 Connect will accept all kinds of voltage inputs. From USB to 12v PSUs, your power options are wide open here.

This is a project that no home automation enthusiast should overlook. It’s small, simple and very easy to build. But it’s also the gateway to creating a great home automation system. If you’re only just getting started, this is the project to begin with. It’s the tiny module where all the important data comes from to make your home truly autonomous. RootSaid’s excellent tutorial also makes it easy to see how you can expand on the project in lots of ways.

Check it out, and make sure you subscribe to his channel.

The post Self Contained, Cloud Connected Home Monitoring Module appeared first on Arduino Blog.

All too often, those who are new to Arduino struggle with creating large projects due to a lack of experience and components. This can be frustrating, but Instructables user MAKE_IT WITH_ME decided to tackle this issue by designing a super cheap way to automate home circuitry from just a single Starter Kit. His build uses a single Arduino Uno, although it can easily be swapped with something like a Nano or Mega, along with a stepper motor/driver, servo motor, threaded rod, and an IR receiver + remote combo. 

The main portion of the home automation setup is the stepper motor assembly, and it is responsible for moving the servo motor back and forth across the bank of switches. Due to the stepper motor not knowing its initial position relative to the device, it must be “homed” or set to its zero position by moving right until the edge hits the limit switch. When a request to turn a switch on or off is received from the IR remote, the Arduino board decodes the instruction and converts the command into the number of steps the stepper motor must take to reach the desired location. After the servo moves and flips the switch on or off, the entire thing returns back to the initial area. 

To read more about the process of how this device was constructed and how it was programmed, you can check out its Instructables write-up here.

The post Home automation on the cheap appeared first on Arduino Blog.

It’s the end of the academic semester for many students around the globe, so here comes the flurry of DIY projects. Always a great time to check out all the cool hacks from our readers all over the world. One project that piques our interest comes courtesy of [Jason Ummel] and his Auto-Bartender.

[Jason] developed this project as a part of his robotics class taught by Professor Martinez, one of our friends at FlexiLab. Powered by one of our favorite microcontrollers, the ATmega328, the Auto-Bartender is driven by a single 12 V motor coupled with 10 individual valves for separate drinks. Drinks are pumped into a cup sitting on top of a scale, allowing the device to know how much of each drink has been dispensed. The entire setup is controlled using a smartphone application developed in MIT App Inventor, a super-easy way to prototype Android applications.

Furthermore, [Jason] incorporated a number of user-centered design considerations into his project. These include an LCD to display updates, a green LED to indicate the device is in progress, and a buzzer to let the user know the drink is complete.

We really like the combination of craftsmanship, electronics hardware design, and software development that [Jason] put into his project. It’s the kind of project we know our readers will enjoy.

It looks like Jason substituted tap water for Whiskey and Dr. Pepper for his demo. Not exactly what we had in mind, but I guess he still has exams to finish.

Cool project [Jason]! We can’t wait to see Auto-Bartender on Hackaday.io.

Bottoms up!


  • Newsletter

    Sign up for the PlanetArduino Newsletter, which delivers the most popular articles via e-mail to your inbox every week. Just fill in the information below and submit.

  • Like Us on Facebook