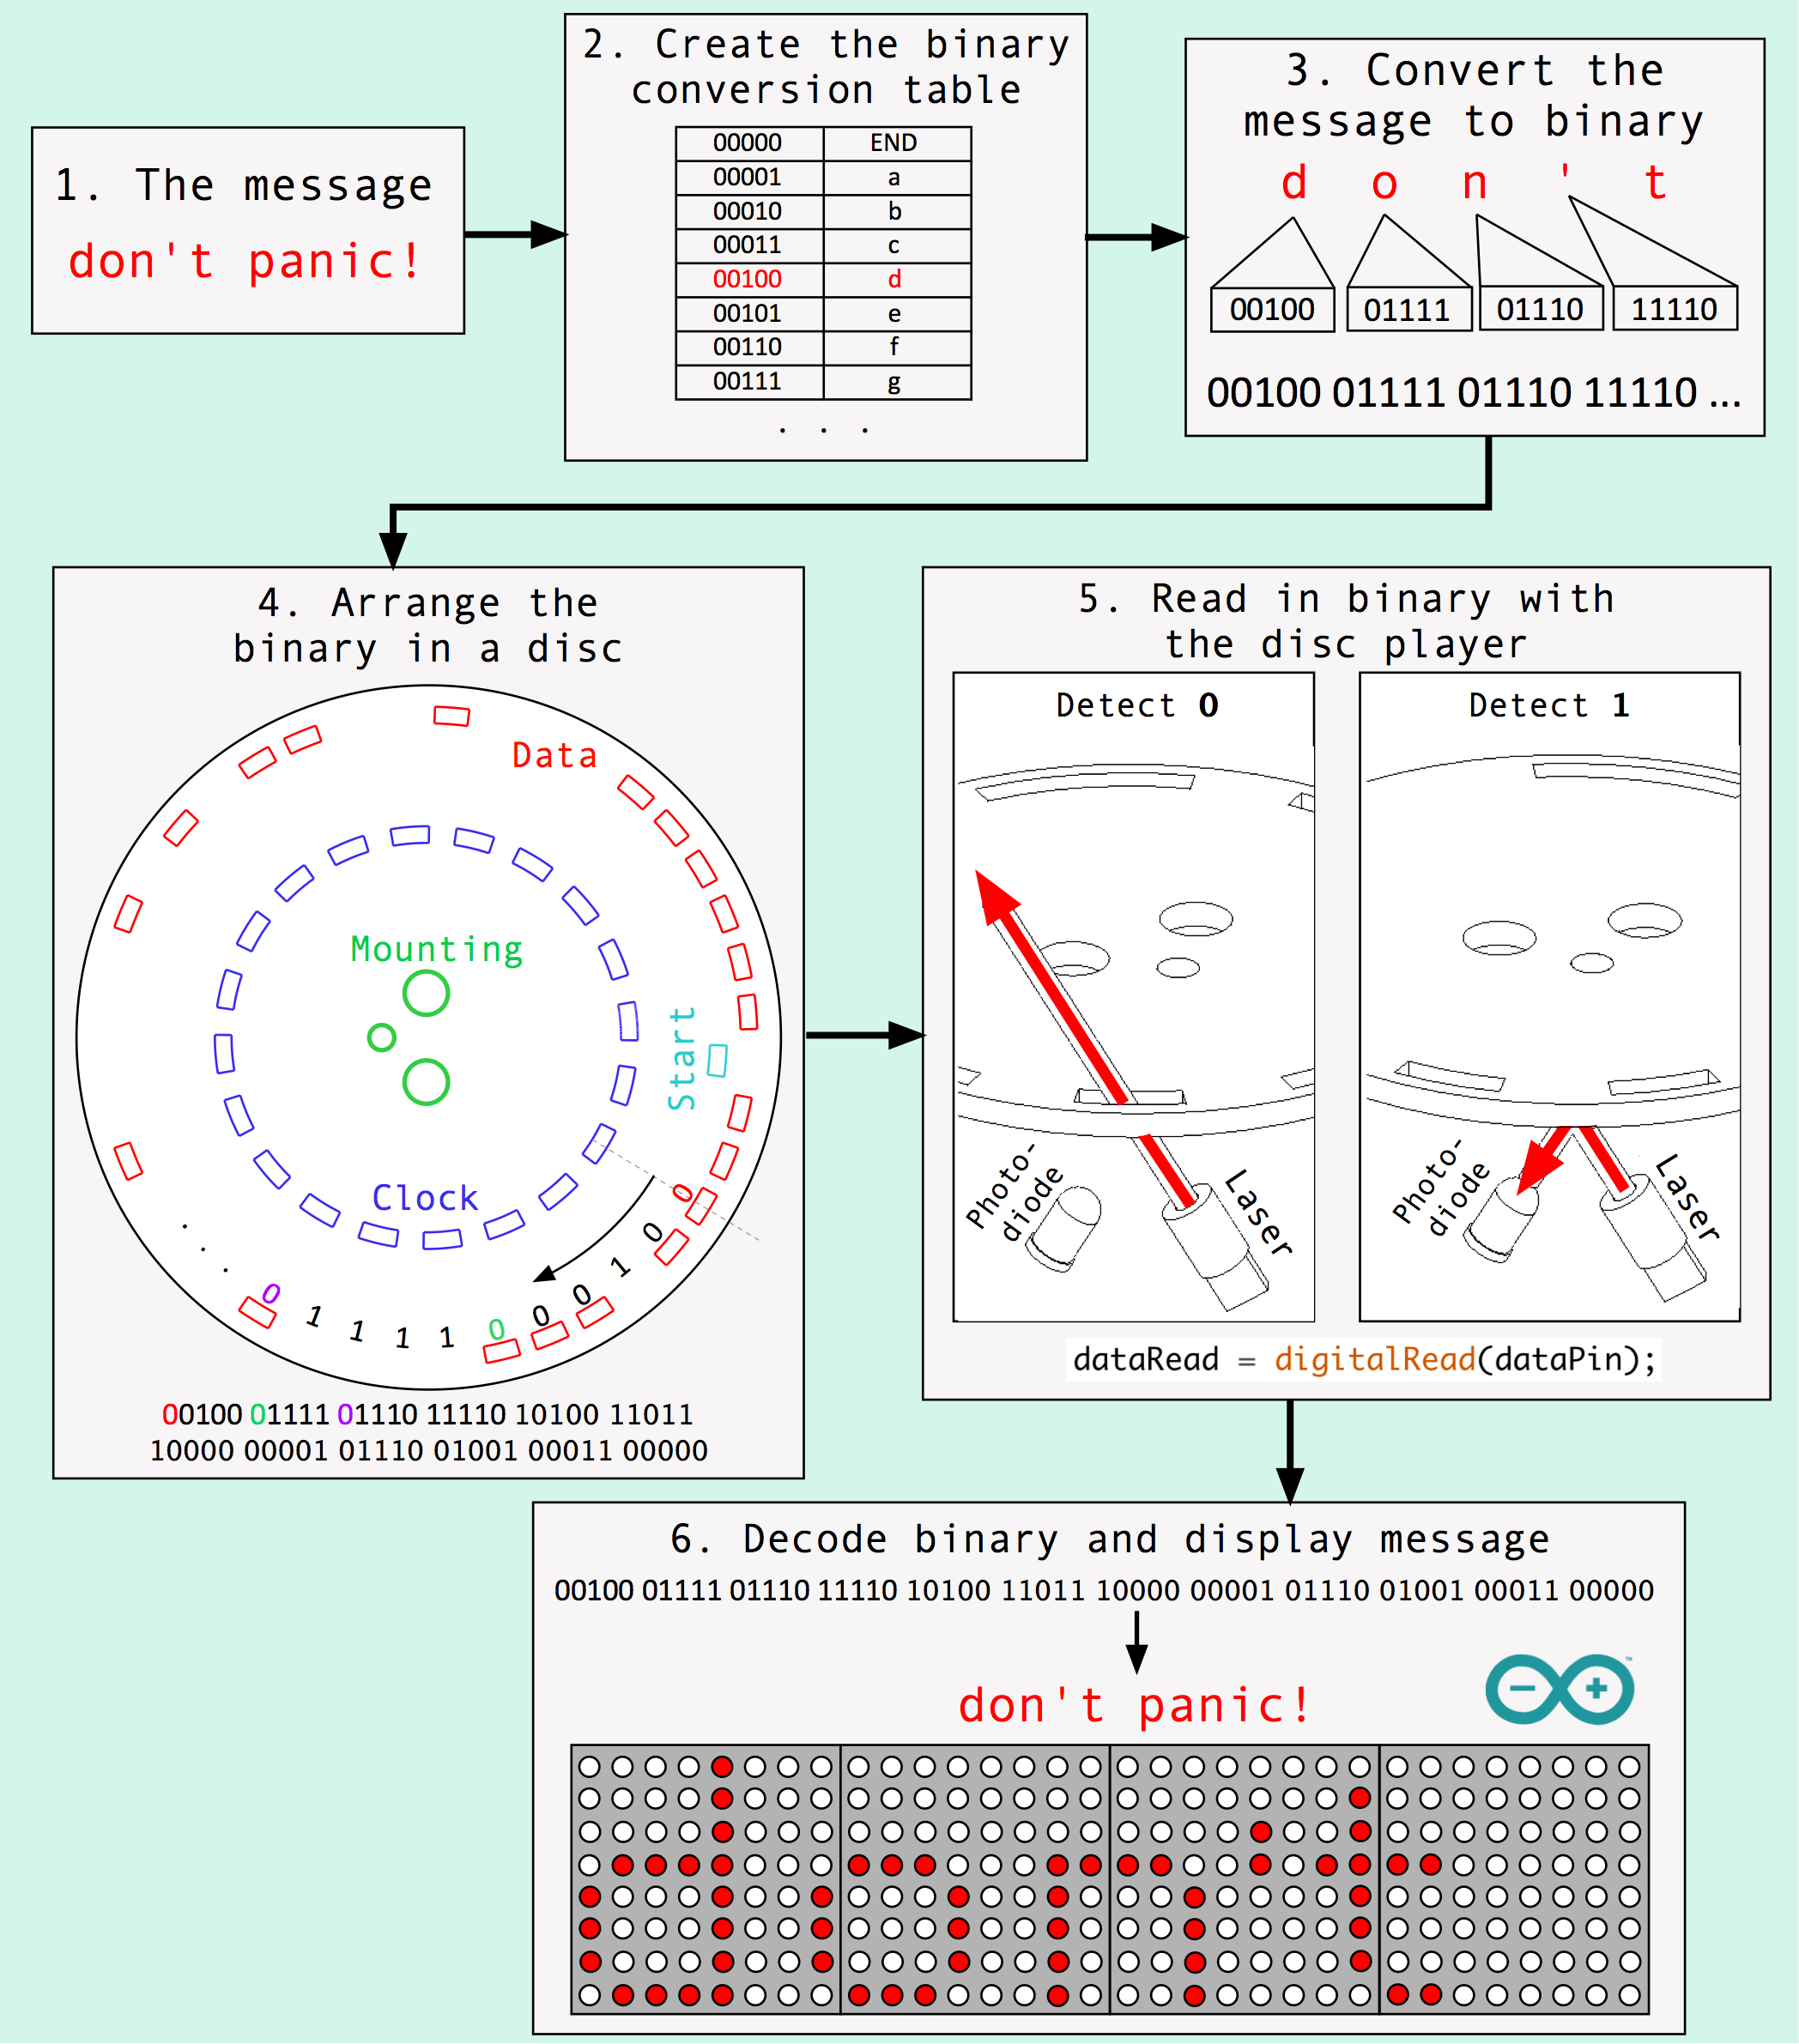
[jbumstead] used MATLAB to convert the text messages into binary to be cut out of the disk.[jbumstead] wanted to demonstrate the idea of information-storing devices such as LPs, CDs, and old hard drives. What he came up with lies directly at the intersection of art and technology: an intricately-built machine that plays beautiful collaged wooden disks. Much like the media that inspired the Wooden Disk Player, it uses a laser to read encoded data, which in this case is short bits of text like “Don’t Panic”.
These snippets are stored in binary and read by a laser and photodiode pair that looks for holes and not-holes in the disk. The message is then sent to an Arduino Nano, which translates it into English and scrolls the text on an LED matrix. For extra fun, the Nano plays a MIDI note every time it reads a 1, and you can see the laser reading the disk through a protective acrylic shield.
Though the end result is fantastic, [jbumstead] had plenty of issues along the way which are explored in the build video after the break. We love it when people show us their mistakes, because it happens to all of us and we shouldn’t ever let it tell us to stop hacking.
We would be preaching to the choir if we told you that fear is the action killer when it comes to the challenge of new projects in uncharted territory. Everyone who reads Hackaday knows that it takes mettle to forge through the self-doubt as we push ourselves to new engineering heights.
[JBV Creative] hears the voice, too: the one that says you can’t build that thing, it’s too difficult/useless. He knows that both creativity and anti-creativity stem from the same source — the powerful human mind that dreams up these projects in the first place.
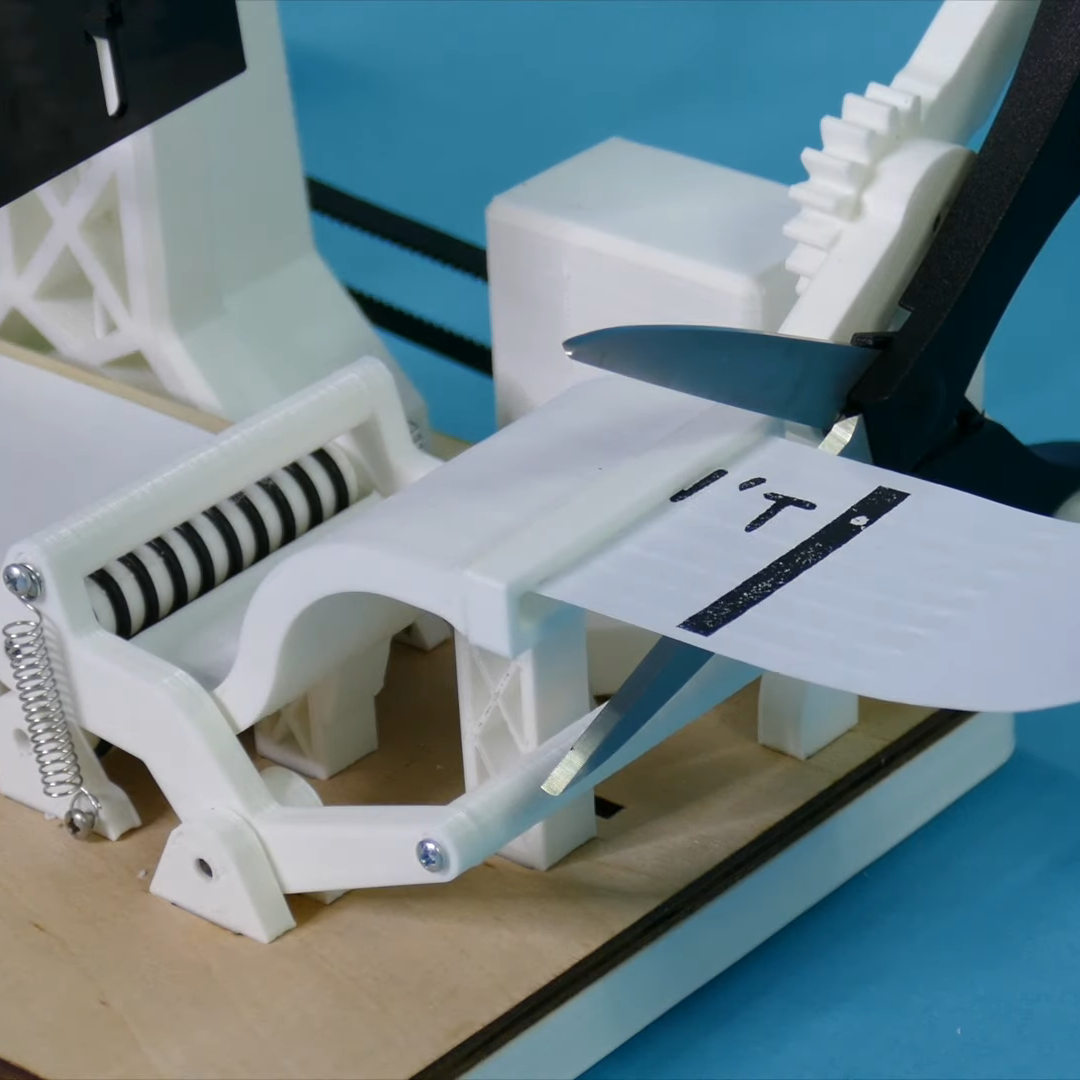
The Encouragement Machine combines the two in a piece that engineers art from garbage, aka negative thoughts. It works by first acknowledging the most basal of discouraging thoughts — an important step of the process — and then it simply trims away the negativity.
This machine uses a stepper motor to feed receipt paper underneath a custom stamp that says YOU CAN’T DO IT. Then it passes the paper through a pair of servo-driven scissors that snip off the apostrophe-t.
Ironically or not, [JBV Creative] ran into a few issues with this build, but managed to muster up enough moxie to work through the problems without encouraging slips of paper. We have to wonder how much more smoothly the next project will go given all the positivity he now has on-demand.
[JBV] doesn’t delve into the electronics much, but it looks like an Arduino and a motor driver to us. We totally dig the design — it looks like an electrical substation or rocket launch pad that happens to have a Ferris wheel. Step right up and check out the build video after the break.
Mankind will always wonder whether we’re alone in the universe. What is out there? Sure, these past weeks we’ve been increasingly wondering the same about our own, direct proximity, but that’s a different story. Up until two years ago, we had the Kepler space telescope aiding us in our quest for answers by exploring exoplanets within our galaxy. [poblocki1982], who’s been fascinated by space since childhood times, and has recently discovered 3D printing as his new thing, figured there is nothing better than finding a way to combine your hobbies, and built a simplified model version simulating the telescope’s main concept.
The general idea is to detect the slight variation of a star’s brightness when one of its planets passes by it, and use that variation to analyze each planet’s characteristics. He achieves this with an LDR connected to an Arduino, allowing both live reading and logging the data on an SD card. Unfortunately, rocket science isn’t on his list of hobbies yet, so [poblocki1982] has to bring outer space to his home. Using a DC motor to rotate two “planets” of different size, rotation speed, and distance around their “star”, he has the perfect model planetary system that can easily double as a decorative lamp.
Obviously, this isn’t meant to detect actual planets as the real Kepler space telescope did, but to demonstrate the general concept of it, and as such makes this a nice little science experiment. For a more pragmatic use of our own Solar System, [poblocki1982] has recently built this self-calibrating sundial. And if you like rotating models of planets, check out some previous projects on that.
[Harrison] has been busy finding the sweeter side of quarantine by building a voice-controlled, face-tracking M&M launcher. Not only does this carefully-designed candy launcher have control over the angle, direction, and velocity of its ammunition, it also locates and locks on to targets by itself.
Here comes the science: [Harrison] tricked Alexa into thinking the Raspberry Pi inside the machine is a smart TV named [Chocolate]. He just tells an Echo to increase the volume by however many candy-colored projectiles he wants launched at his face. Simply knowing the secret language isn’t enough, though. Thanks to a little face-based security, you pretty much have to be [Harrison] or his doppelgänger to get any candy.
The Pi takes a picture, looks for faces, and rotates the turret base in that direction using three servos driven by Arduino Nanos. Then the Pi does facial landmark detection to find the target’s mouth hole before calculating the perfect parabola and firing. As [Harrison] notes in the excellent build video below, this machine uses a flywheel driven by a DC motor instead of being spring-loaded. M&Ms travel a short distance from the chute and hit a flexible, spinning disc that flings them like a pitching machine.
Unless you happen to be from Finland, this is just an all too familiar situation: you’re stuck in an inescapable situation with this one person who is really more of an acquaintance than a friend, and neither of you knows who should say something in hopes of keeping a conversation going. Awkward silence is inevitable, and the longer it lasts, the more excruciating the thought of opening your mouth becomes. Well, consider those days over, thanks to [Jasper Choi] and his friends, who blessed us with the System for Awkward Silence Solution and Interaction Enhancer, or SASSIE.
Built as a laser-cut rotating cylinder, and equipped with a pair of microphones, SASSIE detects and counts the duration of any ongoing silence in the room. Once a pre-defined time limit is reached, it rotates itself to a random direction, symbolically pointing a finger to one of the people present in the room to indicate its their turn to speak now. To break the silence right off the bat, the finger pointing is accompanied by some pre-recorded messages. Unfortunately the audio files exceeded the storage of the Arduino Uno used here, so the responsibilities had to be divided between two Arduinos, arranged with the help of some simple serial communication.
While this is obviously a tongue-in-cheek project, it might just be a welcoming relieve for people with social anxiety, and there is definitely potential to take the idea further. Maybe with some inspiration from this happy robot fellow, a future version might ease the conversation even further by suggesting a topic along the way.
Who doesn’t love a good robot? If you don’t — how dare you! — then this charming little scamp might just bring the hint of a smile to your face.
SDDSbot — built out of an old Sony Dynamic Digital Sound system’s reel cover — can’t do much other than turn left, right, or walk forwards on four D/C motor-controlled legs, but it does so using the power of a Pixy camera and an Arduino. The Pixy reads colour combinations that denote stop and go commands from sheets of paper, attempting to keep it in the center of its field of view as it toddles along. Once the robot gets close enough to the ‘go’ colour code, the paper’s orientation directs the robot to steer itself left or right — the goal being the capacity to navigate a maze. While not quite there yet, it’s certainly a handful as it is.
With the care of a maker, [Arno Munukka] takes us under the hood of his robot to show how he’s made clever use of the small space. He designed a duo of custom PCBs for the motors and stuck them near the robot’s top — you can see the resistors used to time the steps poking through the robot’s case, adding a functional cosmetic effect. The Arduino brain is stuck to the rear, the Pixy to the front, and the power boards are snug near the base. Three USB ports pepper the robot’s posterior — a charging port, one for programming the Arduino, and a third to access the Pixy camera.
What do you think — had a change of heart regarding our future overl– uh, silicon-based friends? Yes? Well here’s a beginner bot to will get you started.
One of the bigger problems with any CNC machine or 3D printer is the issue of missed steps when moving the toolhead. If a stepper motor misses a step, the entire layer of the print – and every layer thereafter – will be off by just a tiny bit. Miss a few more steps, and that print will eventually make its way into the garbage. [Misan] has the solution to this: closed loop control of DC motors for a 3D printer.
Most printer firmwares use an open loop control system for moving their motors around. Step a few times in one direction, and you know where the nozzle of a 3D printer will be. Missed steps confound the problem, and there’s no way for the firmware to know if the nozzle is where it should be at any one time.
[Misan]’s solution to this was a DC motor coupled to an optical encoder. Both the motor and the encoder are connected to an Arduino Pro Mini which receives step and direction commands from the printer controller. The controller takes care of telling the motor where to go, the Arduino takes care of making sure it gets there.
The entire build is heavily derived from ServoStrap, but [Misan] has a very cool demo of his hardware: during a print, he can force the X and Y axes to either side, and the Arduino in each motor will move the print head back to where it needs to be. You can check that out below.
Planet Arduino is, or at the moment is wishing to become, an aggregation of public weblogs from around the world written by people who develop, play, think on Arduino platform and his son. The opinions expressed in those weblogs and hence this aggregation are those of the original authors. Entries on this page are owned by their authors. We do not edit, endorse or vouch for the contents of individual posts. For more information about Arduino please visit www.arduino.cc
You are currently browsing the archives for the DC motor category.