Posts | Comments

Planet Arduino

Archive for the ‘Robotics’ Category

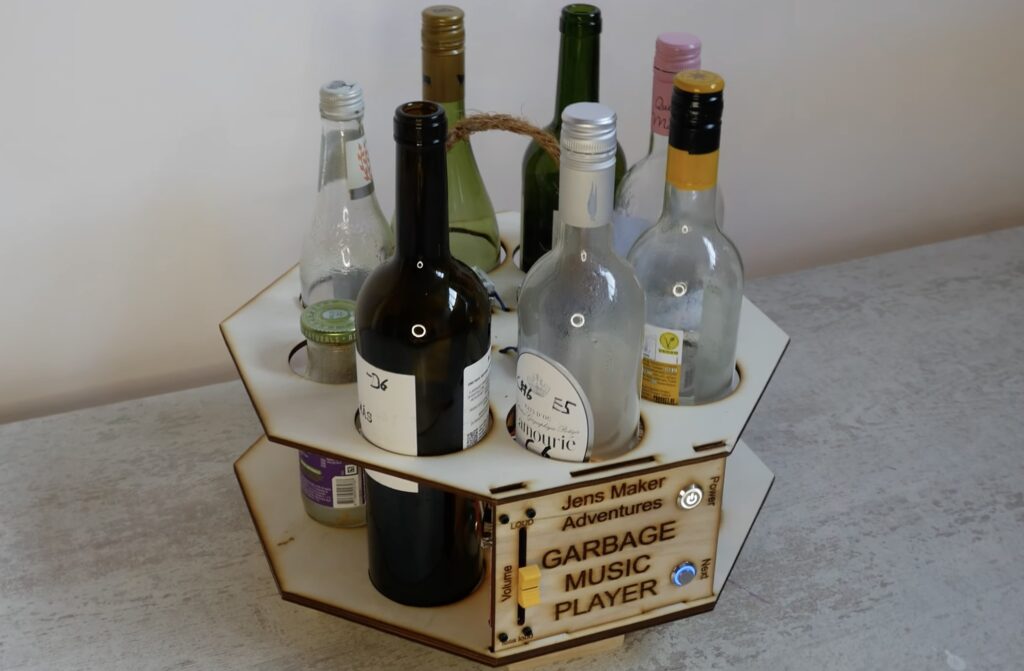
Percussion instruments are likely the first kind that humanity invented, because they’re quite simple: hit a thing and a noise happens. Different things produce different frequencies with different timbres, and glass bottles have a nice xylophonic sound to them. Because glass bottles are easy to find among discarded garbage, Jens of the Jens Maker Adventures YouTube channel took advantage of them to build this awesome robotic instrument.

Jens started by collecting a bunch of different bottles. He tapped each to while searching to get a sense of the notes they produced, which he could then lower by adding some water to fine tune the pitch. Once he had enough bottles to cover a range of notes, he set out to construct a robot to play them.

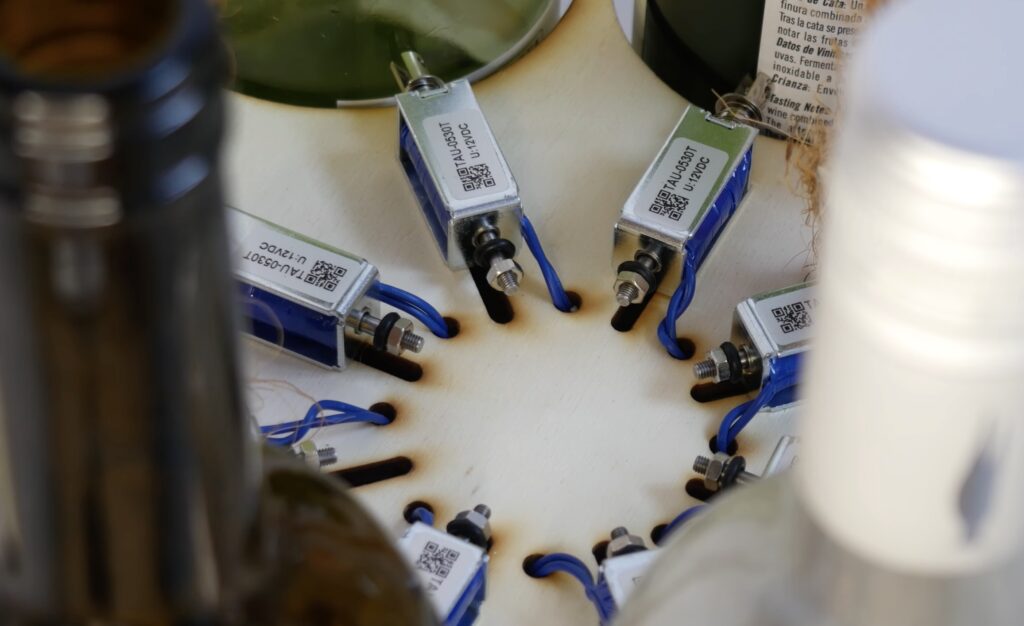
Solenoid actuators tap each bottle and an Arduino UNO Rev3 board controls that tapping. It does so according to MIDI files created in the popular Ableton software. Jens matched the available notes in Ableton to those produced by the glass bottles, so he could simply compose melodies using those notes knowing that the robot could play them. The Arduino reads the MIDI files output by Ableton and strikes the corresponding bottles.

Finally, Jens laser-cut a plywood frame and enclosure that holds the bottles, the Arduino, and the solenoids. It works with seven bottles, which is the number of notes this machine can play.

Jens demonstrated that by playing a guitar along with the robotic instrument and the result sounds very pleasant — especially for something made with garbage.

The post This robot turns old bottles into a musical instrument appeared first on Arduino Blog.

Robots with wheels are commonplace and even legged robots have lost some of that allure that comes from new technology. But what else is there? Well, if we look at nature we can see all kinds of interesting ways that critters manage to move around. Worms, for instance, turn wriggling into forward motion, with inchworms relying on peristalsis — the same mechanism your esophagus utilizes to move food to your stomach. James Bruton wants to build a peristaltic motion robot big enough to ride and constructed this prototype to test his ideas.

Peristalsis is well understood as it relates to some applications, like pumps. But this robot is a unique challenge because of the scale and because it is made of rigid bodies. All of the mechanical parts were 3D-printed and an Arduino Mega 2560 board controls the movement by actuating servo motors. For now, the Arduino only has to coordinate the movement by activating the servos in sequence. That’s because this prototype only moves forward and backward. But the full-scale rideable version would be more complex to allow for turns.

The secret to this robot’s movement is all in the linkages that connect the roller “feet” to the body. They resemble scissor lift mechanisms, but the tops mount to carriages that can slide forward and backward independently. The servo motors handle the actuation, so the Arduino can control the extension of the linkages and the position of the feet along the longitudinal axis. The robot has four segments and two of them make contact with the ground at any given time, while the opposite two lift up and move forward to repeat the cycle.This isn’t very efficient, but it does work. And, importantly, it has the potential to handle a lot of weight. That will be very useful if Bruton does scale the robot up to ride on

The post Prototyping a rideable peristaltic motion robot appeared first on Arduino Blog.

The future we were promised was supposed to include robot maids and flying cars. The future we got has Roomba vacuums and Southwest Airlines. But at least those Roomba vacuum robots work pretty well for keeping floors slightly cleaner. Sadly, they leave elevated surfaces untouched and dust-ridden. To address that limitation, Jared Dilley built this tiny DIY Roomba to clean his desk.

Dilley is a dog owner and so his desk ends up with quite a bit of dust and loose hair, even though his dog is large and doesn’t sit on the desk—a mystery all pet owners will find relatable. Fortunately, Dilley is an engineer and had already created a small Arduino-controlled tank robot a while back. That operated a bit like a Roomba and would drive around until its ultrasonic sensor detected an obstacle, at which point it would turn. Dilley just needed to repurpose that robot into small mean cleaning machine.

The 3D-printed robot operates under the control of an Arduino UNO Rev3 through a motor driver shield. Originally, it only had the ultrasonic sensor, which was enough to detect obstacles in front of the robot. But because its new job is to patrol desks and countertops, Dilley had to add “cliff” sensors to keep it from falling off. He chose to put an infrared sensor at each of the front two corners. The Arduino will register the lack of a reflection when one of those sensors goes past an edge, and will then change course. A Swiffer-like attachment on the back of the robot wipes up dust and dog hair.

The post Tiny DIY Roomba cleans desks and countertops appeared first on Arduino Blog.

Modern engineering is increasingly cross-disciplinary, so today’s students often take courses that would have seemed to be “outside their field” a couple of decades ago. Pelochus and their classmates at the University of Granada are studying computer engineering, but had a class that challenged them to build battlebots in order to get some hands-on learning with microcontrollers and embedded systems. To dominate the competition, they used an Arduino to create the Rockobot.

This is a play on a meme that was popular in the 3D printing community recently. For laughs, people would slap a bust of Dwayne “The Rock” Johnson — wrestler and actor extraordinaire — onto just about anything that could be 3D-printed. Pelochus and their team figured that such adornment would increase their chances of success in a battle, and we can smell what they’re cooking.

Below the studly noggin, the Rockobot is a pretty standard tank-style battlebot. It has bent sheet metal plows in the front and back, which are the primary offense and defense. An Arduino Nano board controls the motors that drive the tank treads through a custom PCB populated with L289N H-bridge drivers. Power comes from a 1550mAh 14.8V battery through a step-down converter. Ultrasonic sensors on the front and back, along with infrared sensors on the sides, help the Rockobot navigate autonomously while avoiding collisions.

The spirit of Mr. Johnson must have been inhabiting the Rockobot, because it blew through the competition and took the top position in the class tournament.

The post Can you smell what the Rockobot is cooking? appeared first on Arduino Blog.

The rapid rise of edge AI capabilities on embedded targets has proven that relatively low-resource microcontrollers are capable of some incredible things. And with the recent release of the Arduino UNO R4 with its Renesas RA4M1 processor, the ceiling has gotten even higher as YouTuber and maker Nikodem Bartnik has demonstrated with his lidar-equipped mobile robot.

Bartnik’s project started with a simple question of whether it’s possible to teach a basic robot how to navigate around obstacles using only lidar instead of the more resource-intensive computer vision techniques employed by most other platforms. The chassis and hardware, including two DC motors, an UNO R4 Minima, a Bluetooth® module, and SD card, were constructed according to Open Robotic Platform (ORP) rules so that others can easily replicate and extend its functionality. After driving through a series of courses in order to collect a point cloud from the spinning lidar sensor, Bartnik imported the data and performed a few transformations to greatly minify the classification model.

Once trained, the model was exported with help from the micromlgen Python package and loaded onto the UNO R4. The setup enables the incoming lidar data to be classified as the direction in which the robot should travel, and according to Bartnik’s experiments, this approach worked surprisingly well. Initially, there were a few issues when navigating corners and traveling through a figure eight track, but additional training data solved it and allowed the vehicle to overcome a completely novel course at maximum speed.

The post Teaching an Arduino UNO R4-powered robot to navigate obstacles autonomously appeared first on Arduino Blog.

Building a robot is only half the battle, because you also need a way to control it. Something like a rover may work with a simple joystick or even typed commands. But complex robots often have many motors and controlling those all directly becomes a challenge. That’s why Will Cogley chose motion control for his bionic hand.

This is the newest iteration of a project that Cogley first started a few years ago. It is robotic hand meant to mimic a human hand as much as possible. Human fingers do not contain muscles. Instead, muscles in the forearms and palms pull on tendons to move the fingers. Cogley’s bionic hand works in a similar manner by using servo motors in the forearm to pull on cables that actuate the fingers. An Arduino UNO Rev3 moves the servos according to commands from a PC, but Cogley needed a way to streamline those commands.

Cogley chose a Leap Motion Controller for this job. It can track the motion of the user’s hand in near real-time and update a 3D model on the computer to reflect that. It displays that model in Unity, which is a 3D game engine that has the flexibility to perform in applications like this. Unity can determine the angle of each joint and Cogley was able to take advantage of the Uduino plugin to send servo commands to the Arduino based on those angles.

The result is a bionic hand that moves to match the user’s own hand.

The post This bionic hand responds to motion control appeared first on Arduino Blog.

Ivan Miranda has a humble dream: he wants to build a massive 3D-printed robot that he can ride upon. In other words, he wants a mech. But that is obviously a very challenging project that will take an incredible amount of time and money. So he decided to test the waters with one piece of the mech: a huge 3D-printed robotic hand.

Miranda designed this robotic hand at the scale necessary for an enormous rideable mech, but he has only built the one hand at this point. This let him test the idea before jumping into the deep end with the full project. The structure and most of the mechanical components were 3D-printed. It has four fingers and a thumb, each with three joints (like a real human hand). It is mostly rigid PLA, but there are some flexible TPU parts that add grip.

Servos actuate all 15 of those joints. Most of them have 11kg-cm of torque, but the base of each finger has a more powerful servo with 25kg-cm of torque. An Arduino Mega 2560 controls all of the servo motors with pulse-width modulation (PWM) signals. Power, of course, comes directly from the power supply and not the Arduino.

In testing, the hand seems to work quite well. It can move and grip large objects, though the belts do slip and need to be replaced with a type that can’t stretch. We’re not sure if Miranda will complete the entire mech, but we sure hope that he does!

The post This gargantuan 3D-printed robot hand is just the beginning appeared first on Arduino Blog.

A popular goal among roboticists is animal-like locomotion. Animals move with a fluidity and grace that is very hard to replicate artificially. That goal has led to extremely complex robots that require a multitude of motors and sensors, along with heavy processing, to walk. But even those don’t quite match biological movement. Taking a new approach, engineers from Carnegie Mellon University and the University of Illinois Urbana-Champaign created a simple bipedal robot named “Mugatu” that walks using a single actuator.

This approach is counter-intuitive, but quite sensible when we actually look at the gaits of real animals. Bipedal animals, such as humans, don’t need to engage many muscles when walking on flat surfaces. We achieve that efficiency with balance and body geometry evolved for this purpose. In a sense, a walking human is always falling forward slightly and redirecting their inertia to take a step. This robot walks in a similar manner and only needs a motor to move one leg forward relative to the other.

The team built Mugatu using 3D-printed legs connected by a servo “hip” joint. An Arduino MKR Zero board controls that motor, moving it with the precise timing necessary to achieve the “continuous falling” gait. This prototype doesn’t utilize it yet, but there is also an IMU in the left leg that could provide useful feedback data in the future. For now, the robot relies on pre-programmed movements.

While the prototype Mugatu has little utility, the research could prove to be indispensable for developing more natural gaits with fewer actuators.

Image credit: J. Kyle et al.

The post Bipedal robot walks with a single motor appeared first on Arduino Blog.

Your dog has nerve endings covering its entire body, giving it a sense of touch. It can feel the ground through its paws and use that information to gain better traction or detect harmful terrain. For robots to perform as well as their biological counterparts, they need a similar level of sensory input. In pursuit of that goal, the Autonomous Robots Lab designed TRACEPaw for legged robots.

TRACEPaw (Terrain Recognition And Contact force Estimation Paw) is a sensorized foot for robot dogs that includes all of the hardware necessary to calculate force and classify terrain. Most systems like this use direct sensor readings, such as those from force sensors. But TRACEPaw is unique in that it uses indirect data to infer this information. The actual foot is a deformable silicone hemisphere. A camera looks at that and calculates the force based on the deformation it sees. In a similar way, a microphone listens to the sound of contact and uses that to judge the type of terrain, like gravel or dirt.

To keep TRACEPaw self-contained, Autonomous Robots Lab chose to utilize an Arduino Nicla Vision board. That has an integrated camera, microphone, six-axis motion sensor, and enough processing power for onboard machine learning. Using OpenMV and TensorFlow Lite, TRACEPaw can estimate the force on the silicone pad based on how much it deforms during a step. It can also analyze the audio signal from the microphone to guess the terrain, as the silicone pad sounds different when touching asphalt than it does when touching loose soil.

More details on the project are available on GitHub.

The post Helping robot dogs feel through their paws appeared first on Arduino Blog.

In robotics and several other disciplines, PID (proportional-integral-derivative) control is a way for systems with closed-loop feedback to adjust themselves according to sensor data without overshooting the target. Drones, for example, use PID control to remain stable without wild oscillations caused by over-correction. But implementing PID control can feel overwhelming, so Adam Soileau from element14 Presents built a simple robot for some experimentation.

This robot’s only job is to drive forward until it sees a wall, then stop at a specific distance from that wall. That isn’t hard to achieve when a robot is moving at slow pace, because the code can tell the robot to stop moving the moment it reaches the target distance. But when moving fast, the robot has to take braking acceleration into account and that is much harder to predict. PID control is perfect for this situation, because it adjusts motor output in real-time according to the incoming sensor data.

In this case, that sensor data comes from an ultrasonic rangefinder mounted to the front of the 3D-printed robot. An Arduino UNO R4 Minima board receives that data and controls the robot’s two motors through H-bridge drivers. That hardware is very straightforward so that Soileau could focus on the PID control. Tuning that is all about balancing the three constant values to get the desired performance. Soileau spent some time working on the Arduino sketch to get the PID control integrated and was eventually able to make the robot act like it should.

If you’re interested in using PID control in your next robotics project, then Soileau’s video should help you get started.

The post Experiments in PID control with an Arduino UNO R4 Minima-powered robot appeared first on Arduino Blog.


  • Newsletter

    Sign up for the PlanetArduino Newsletter, which delivers the most popular articles via e-mail to your inbox every week. Just fill in the information below and submit.

  • Like Us on Facebook