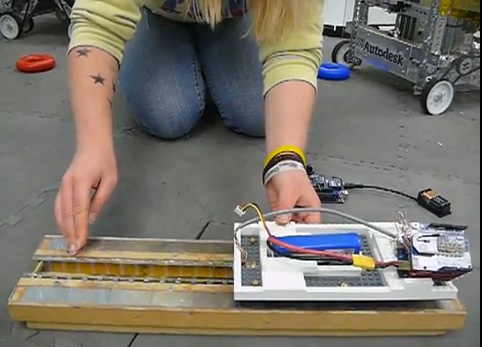
A maglev is just like a conventional train but instead of wheels it has magnets and it levitates!
The team did a great job not only for the results achieved but especially in sharing the project’s documentation, detailed with all the steps for the construction through videos and pictures so that others can more easily follow in their footsteps.
The maglev, which won the Maker Faire Editor’s Choice blue ribbon, contains Arduino UNO, Arduino Wireless Protoshield, plus many other components you can explore in their videos below and in the project page.
Over the last few years I’ve been writing a few Arduino tutorials, and during this time many people have mentioned that I should write a book. And now thanks to the team from No Starch Press this recommendation has morphed into my new book – “Arduino Workshop“:
Although there are seemingly endless Arduino tutorials and articles on the Internet, Arduino Workshop offers a nicely edited and curated path for the beginner to learn from and have fun. It’s a hands-on introduction to Arduino with 65 projects – from simple LED use right through to RFID, Internet connection, working with cellular communications, and much more.
Each project is explained in detail, explaining how the hardware an Arduino code works together. The reader doesn’t need any expensive tools or workspaces, and all the parts used are available from almost any electronics retailer. Furthermore all of the projects can be finished without soldering, so it’s safe for readers of all ages.
The editing team and myself have worked hard to make the book perfect for those without any electronics or Arduino experience at all, and it makes a great gift for someone to get them started. After working through the 65 projects the reader will have gained enough knowledge and confidence to create many things – and to continue researching on their own. Or if you’ve been enjoying the results of my thousands of hours of work here at tronixstuff, you can show your appreciation by ordering a copy for yourself or as a gift
You can review the table of contents, index and download a sample chapter from the Arduino Workshop website.
Arduino Workshop is available from No Starch Press in printed or ebook (PDF, Mobi, and ePub) formats. Ebooks are also included with the printed orders so you can get started immediately.
In the meanwhile have fun and keep checking into tronixstuff.com. Why not follow things on twitter, Google+, subscribe for email updates or RSS using the links on the right-hand column? And join our friendly Google Group – dedicated to the projects and related items on this website. Sign up – it’s free, helpful to each other – and we can all learn something.
Over the last few years I’ve been writing a few Arduino tutorials, and during this time many people have mentioned that I should write a book. And now thanks to the team from No Starch Press this recommendation has morphed into my new book – “Arduino Workshop“:
Although there are seemingly endless Arduino tutorials and articles on the Internet, Arduino Workshop offers a nicely edited and curated path for the beginner to learn from and have fun. It’s a hands-on introduction to Arduino with 65 projects – from simple LED use right through to RFID, Internet connection, working with cellular communications, and much more.
Each project is explained in detail, explaining how the hardware an Arduino code works together. The reader doesn’t need any expensive tools or workspaces, and all the parts used are available from almost any electronics retailer. Furthermore all of the projects can be finished without soldering, so it’s safe for readers of all ages.
The editing team and myself have worked hard to make the book perfect for those without any electronics or Arduino experience at all, and it makes a great gift for someone to get them started. After working through the 65 projects the reader will have gained enough knowledge and confidence to create many things – and to continue researching on their own. Or if you’ve been enjoying the results of my thousands of hours of work here at tronixstuff, you can show your appreciation by ordering a copy for yourself or as a gift
You can review the table of contents, index and download a sample chapter from the Arduino Workshop website.
Arduino Workshop is available from No Starch Press in printed or ebook (PDF, Mobi, and ePub) formats. Ebooks are also included with the printed orders so you can get started immediately.
04/07/2013 – (my fellow) Australians – currently the easiest way of getting a print version is from Little Bird Electronics.
In the meanwhile have fun and keep checking into tronixstuff.com. Why not follow things on twitter, Google+, subscribe for email updates or RSS using the links on the right-hand column? And join our friendly Google Group – dedicated to the projects and related items on this website. Sign up – it’s free, helpful to each other – and we can all learn something.
Got to get the Pi going soon I once worked on an IDU for a helicopter so I'm thinking along those lines for the interface
The Pi can run the display which I have I want to find a way to piping video to the display in real time and overlaying all the symbols and controls depending on mode
Thank you [priyansmurarka] to send us this project involving Xbee. This module is fully compatible with Arduino Boards and you can connect it with a proper shield, the [WirelessShield] . With that you can make comunicate Arduinos wireless, including sending messages about status or whatever you want. The submission of today is about building up a simple chat system.
It is a simple peer to peer chat system made using XBee radios which are compatible with Arduino .
On the [blog] of [priyansmurarka] you can find all the step to configure two modules and make them “talk”
This is an interesting implementation of Arduino and Wireless comunication. The user [priyansmurarka] posted:
Ok, so here is the basic problem statement. I need to develop a temperature sensing system such that the temperature from the sensor node is relayed to a co-ordinator sensor and then the co-ordinator node shows the user in a simple graphical form.
For the wireless communication, I used Xbee Series 2 modules with Arduino Board Shields.
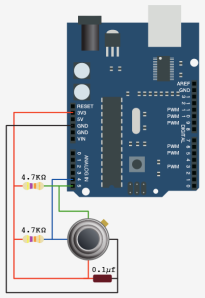
Uses Melexis Temperature sensor and Arduino Board to monitor and plot ambient temperature.
The realization of this project is well documented on the [blog], with code, graphs and pictures.
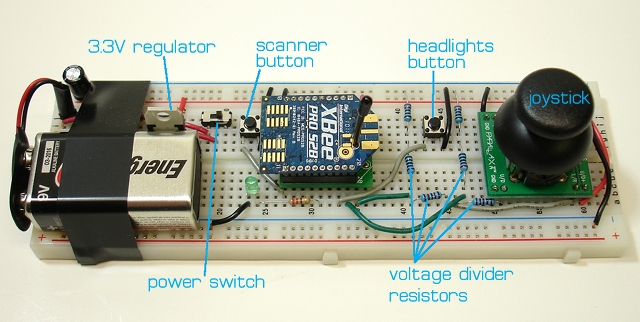
In his blog, Michael describes a nice 4WD robot he realized by means of an arduino-compatible board, a motor shield and a couple of XBee radios, which have been used to implement a simple and effective remote control.
Actually, the remote is made up of a standard breadboard equipped with a joystick, a couple of buttons (that can turn the robot in a Kitt-like vehicle!) and the XBee radio. One interesting feature of this project is that the remote controller is fairly simple and has been designed to work with just the XBee radio board, instead of requiring an additional MCU.
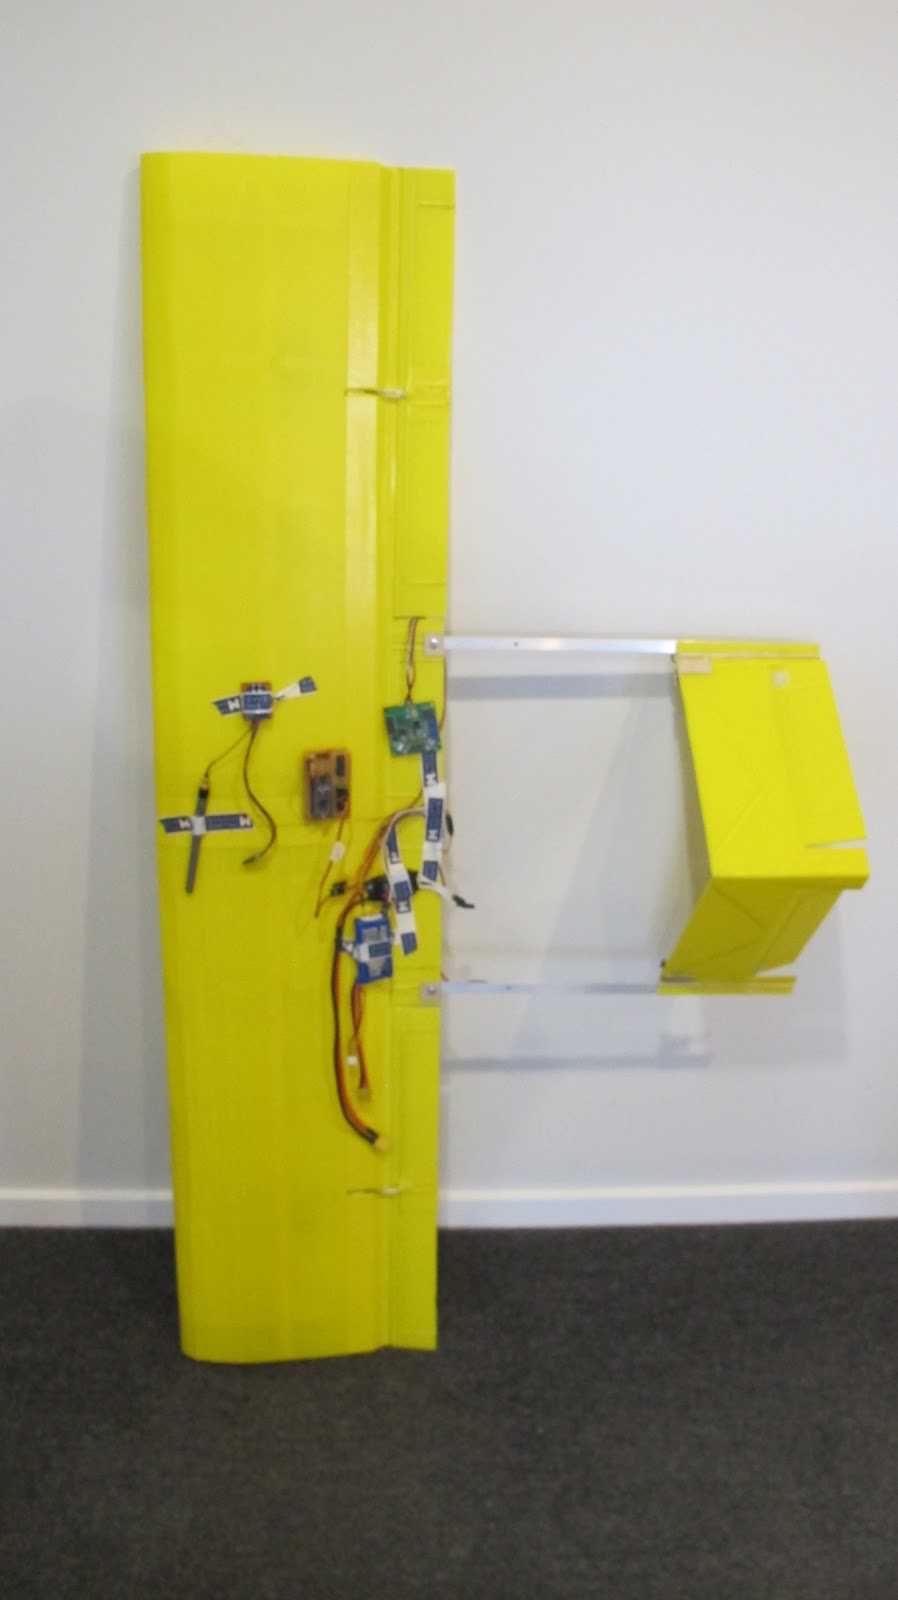
[nickatredbox] keeps up to date with the improvements of his project [yellow plane]. As you can find on this blog, the project is evolving week by week. Let’s see what’s today submission
1200 mm Wing space
280 mm cord
14% Clark Y
Target AUW 1300 Grams
Missing battery and camera box have a design which should weigh 140 grams empty.
The assembly shown below weighs 684 Grams no motor or electronics.
Electronics shown weigh 110 grams ESC Arduino board, Xbee, antenna and Gyro board
Motor & prop another 120 Gram
Here you have a [video] and there you can follow the project on the [website]
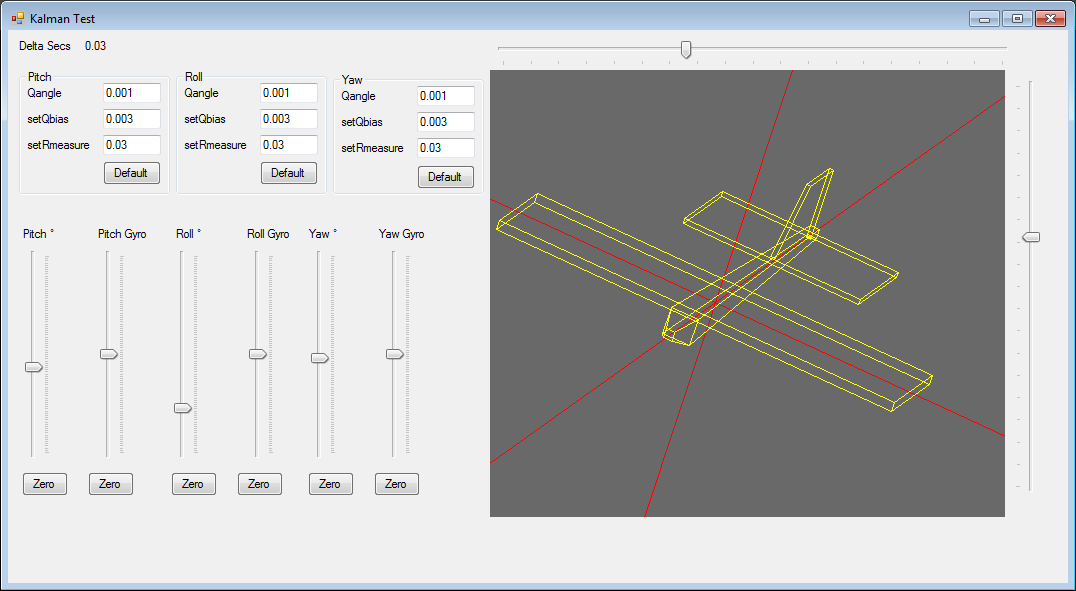
/* Copyright (C) 2012 Kristian Lauszus, TKJ Electronics. All rights reserved.
This software may be distributed and modified under the terms of the GNU
General Public License version 2 (GPL2) as published by the Free Software
Foundation and appearing in the file GPL2.TXT included in the packaging of
this file. Please note that GPL2 Section 2[b] requires that all works based
on this software must also be made publicly available under the terms of
the GPL2 ("Copyleft").
Contact information
-------------------
Kristian Lauszus, TKJ Electronics
Web : http://www.tkjelectronics.com
e-mail : kristianl@tkjelectronics.com
*/
#ifndef _Kalman_h
#define _Kalman_h
class Kalman {
public:
Kalman() {
/* We will set the varibles like so, these can also be tuned by the user */
Q_angle = 0.001;
Q_bias = 0.003;
R_measure = 0.03;
bias = 0; // Reset bias
P[0][0] = 0; // Since we assume tha the bias is 0 and we know the starting angle (use setAngle), the error covariance matrix is set like so - see: http://en.wikipedia.org/wiki/Kalman_filter#Example_application.2C_technical
P[0][1] = 0;
P[1][0] = 0;
P[1][1] = 0;
};
// The angle should be in degrees and the rate should be in degrees per second and the delta time in seconds
//Throttle val = TxVal[1] / 10; val = map(val, 1, 179, 30, 179); val = constrain(val, 1, 165); // scale it to use it with the servo (value between 0 and 180) servo[0].write(val); // sets the servo position according to the scaled value
//Vee tail
//Left Elevator Joy 1 Y TxVal[4] val = (YawTarg + YawTrim) + (PitchTargCentred + PitchTrim); val = constrain(val, 15, 165); val = map(val, 0, 179, 135, 45); // scale it to use it with the servo (value between 0 and 180) servo[1].write(val); // sets the servo position according to the scaled value
//Right Elevator Joy 1 Y TxVal[4] val = (YawTarg + YawTrim) - (PitchTargCentred + PitchTrim); val = constrain(val, 15, 165); val = map(val, 0, 179, 135, 45); // scale it to use it with the servo (value between 0 and 180) servo[2].write(val); // sets the servo position according to the scaled value
//Left Flaperon val = 90 + (RollTargCentred + Flaps) + RollTrim; val = constrain(val, 15, 165); val = map(val, 0, 179, 165, 15); // scale it to use it with the servo (value between 0 and 180) servo[3].write(val); // sets the servo position according to the scaled value
//Right Flaperon val = 90 + (RollTargCentred - Flaps) + RollTrim; val = constrain(val, 15, 165); val = map(val, 0, 179, 165, 15); // scale it to use it with the servo (value between 0 and 180) servo[4].write(val); // sets the servo position according to the scaled value
//Joy 2 x nose Wheel val = (TxVal[6] / 10); val = map(val, 0, 179, 55, 125); servo[5].write(val); // sets the servo position according to the scaled value
}
14% Clark Y more or les given the limitations of the Coroplast
Planet Arduino is, or at the moment is wishing to become, an aggregation of public weblogs from around the world written by people who develop, play, think on Arduino platform and his son. The opinions expressed in those weblogs and hence this aggregation are those of the original authors. Entries on this page are owned by their authors. We do not edit, endorse or vouch for the contents of individual posts. For more information about Arduino please visit www.arduino.cc
You are currently browsing the archives for the xBee category.