Posts | Comments

Planet Arduino

Archive for the ‘Arduino micro’ Category

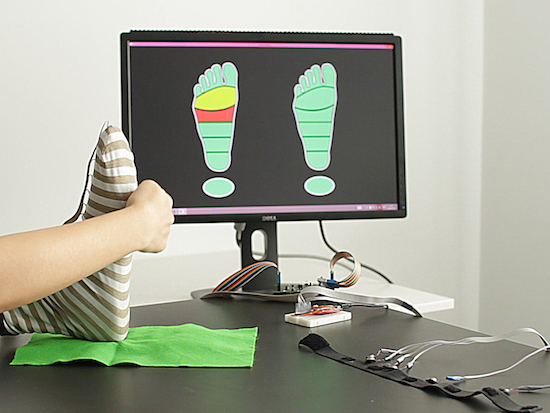
Developed by researchers at the University of Applied Sciences in Linz, the proCover is a sensor-enabled smart sock that adds sensations to current prosthetic limbs.

Although work on more advanced prostheses continues, commercially available limbs still lack tactile feedback. The proCover addresses this not by modifying or replacing the prosthesis, but by using a sock with piezoresistive force sensors embedded in it. This allows for the user to tell where on a foot it’s being touched, as well as the pressure applied, and it can be set up to suit a user’s needs.

Feedback is provided by vibrating rings that can also be placed on a user’s body where convenient. A version that detects how far a prosthetic knee is bent has also been tested.

The design and construction of prostheses that can emulate a natural sense of touch is of growing research interest. Over the last few decades, a number of solutions have been developed for the detection of pressure, slip, heat and texture… However, many of the exciting innovations in this field will likely remain out of reach for most people due to a multitude of factors pertaining to cost, accessibility, health status, and personal attitudes towards elective surgery. We introduce proCover, a low-cost sensing wearable in the form of a textile sock that can be applied retroactively to lower-limb prosthetics to make sensing capabilities more broadly accessible to those who rely on these assistive devices.

You can find more information in the project’s 12-page paper or in this TechCrunch article for a slightly shorter summary.

(Photos: Media Interaction Lab)

With a mouth-operated joystick and “sip and puff” controls, the LipSync aims to make smartphones more accessible for everyone.

For the huge number of people that use them, smartphones have certainly made their lives easier. Unfortunately, these amazing gadgets are difficult to use for those with limited or nonexistent use of their arms and hands. The LipSync attempts to address this issue with a device that can be made in just over a weekend’s worth of work. It uses an Arduino Micro along with a Bluetooth module for communication, and allows someone to interface with the phone using its tiny joystick, as well as the user’s controlled breath.

Smartphones and other similar mobile devices have become a staple piece of technology in this day and age. For people in wheelchairs whom experience difficulties with gross or fine upper body motor control, the usage of mobile devices can be very challenging. The LipSync is an assistive technology device which is being developed to allow quadriplegics the ability to use touchscreen mobile devices by manipulation a mouth-operated joystick with integrated sip and puff controls.

You can find more information on this project, including the files needed to build one, on its Hackaday.io page.

If you’ve ever dreamt of sitting in the driver’s seat of an RC car, you’ll love this recent project from Paul Yan. The designer has hacked together a first-person driving experience using a natural steering wheel that lets you feel like you’re playing a race kart game in real life.

As he describes in the video below, Yan used an old PS2 wheel controller, two Arduinos, a mini FPV camera, and a headset to act as a standalone monitor. The RC car–which is equipped with a Micro–interfaces with the wheel using an Uno and a PS2 Shield. Both Arduinos communicate via a pair of NRF24L01 modules.

I got the idea for this project while watching my three-year-old son play with his radio controlled toy cars. These all use the conventional two joysticks. The left is isolated to vertical movement to control the motor and the right stick is isolated to horizontal movement to control the turning direction of the front wheels.

When it comes to farming veggies like cucumbers, the sorting process can often be just as hard and tricky as actually growing them. That’s why Makoto Koike is using Google’s TensorFlow machine learning technology to categorize the cucumbers on his family’s farm by size, shape and color, enabling them to focus on more important and less tedious work.

A camera-equipped Raspberry Pi 3 is used to take images of the cucumbers and send them to a small-scale TensorFlow neural network. The pictures are then forwarded to a larger network running on a Linux server to perform a more detailed classification. From there, the commands are fed to an Arduino Micro that controls a conveyor belt system that handles the actual sorting, dropping them into their respective container.

You can read all about the Google AI project here, as well as see it in action below!

Just when you thought you’ve seen every possible kind of Arduino-driven clock, another one emerges. This “DIY strange-looking” device takes the form of a wheel with times written on it, which is rotated using an Arduino Micro and a 5V stepper motor. And while it may not be the most accurate timekeeper out there, it’s an excellent way for Makers to explore electronics, programming, and even geometry.

Unlike most clocks that have either two or three hands going around a 12-hour face, 17-year-old Instructables user “Electronics for Everyone” chose a fixed pointer to denote the time in 10-minute intervals instead.

The idea behind the clock is a circle with a circumfrence of 72cm that ticks at 1cm every 10 minutes, which means every 72 ticks will equal 12 hours…

You can find an entire breakdown of the build, along with its measurements and code, on its project page here.

For a recent column in the Dutch newspaper de Volkskrant, Rolf Hut built a slick longboard with LED strips that respond to speed. If you think that sounds awesome, wait until you see it in action.

As the Maker explains, four magnets and a Hall effect sensor are used to measure the longboard’s speed so the Adafruit NeoPixels can react at the same pace. To achieve this, the magnets are glued to the inside of each wheel, while a Hall sensor counts the number of revolutions and sends that information over to one of two Arduino Micros. The first Arduino translates that into a speed, while the second Micro converts that speed into a signal for the LEDs. Everything is powered by a power bank.

Intrigued? Head over to the Hut’s project page, where you will find a detailed breakdown of his build along with its code.

ns1

We’ve been playing with NS1 Nanosynth in the last few weeks, when it first appeared under our radars on the Christmas’ Gift Guides (while going sold out in few days, after Synthopia blessed it with this interesting review).  It’s a hackable and customizable analog synthesizer coupled with an Arduino Micro platform.

Personally, it was one of my first steps into modular synthesizers. Nice sounds, easy approach. Peter Kirn is perfectly picturing this amazing compromise here!

Synths: they’re fun to tweak and play. Modulars: they’re fun to patch. Arduinos: they’re fun to hack. Small things: they’re fun to carry around.

But how to track patches? How to share sounds with friends? I was playing mainly with my son, and managed to print out a paper sketch depicting all the different pinout of the synth. I wasn’t satisfied with that, I needed more!

I started writing Sound Machines, about new patches, more sounds. It turned out I made a Fritzing part out of the Nanonsynth, and we started sharing each other patches. This repository holds them, and this is a short review of the best. Enjoy!


Here you can listen to the envelope Generator (ADSR) in action:


Want to add your very own sounds? You can either add it to their repository or comment here!

[Brian] managed to resist the draw of the Left Shark costume and went as a cyberpunk for Halloween this year. Among his costume’s props was a small, one-handed chording keyboard that fit easily into one of his pockets. Now he could have just glued a couple of key caps to something small and called it a day. Instead, [Brian] made a fully functional and modular chording keyboard that can communicate over Bluetooth or USB.

What is a chording keyboard, you ask? Instead of entering keystrokes one at a time, a much smaller set of keys are mashed in meaningful combinations called chords. Once you know what you’re doing, it’s much faster than a standard keyboard. If you’ve ever seen a court reporter hammering away on a tiny machine, you have seen a chording keyboard in action. Our own [Elliott Williams] covered the topic in detail over the summer.

[Brian]’s keyboard has seven keys, one for each finger and three for the thumb. Any key found on a standard 104-key can be made by pressing a combination of keys with the fingers in relation to the center, near, or far thumb keys. We’re pretty impressed that he was able to stuff all of that hardware in such a small 3D-printed package. It’s based on an Arduino micro and uses an Adafruit EZ Key for Bluetooth communication with a phone or tablet.

The ultimate plan is to make this into a wrist-mounted chording keyboard that extends or retracts with the flick of your wrist. [Brian] has made some progress on this, having developed and printed the mechanism. But as you can see in the video after the break, adding the keyboard to it is just too much for the hobby servos he chose to move. Still, if he can dial it in this is going to be awesome!

The keyboard also has an ADXL335 accelerometer breakout, which means it can function as a tilt mouse. Neither the Bluetooth nor the tilt mouse functionality are imperative, though—if you want to make your own and leave either of these out, there is no need to alter the code.


Filed under: Arduino Hacks


  • Newsletter

    Sign up for the PlanetArduino Newsletter, which delivers the most popular articles via e-mail to your inbox every week. Just fill in the information below and submit.

  • Like Us on Facebook