Posts | Comments

Planet Arduino

Archive for the ‘MKR WiFi 1010’ Category

Go to any model railroading convention and you’ll see that most layouts have far more work put into the terrain and buildings than into the trains themselves. The emphasis is usually on realism, so enthusiasts spend uncountable hours constructing and weathering their buildings. But lighting those buildings can be difficult, leading many people choose simple static lighting. This project by Olivier Wagener makes it relatively easy to upgrade that lighting to something much more sophisticated.

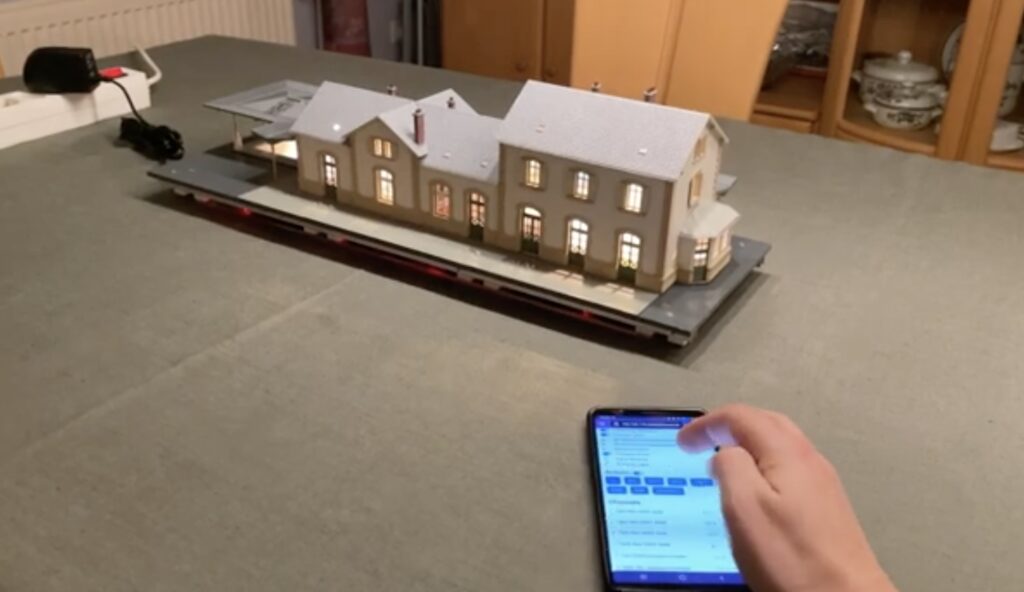
Wagener started this project to help his father improve the lighting of a train station building for his model railroad. The result is really impressive, because every room in the building has two of its own LEDs: one a warm temperature and one a cool temperature. This also supports RGB LEDs. Using a smartphone, the user can set the brightness, color, and temperature of each room individually. They can also group those into zones for quick control. Once setup, the user has complete control over the realistic lighting and that adds a whole new dimension to model railroading.

This is possible thanks to an Arduino MKR 1010 WiFi board that communicates with Wagener’s custom app over the local network. This can handle up to 976 single-color LEDs (warm or cool), 305 RGB LEDs, or some combination of the two. To give the Arduino full PWM (pulse-width modulation) control over that many LEDs, Wagener chose PCA9685 PWM module boards. Each one has 16 channels, so a full set of 976 single-color LEDs will require 61 boards. 305 RGB LEDs will also require 61 boards, because each of those LEDs takes up three channels.

If you want to use Wagener’s project in your own buildings, all of the code and information is available on his Gitlab page

The post The ultimate lighting system for model railroaders appeared first on Arduino Blog.

Hazardous pollution in the form of excess CO2, nitrogen dioxide, microscopic particulates, and volatile organic compounds has become a growing concern, especially in developing countries where access to cleaner technologies might not be available or widely adopted. Krazye Karthik’s Environmental Sense Mask (ES-Mask) focuses on bringing attention to these harmful compounds by displaying ambient air quality measurements in real-time.

In order to get values for the air quality index (AQI), CO2, volatile organic compounds (VOCs), and temperature/humidity, Karthik selected the Nicla Sense ME due to its onboard Bosch BME688 sensor module. In addition to providing this data over Bluetooth® Low Energy, the Nicla Sense ME also sends it over I2C to a MKR WiFi 1010 which is responsible for parsing the data. Once done, a comment is generated for the current AQI ranging from “excellent” to “hazardous.” This reading is displayed on an attached OLED screen and a ring of 24 NeoPixel LEDs are illuminated according to the level of dangerous pollutants.

Beyond the microcontroller and sensor components, Karthik added a 5V fan to a mask along with a few air filters to help increase the cleanliness of the air he was breathing. Last of all, he built a mobile app that grabs the data via BLE and shows it in an organized format.

For more details on the ES-Mask, you can check out Karthik’s write-up here on the Arduino Project Hub.

The post The Environmental Sense Mask monitors air quality in real-time appeared first on Arduino Blog.

As a part of his new raised garden bed project, Shawn Murphy was looking for ways to improve his backyard even further with intelligent IoT systems. Apart from the existing 1800W solar panel array, he also wanted a device that could report current weather and soil conditions in real-time and even perform some watering tasks without the need for human intervention.

Initially, Murphy had researched constructing a pump that could take water from a pair of rain storing barrels and deliver it to the garden bed. However, this would have been costly to build and maintain, so he instead went with a gravity-fed setup. In this configuration, gravity would move water down-slope to a solenoid valve attached to the Arduino IoT Explorer Kit’s 24V relay pin. Once wired together, he added a soil moisture sensor for measuring the water content of the soil, along with a 12V battery pack and solar charge controller for off-grid power.

The resulting hardware was then loaded with a sketch that would continually read the moisture content of the soil, activate the solenoid valve if necessary, and even turn on a small fan if the enclosure were to get too hot. Best of all, the WiFi connectivity of the IoT Explorer Kit allowed Murphy to send the values remotely to an Arduino Cloud dashboard, complete with toggle switches for manually overriding the solenoid valve if necessary.

For more information about this project, watch Murphy’s videos below and read his write-up on Hackster.io.

The post Automatically monitor and irrigate your raised garden bed with the Arduino Cloud appeared first on Arduino Blog.

Going outside to see the weather is time consuming and merely looking at a phone gets boring, which is what inspired YouTuber Mikey Makes to build a fun weather-telling device that displays the current conditions in a new format. Owing to his love of the old BBC weather symbols, which were placed on physical stickers rather than a computer screen, Mikey Makes wanted to replicate them and physically swap out various components in a mechanical fashion.

At the very front is a large gray cloud that is permanently fixed in place. If the conditions outside become cloudy, rainy, or snowy, small symbols for each state are rotated underneath the cloud using a stepper motor in conjunction with a DC gear motor. The symbols for partly cloudy and full sun were tougher to integrate since they are either behind the cloud or completely cover it. For partial sun, a series of disks rotate behind the cloud to slowly pull up the rays of sunshine that emanate outwards. Otherwise, full sun causes a large sun symbol to move across the front of the cloud and block it entirely.

Controlling all of these components is a MKR WiFi 1010, which pulls real-time weather data from the openweathermap API. Then depending on the desired movements, it sends signals to an A4988 stepper motor driver or an H-bridge module for the DC motors. 

To see more about how this project works and its intricate mechanical design, you can watch Mikey Makes’ demonstration video below!

The post Check the weather from indoors with this MKR WiFi 1010-controlled contraption appeared first on Arduino Blog.

As part of his ongoing autonomous robot project, YouTuber Nikodem Bartnik wanted to add LIDAR mapping/navigation functionality so that his device could see the world in much greater resolution and actively avoid obstacles. In short, LIDAR works by sending out short pulses of invisible light and measuring how much time it takes for the beam to reflect off an object and return to its detector. By combining this distance value with the angle of the sensor at the moment of measurement, a virtual cloud of points can be built and used to represent the entire space around the robot.

The LIDAR module Bartnik opted to use was fairly simple, as it sent measurements in frames over UART that encoded everything including the sensor’s angle, the distance, and the speed of the device. He then created a simple sketch for the MKR WiFi 1010 that takes advantage of the increased power and connectivity to read values and send them to a host machine for further processing and visualization. 

The resulting Python script opens a websocket, which receives the aforementioned data, does some basic filtering, and then displays it within a point-cloud. It also determines the direction in which the robot should move and sends that command back to the MKR board so it can tell the attached Arduino Uno how to move the motors. 

The post See how Nikodem Bartnik integrated LIDAR room mapping into his DIY robotics platform appeared first on Arduino Blog.

USB battery banks are a dime-a-dozen and useful for recharging all of those devices in your life. But the typical cheap battery banks don’t provide you with much information about their status. You usually just get a few LEDs that provide a very general idea of how much battery life remains. Keenan Johnson needed more info for an upcoming project and so he hacked a USB battery bank to gather telemetry.

The most useful data about a USB battery bank is its voltage at any given time, which tells you approximately how much longer the batteries will last. But there is other telemetry that Johnson wanted to have, including the charging current and output current. This USB battery bank contains an HT66F018 microcontroller to monitor the battery cells and control charging/discharging, but it runs custom firmware and doesn’t make the telemetry accessible through a standard interface like I2C or SPI.

Fortunately for Johnson, the PCB inside the battery bank has handy pins marked P+, LOAD, and CHRG. Those correspond to battery voltage, output current, and charging current respectively. Johnson could measure those with a multimeter, but needed a better way to monitor the telemetry. To gather that, he connected a MKR WiFi 1010 board to the test points via an ADC (Analog-to-Digital Converter) module. Johnson programmed a simple interface that he could access remotely that shows him battery voltage, load current, and charge current, and also added an Adafruit NeoPixel LED status indicator.

The post Hacking a USB battery bank to gather telemetry appeared first on Arduino Blog.

Constructing your very own IoT weather monitoring station can be a complicated ordeal, as getting values from the embedded device to some kind of web server in a secure manner takes a lot of effort and time to complete. For his system, Clem Mayer from element14 Presents was able to use a MKR WiFi 1010 that sends relevant weather information at a set interval, which can then be viewed from anywhere in the world with an Internet connection.

Aside from the Arduino as the main control board, Mayer went with a DHT11 temperature and humidity sensor for collecting weather data and a LiPo battery cell that lets this device sit outside for extended periods of time. In the future, Mayer speculated that he might add light or gas sensors for even more in-depth readings. All of the electronics were placed into a watertight enclosure, which has a clear acrylic top for viewing the status RGB LED.

The Arduino Cloud service was used to configure the MKR WiFi 1010, set up several cloud variables, and create a virtual dashboard for keeping tabs on both current and historical readings. After making the processor sleep for eight seconds to conserve battery power, a reading is taken from the onboard sensor and written to the cloud where it can then be seen in the dashboard.

The post This MKR WiFi 1010-based weather station sends readings to the Arduino Cloud appeared first on Arduino Blog.

It is probably well known by now that COVID-19 can cause serious side effects in people that last for months at time, meaning that recovering from the disease can be an arduous process. Some symptoms include trouble breathing, heart inflammation, and blood clotting, so being able to track these conditions as they progress is vital to ensuring ongoing safety for a patient. In response, Kamrul Hussain created the Vital Care project and entered it into element14’s Design for a Cause 2021 contest, where makers were challenged to use the Arduino Nano 33 IoT in some way for the good of humanity. 

Hussain’s project implements a pair of sensors to measure various bodily functions: an AD8232 module for measuring heart activity and a MAX30102 for tracking oxygen saturation over time. The former board is connected to a MKR WiFi 1010, which relays heartbeat data to an Arduino Cloud dashboard. The latter module sits in a wrist-mounted enclosure and senses the level of oxygenated blood. This data is fed into a Nano 33 IoT and then sent to a dashboard as well. 

When these two devices were combined into a single project and had their data streams fed into a single app, both the accuracy and breadth of the vitals data taken were greatly increased over what could be achieved in a doctor’s visit.

You can read more about the Vital Care project, which was named a runner-up in the contest, here in Hussain’s blog posts.

The post Vital Care is an Arduino-based device for the continuous monitoring of vital signs appeared first on Arduino Blog.

Normally when an inexpensive wall clock stops ticking, you simply buy a new one. However, ‘Developer Hendrik’ decided to bring his broken clock back to life, or some semblance thereof, using a 3D-printed four-axis robot arm dubbed “Serworm Michael.”

Under the control of a MKR 1010 WiFi and DYNAMIXEL MKR Shield, along with a Raspberry Pi, Serworm Michael is set up to push the minute hand into the next position. Five DYNAMIXEL XL330-M288-T servos drive the robot, which are programmed by physically moving the arm and using a command line interface.

You can see it in action in the video below, while more details on Serworm Michael are available on GitHub.

The post This overengineered robotic clock will not be underappreciated appeared first on Arduino Blog.

After three short years of use, Roni Bandini’s Samsung washing machine started to act erratically, and several technicians looked at it without really fixing the problem. Bandini then decided to take matters into his own hands and replaced its brains with a MKR WiFi 1010 board, along with four relays and a trio of buttons.

This new system can control the motor and valves to progress through a wash cycle. It also takes advantage of the Arduino’s WiFi abilities to integrate with Telegram, sending a message to the entire family when the laundry is done.

Future goals for the project include varying the motor speed and making it reverse, but so far it’s a brilliant way to keep a large hunk of metal and plastic out of the junkyard. Code is available on GitHub, and print files for the enclosure are up on Thingiverse.


  • Newsletter

    Sign up for the PlanetArduino Newsletter, which delivers the most popular articles via e-mail to your inbox every week. Just fill in the information below and submit.

  • Like Us on Facebook