Posts | Comments

Planet Arduino

Archive for the ‘3D printed enclosure’ Category

Have you ever wanted to experiment with MIDI, but didn’t know where to start? Or perhaps you didn’t think you could afford to properly outfit your digital beat laboratory, especially given the average hacker’s penchant for blinkenlights? Well worry no more, as [Johan von Konow] has unveiled a collection of DIY MIDI devices that anyone with a 3D printer can build on the cheap.

The LEET modular synthesizer is made up of a keyboard, drum pad, chord keyboard, arpeggiator and a step sequencer that plug into your computer and interface with industry standard digital audio workstation (DAW) programs. The down side is that they don’t do anything on their own, but this simplification allowed [Johan] to really streamline the design and bring the cost of the build down to the bare minimum.
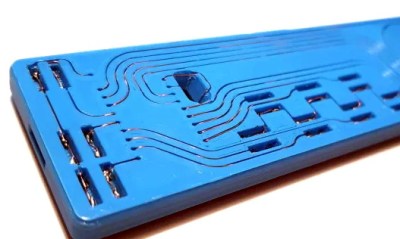
Integrated wire channels mean no PCB is required.

You don’t need to build all the components either, especially if you’re just testing the waters. The keyboard is a great starting point, and even if you have to buy all the components new from eBay, [Johan] says it shouldn’t cost you more than $10 USD to build. You just need an Arduino Pro Micro, some tact switches, and a section of WS2812 RGB LED strip. There’s an excellent chance you’ve already got some of that in the parts bin, which will make it even cheaper.

There is one missing element though: the PCB. But not because you have to source it yourself. Like his clever Arduboy clone we covered earlier in the year, the 3D printed bodies for all of the LEET devices have integrated wiring channels that serve as a stand-in for a traditional circuit board. Simply place all your components, push some stiff 0.3 mm diameter wire down into the channels, and solder the ends. It’s a very neat approach, and something we could see becoming more popular as desktop 3D printers become an increasingly common sight in the home workshop.

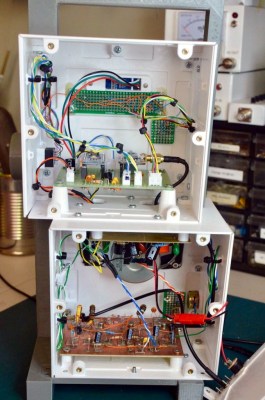
Over the winter, [Michael LeBlanc] thought a good way to spend his time during those long dark nights would be to scratch build his own direct conversion receiver. He was able to find plans for such a project easily enough online, but where’s the fun in following instructions? The final result incorporates what he found online with his own unique tweaks and artistic style.

[Michael] based his receiver on a modified approach to the DC40 created by [Ashhar Farhan], a name likely familiar to readers involved in amatuer radio. He further modified the design by swapping out the audio amplifier for a TDA2003A, and bolted on a digital tuner by way of an Arduino and a Si5351 clock generator. There’s a small OLED to show the current frequency, which is adjusted with a high-quality Bourns EM14 optical encoder so he can surf the airwaves in the comfort and style.

The digital tuner mated to the analog DC40 receiver gives the radio an interesting duality, which [Michael] really embraces with his enclosure design. Obsensibly he wanted to keep the two halves of the system in their own boxes to minimize any interference, but the 3D printed case exaggerates that practical consideration into a fascinating conversation piece.

The analog and digital compartments are askew, and their rotary controls are on opposite sides. The radio looks like it might topple over if it wasn’t for the fact that the whole thing is bolted together, complete with brass inserts for the printed parts. The integrated carry handle at the top somehow manages to make it look vintage and ultra-modern at the same time. Rarely do you see a printed enclosure that’s both meticulously designed inside and aesthetically pleasing externally. [Michael] earned his 3D Printing Merit Badge for sure with this one.


  • Newsletter

    Sign up for the PlanetArduino Newsletter, which delivers the most popular articles via e-mail to your inbox every week. Just fill in the information below and submit.

  • Like Us on Facebook