Posts | Comments

Planet Arduino

Archive for the ‘diy’ Category

Photography turntables are made for both the precise and lazy. Whether you are concerned about the precision of consistent angles during a photo shoot or you simply do not want to stand there rotating a plate after every picture — yes, it does get old — a lazy susan style automatic photography turntable is the ticket. This automatic 360° design made over at circuito.io satisfies both of these needs in an understated package

The parts required to make this DIY weekend project are about as minimal as they get. An Arduino Uno controls it all with a rotary encoder for input and a character LCD to display settings. The turntable moves using a stepper motor and an EasyDriver. It even takes care of controlling the camera using an IR LED.

The biggest obstruction most likely to arise is creating the actual laser cut casing itself. The circuito team avoided this difficulty by using Pololu‘s online custom laser cutting service for the 4 necessary laser cut parts. After all of the components have been brought together, all that is left to do is Avengers assemble. They provide step by step instructions for this process in such a straightforward way that you could probably put this sucker together blindfolded.

We have seen some other inspired photography turntables on Hackaday before. [NotionSunday] created a true turntable hack based off of the eject mechanism of an old DVD-ROM drive. With the whole thing spinning on the head assembly of a VCR, this is the epitome of letting nothing go to waste. We also displayed another very similar Arduino Uno controlled turntable created 2 years ago by [Tiffany Tseng]. There is even a non-electronic version out there of a DIY 360° photography turntable that only uses a lazy susan and tape measure. All of these photography turntable hacks do the job wonderfully, but there was something that we liked about the clean feel of this one. All of the necessary code for this project has been provided over at GitHub. What is your favorite photography turntable?


Filed under: Arduino Hacks, digital cameras hacks

For anyone who has owned a boombox or an old(er) cassette player, the digital age volume controls feel incredibly awkward. Keep pressing buttons to get the volume just right can get tiresome real quick. The volume knob just makes sense and in a simple project, [Jeremy S Cook] brings us the Custom Computer Volume Control Knob.

The build employs an Adafruit Trinket board coupled with a rotary encoder and a push button as described by the designers themselves. We reached out to [Jeremy S Cook] to enquire about the build and it turns out his version uses an MDF enclosure as well as an MDF knob. A larger PCB has the encoder and button solder on with the Trinket board connecting to them via multi strand wires. An Acrylic sheet cut to the size serves as the top cover and completes the build.

The button serves as a play/pause button and can come in handy. Since the device enumerates as an HMI device, it should work with almost any OS. It could easily be extended to work with Android Tablets or even iPads. Check out the video below for a demonstration and if you like the idea of custom input devices, check out this DIY shortcut Keyboard.


Filed under: Arduino Hacks

Are you an angry programmer? Do you get the frequent urge to smash the return key or space bar after finishing every single line of code? Well then [Konstantin Schauwecker]’s typewriter keyboard is just the thing for you. In his project, [Konstantin] hacked a German Olympia Monica typewriter into a USB keyboard.

The project uses no less than 50 photo interrupters mounted on a custom PCB that mounts directly under the typewriter itself. The circuit board is so designed that the hammer arms take a position in obstructing the opto-interrupters. Every time a key is pressed, the corresponding device sends a signal to an Arduino.

In order to enable the wiring of 50 signals to an Arduino Leonardo, multiplexers and decoders are employed. CD4515, 4×16 line decoders work to activate the optical signals and the CD4067, 16×4 multiplexers are used to return the scans. This forms the traditional scanning keyboard matrix and the whole thing is managed in the Arduino code (available as a zip file).

This project can be a great starting point for anyone who wants to hack their grandpa’s old typewriter or make one in order to annoy the guy sitting next to them. Check out the video below for a demo and teardown and if you prefer Raspberry Pis then check out this mechanical typewriter hack.


Filed under: Arduino Hacks

An ISP dongle is a very common piece of equipment on a maker’s bench. However, its potential as a hackable device is generally overlooked. The USBASP has an ATmeg8L at its heart and [Robson] decided that this humble USB device could be used as an interface between his PC and a SNES Joypad.

A SNES controller required three pins to communicate with a host: clock, data and latch. In his hack, [Robson]  connects the controller to the ISP interface using a small DIY adaptor and programs the AVR using the V-USB library. V-USB is a software USB library for small microcontrollers and comes in pretty handy in this instance.

[Robson] does a pretty good job of documenting the entire process of creating the interface which includes the USB HID code as well as the SNES joypad serial protocol. His hack works on both Windows and Linux alike and the code is available on GitHub for download.

Simple implementation like this project are a great starting point for anyone looking to dip their toes in the DIY USB device pool. Veterans may find a complete DIY joystick more up their alley and will be inspired by some plastic techniques as well.


Filed under: Arduino Hacks, hardware

Working with CAD programs involves focusing on the task at hand and keyboard shortcuts can be very handy. Most software packages allow the user to customize these shortcuts but eventually, certain complex key combination can become a distraction.

[awende] over at Sparkfun has created a Cherry MX Keyboard which incorporates all of the Autodesk Eagle Shortcuts to a single 4×4 matrix. The project exploits the Arduino Pro Mini’s ability to mimic an HID device over USB thereby enabling the DIY keyboard. Pushbuttons connected to the GPIOs are read by the Arduino and corresponding shortcut key presses are sent to the host machine.

Additional functionality is implemented using two rotary encoders and the Teensy encoder library. The first knob functions as a volume control with the push-button working as a mute button. The encoder is used to control the grid spacing and the embedded button is used to switch between imperial and metric units. The entire code, as well as the schematic, is available on GitHub for your hacking pleasure. It’s a polished project just ready for you to adapt.

The project can be extended to be used with other computer software such as Gimp and the keys may be replaced by capacitive touch sensors making it more sturdy. Bluetooth can be added to make things wireless and you can check out the Double Action Keyboard to extend functionality further.


Filed under: Arduino Hacks, peripherals hacks

The Arduino has inspired many a creative projects that can be beneficial to humanity. The Arduino Hamster Wheel Pedometer by [John Mueller] on the other hand is a creation that is meant for the cute furry rodent pets. When [John Mueller]’s daughter wanted to keep track of her hamster’s night-time strolls, her maker-dad saw it as an opportunity to get her involved in technology. The project consists of a hamster-wheel with a magnet that triggers a reed switch on completing a revolution. The entire assembly is custom-made and [John Mueller] does an excellent job documenting the build with a lot of clear images.

The wheel is affixed to a shaft with a ball bearing at one end and the entire thing is mounted on the side of the cage so that it can be removed with ease for maintenance. The reed switch is embedded in the wooden mounting block such that the connecting cables pass from inside the assembly. This prevents the hamster from coming in contact with the cabling or damaging it in any way. An LCD and the Arduino Uno are placed outside the cage and are used to display the revolutions of the wheel as well as the equivalent miles travelled.

The code for the Arduino is also supplied for anyone who wants to replicate the project and the video below shows the working of the project. The project could also be extended to count calories burned as well as running speed. This project is a prime example of how technology can be used to assist and is similar to the IoT Hamster Wheels that tweets every movement of the Hamster Life.


Filed under: Arduino Hacks

Drone racing is a very exciting sport, in which there is a lot of room for hackers and makers to add that special sauce into the mix. Usually the aerial finish line requires special race-timing hardware to do the lap counting, and there are timing gate transponders available for around $40. In his project CoreIR and CoreIR-Uplink, [Michael Rickert] decided to reverse engineer the IR Protocol that goes into these beacons and made a homebrew version that mimics the original. The transponders send a 7-digit number out repeatedly to a receiver at the finish line as the UAV passes by and that helps track how fast drone pilots flew around a race track. The hack involves flipping an IR LED ON and OFF with the correct timing, and [Michael Rickert] confesses that it was not as easy as he had imagined.

Using a logic analyser he was able to capture the modulated 38Khz carrier signal and extract the timing from the original beacon, but it took a number of iterations to get the code just right. The IRRemote library has a ‘sendRaw’ function which is quite helpful in these situations and was employed for the task. He experimented with a number of Arduino boards to power the project, before finally going with the Arduino Pro Mini. He has shared the code on github, along with photos of the finished hack which replaces the original circuit. The final sketches include functions to generate the 7-digit code to uniquely identify the quadcopter, which completes the hack in itself.

If that was not enough, he’s gone a step further by coding and sharing a desktop client as well, which turns this hack into a full-fledged project and should prove quite useful for drone racers on a budget. The app is written in NodeJS and packaged using the electron framework, a choice that makes for a very simple way to create cross-platform desktop applications.

A build tutorial is available for you to get started, and if drone racing seems a bit tame, check out Drone Wars for a little more carnage.


Filed under: Arduino Hacks, drone hacks

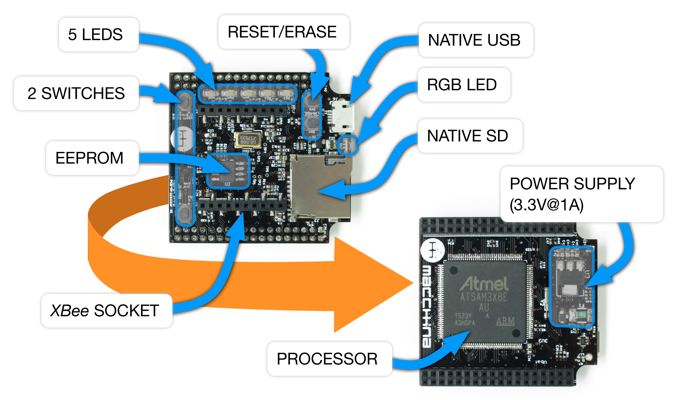
M2 by Macchina

We’re excited to announce the latest member of Arduino’s AtHeart program. M2 by Macchinanow live on Kickstarter–is an open-source, versatile development platform for hacking and customizing cars.

M2’s design is compact, modular, wirelessly connectable, and built on the popular Arduino Due. The device can be wired under the hood for a more permanent installation or plugged into the OBD2 port, enabling you to do virtually anything with your vehicle’s software. 

Macchina, a Minnesota-based company, has partnered with Arduino, Digi and Digi-Key to develop M2, and believes that its highly-adaptable hardware will most benefit hot rodders, mechanics, students, security researchers, and entrepreneurs by providing them access to the inner workings of their rides.

M2 accommodates a wide variety of wireless options thanks to its Digi XBee form-factor socket, allowing you to easily connect your car to the Internet, smartphone, satellites, or the cloud using BLE, WiFi, GSM, LTE, and other modules.

The platform can be programmed using the latest Arduino IDE, and is compatible with a number of software packages. Moreover, given its open-source nature, potential applications are bounded only by the collective imagination of the coding community.

Interested? Check out Macchina’s Kickstarter page to learn more or pre-order your M2 today!

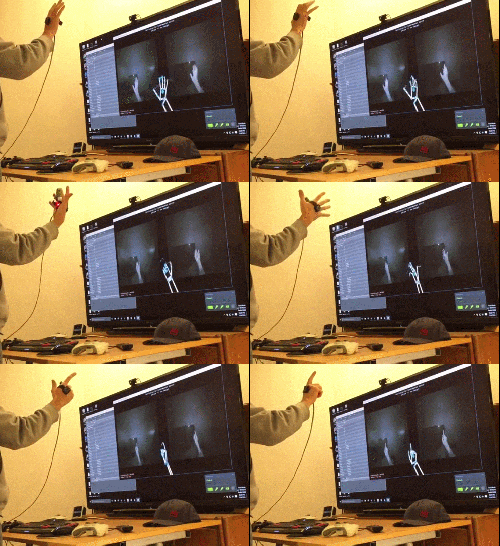
[Florian] has been putting a lot of work into VR controllers that can be used without interfering with a regular mouse + keyboard combination, and his most recent work has opened the door to successfully emulating a Vive VR controller in Steam VR. He uses Arduino-based custom hardware on the hand, a Leap Motion controller, and fuses the data in software.

We’ve seen [Florian]’s work before in successfully combining a Leap Motion with additional hardware sensors. The idea is to compensate for the fact that the Leap Motion sensor is not very good at detecting some types of movement, such as tilting a fist towards or away from yourself — a movement similar to aiming a gun up or down. At the same time, an important goal is for any added hardware to leave fingers and hands free.

emulation-demo-optimized[Florian]’s DIY VR hand controls emulate the HTC Vive controllers in Valve’s Steam VR Tracking with a software chain that works with his custom hardware. His DIY controller doesn’t need to be actively held because by design it grips the hand, leaving fingers free to do other tasks like typing or gesturing.

Last time we saw [Florian]’s work, development was still heavy and there wasn’t any source code shared, but there’s now a git repository for the project with everything you’d need to join the fun. He adds that “I see a lot of people with Wii nunchucks looking to do this. With a few edits to my FreePIE script, they should be easily be able to enable whatever buttons/orientation data they want.”

We have DIY hardware emulating Vive controllers in software, and we’ve seen interfacing to the Vive’s Lighthouse hardware with DIY electronics. There’s a lot of hacking around going on in this area, and it’s exciting to see what comes next.


Filed under: Arduino Hacks, Virtual Reality


  • Newsletter

    Sign up for the PlanetArduino Newsletter, which delivers the most popular articles via e-mail to your inbox every week. Just fill in the information below and submit.

  • Like Us on Facebook