Posts | Comments

Planet Arduino

Archive for the ‘thermal camera’ Category

Thermal cameras can cost well into the five-figure range if you’re buying high-resolution models with good feature sets. New models can be so advanced that their export and use is heavily controlled by certain countries, including the USA. If you just want to tinker at the low end, though, you don’t have to spend a lot of scratch. You can even build yourself something simple based on an Arduino Uno!

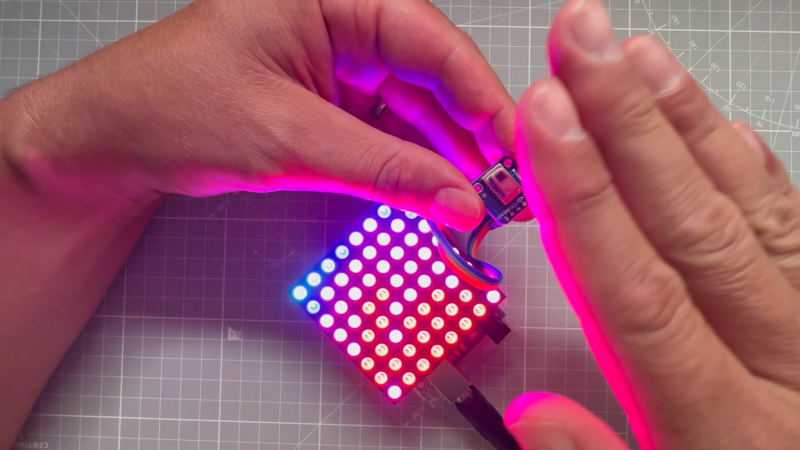
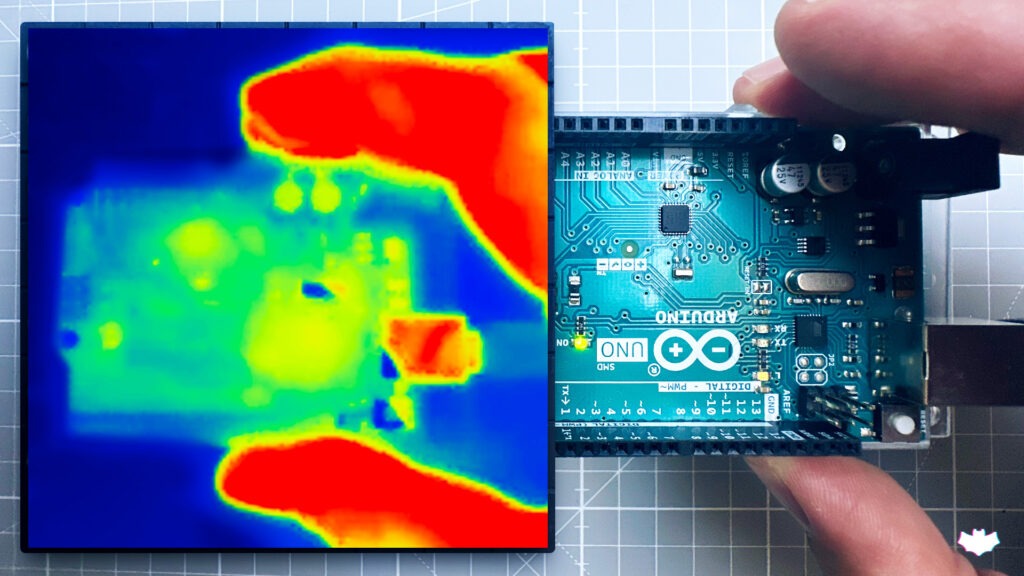
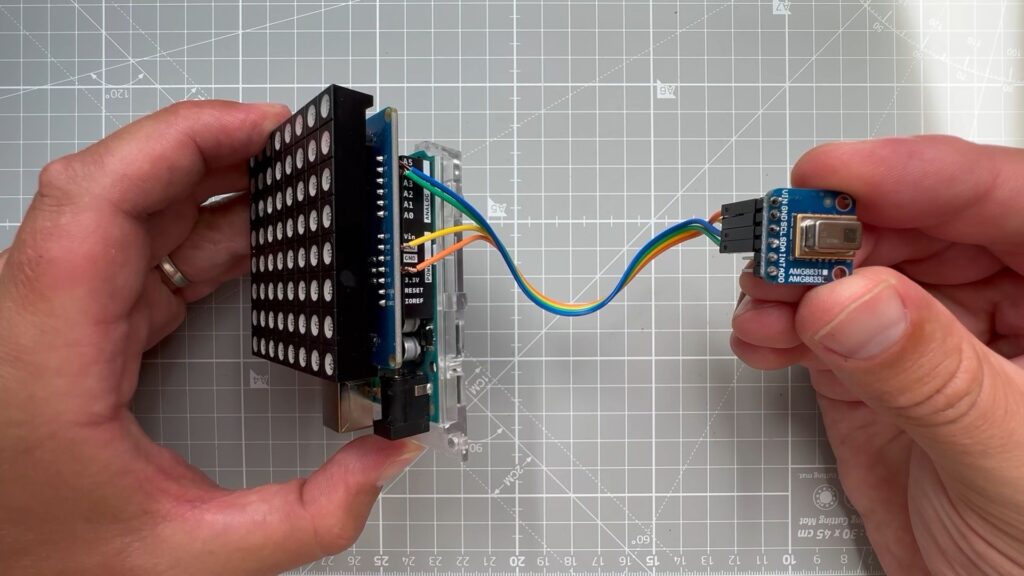
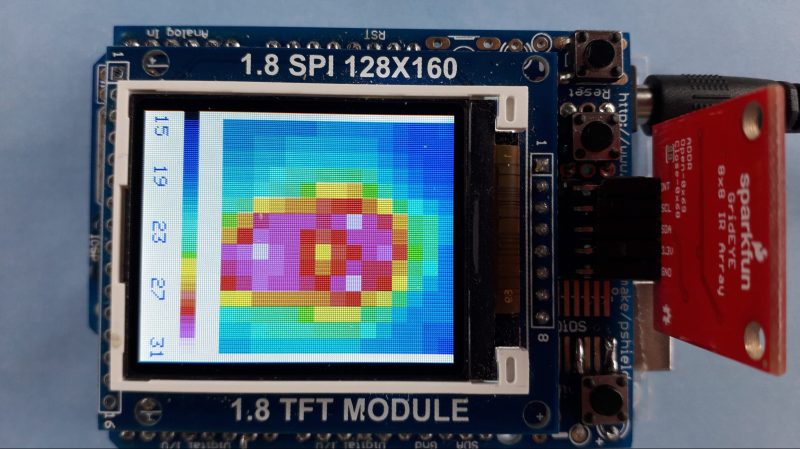
The build uses Panasonic’s cheap “Grid-EYE” infrared array as the thermal sensor, in this case, a model with an 8×8 array of thermopiles. It’s not going to get you any fancy images, especially at long range, but you can use it to get a very blocky kind of Predator-vision of the thermal radiation environment. It’s a simple matter of hooking up the Grid-EYE sensor to the Arduino Uno over I2C, and then spitting out the sensor’s data in a nice visual form on a cheap TFT screen.

It’s a great introduction to the world of thermal imaging. There’s no better way to learn how something works by building a working example yourself. We’ve featured a few similar projects before, too; it’s all thanks to the fact that thermal sensors are getting cheaper and more accessible than ever!

Do you know how you see those cheap telescopes at the department store? The box has beautiful pictures that probably came from the Hubble. What you will see is somewhat different. You have to carefully look at [upir’s] Arduino thermal camera project because it intersperses pictures of what you expect an 8×8 sensor will produce with images produced by a much better camera.

The actual project — watch the video below — is undoubtedly neat. An inexpensive 8×8 IR sensor and an 8X8 LED panel join to form a crude but usable thermal camera.

He leverages several ready-made libraries and walks through how and why he chose them and how he had to modify them. We enjoyed the demo of plotting HSV values to the LED array instead of the usual RGB values.

Given canned code to read the sensor and drive the LEDs, the rest is easy. Of course, like the dime-store telescope, you aren’t going to get amazing results. On the other hand, you probably have everything you need except the $20 sensor sitting around doing nothing anyway.

At around the ten-minute mark, he shows the same sensor in a commercial module that interpolates a higher resolution to an LCD. Still crude, so he also gives a quick review of a commercial camera that plugs into your phone. (You can ignore the video from here on if the stealth advertising bugs you.) We’ve actually looked at that camera before. We’ve also looked at some of the competition. While any of those will beat the 8×8 Arduino camera, they’ll cost more and won’t give you the satisfaction of building it, either.

Thermal cameras are very useful tools, because they let us see heat that would normally be invisible to our eyes. Maybe you’re working on a custom PCB and want to see if any of the components generate excessive heat. Or maybe you’re concerned that your car’s exhaust headers don’t heat evenly and you want to see what’s going on. Thermal cameras tend to be expensive, but Vaclav Krejci (AKA upir on YouTube) has a video that explains how you can build your own low-resolution thermal camera without breaking the bank.

Krejci’s design only has an 8×8 resolution, which is the maximum native output of the AMG8833 infrared sensor array. By conventional digital camera standards, that is too low to be usable. But it is enough for some simple tasks you might want to perform with a thermal camera. At that resolution, the device will act almost like a non-contact thermometer that shows you 64 points. You can identify hot IC chips and even see large thermal currents.

The only components you need to replicate Krejci’s design are an Arduino UNO Rev3 board, an AMG8833 infrared sensor module, and an 8×8 RGB LED matrix (Krejci used a Sunfounder model). The sketch gathers the 64 values from the infrared sensor and then uses those to set the hue of each pixel in the LED matrix. The Colorduino library lets you set pixel colors using the HSV (hue, saturation, value) model, which makes it easy to change the color by adjusting the hue of each pixel.

The result is an LED display that shows a heat map, with cool areas being blue and very hot areas being red. The resolution is low, but each pixel has decent precision.

The post How to build a low-resolution thermal camera at a low cost using Arduino appeared first on Arduino Blog.

Need a quick way to tell your temperature before work tomorrow? Student maker [The Marpe] recently fashioned a sleek home-use thermal camera that even looks like a point and shoot. It works as an Android hardware add-on by integrating the readings from a MLX90640 far-infrared (FIR) thermal sensor with a STM32F042F6Px microcontroller. All this connects to an Android application via USB (MicroUSB or Type C).

On the app, users are able to view, take photos, and display the resulting thermal images from the open thermal camera. The code for the open Android application is also available on his GitHub.

The FIR sensors contain a small array of IR pixels, integrated to measure the ambient temperature of the internal chip, and supply sensor to measure the VDD. Each pixel on the sensor array responds to the IR energy focused on it to produce an electronic signal, which is processed by the camera processor to create a map of the apparent temperature of the object. The outputs of the sensors and VDD are stored in an internal RAM and are accessible through 3.3V I2C. They’re not only low-cost and fairly high resolution, but also available by order on Digi-Key.

The microcontroller is based on the STM32 platform, with 32-bit performance, low-power operation (at 2V to 3.6V and 48 MHz) and is fairly low-cost. The custom-designed PCBs are fitted inside a 3D-printed casing with M2.5 inserts to ease assembly. [The Marpe] used an Esra soldering iron to create a heat insert tool for easier assembly and more consistent results with the heat inserts, which made for a nicer overall finish.

The project has since been presented at the Ljublana Mini Maker Faire in Slovenia and the Trieste Mini Maker Faire in Italy. Here, the open thermal camera is being tested out on a faulty PCB with a shorted component, showing the location of the short on the Android application’s thermal camera display.

Other uses for the camera could be home insulation inspection, water leakage detection, wildlife observation, or even figuring out if your soldering iron is hot enough to use. We’ll say it’s a pretty useful DIY project!


  • Newsletter

    Sign up for the PlanetArduino Newsletter, which delivers the most popular articles via e-mail to your inbox every week. Just fill in the information below and submit.

  • Like Us on Facebook