Posts | Comments

Planet Arduino

Archive for the ‘Homebrew Computer’ Category

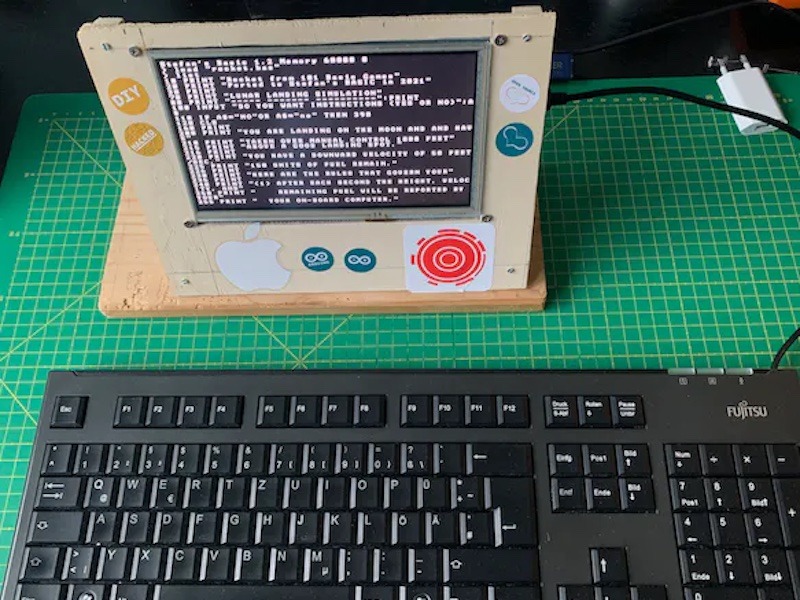
As a continuation from his previous Arduino BASIC interpreter project, Stefan Lenz wanted to take things a step further by recreating a home computer from the 1980s with an Arduino Due board and just a few other components. His system combines a 7″ 800 by 480px TFT screen with an SD card reader acting as the disk, along with a PS/2 port for connecting a keyboard. 

He began by mounting the TFT display shield to the Arduino by slotting it in place and inserting an SD card to function as the external disk since floppy drives have long since disappeared and would be far too unwieldy. After soldering some additional wires to the SPI and I2C bus pins, a level shifter was attached to two digital pins that serve as the data and clock lines for the external PS/2 port. 

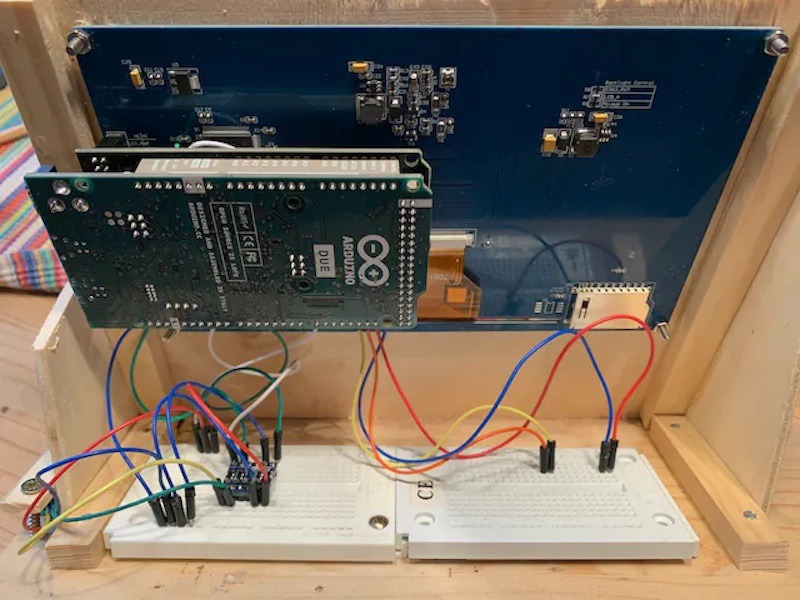
Most of the “magic” in this project comes from the programming which handles everything from reading inputs to showing graphics on the LCD and even interfacing with other peripherals over either I2C or SPI. All of the code needed for this retro home computer can be found here in Lenz’s tinybasic repository, which contains a plethora of example projects and demonstrations that can be run/modified.

The post ’80s-style home computer made from scratch using an Arduino Due appeared first on Arduino Blog.

The MOS Technology 6502 was one of the most popular processors of the 8-bit era. It found a home in legendary computers like the Commodore 64, Acorn Electron, BBC Micro, and Apple II. Even the NES had a custom implementation of the 6502. Because the 6502 is so well documented, it is possible for today’s enthusiasts to use it in their own homebrew computers. To enhance their DIY 6502 computer, rehsd used an Arduino to add USB mouse support.

This homebrew computer is a Ben Eater design, which rehsd modified and created a PCB to streamline. It operates like most computers from the late ’70s and early ’80s. Computers back then didn’t support USB mice — the USB standard wouldn’t even exist until 1996. Joysticks were common, but graphical user interfaces and the mice to support them were not. So rehsd had to find a way to get a USB mouse talking to his 6502 processor. He settled on an Arduino Mega as an adapter.

The mouse connects to the Arduino through a USB host shield, which lets the board read data coming from standard USB devices. The Arduino runs a sketch that polls the mouse data and then sends that data to the 6502 through the VIA (Versatile Interface Adapter). It first triggers interrupts on the VIA and then writes the mouse data to the VIA ports. Code written in assembly runs on the 6502 and reads the mouse data after the interrupts. To demonstrate the mouse, rehsd wrote a simple drawing program that would have been a hit in 1978.

The post Arduino enables USB mouse support on custom 6502 homebrew computer appeared first on Arduino Blog.

When building your own homebrew computer, everything is a challenge. Ultimately, that’s kind of the point. If you didn’t want to really get your hands dirty with the nuts and bolts of the thing, you wouldn’t have built it in the first place. For example, take the lengths to which [rehsd] was willing to go in order to support standard USB mice on their 6502 machine.

Code for mapping mouse movement to digital output.

The idea early on was to leverage existing Arduino libraries to connect with a standard USB mouse, specifically, the hardware would take the form of an Arduino Mega 2560 with a USB Host Shield. There was plenty of code and examples that showed how you could read the mouse position and clicks from the Arduino, but [rehsd] still had to figure out a way to get that information into the 6502.

In the end, [rehsd] connected one of the digital pins from the Arduino to an interrupt pin on the computer’s W65C22 versatile interface adapter (VIA). Then eleven more digital pins were connected to the computer, each one representing a state for the mouse and buttons, such as MOUSE_CLICK_RIGHT and MOUSE_LEFT_DOWN.

Admittedly, [rehsd] says the mouse action is far from perfect. But as you can see in the video after the break, it’s at least functional. While the code could likely be tightened up, there’s obviously some improvements to be made in terms of the electrical interface. The use of shift registers could reduce the number of wires between the Arduino and VIA, which would be a start. It’s also possible a chip like the CH375 could be used, taking the microcontroller out of the equation entirely.

From classic breadboard builds to some impressively practical portable machines, we’ve seen our fair share of 6502 computers over the years. Despite the incredible variation to be found in these homebrew systems, one thing is always the same: they’re built by some of the most passionate folks out there.

[Thanks to Jim for the tip.]

Richard of ARITH-MATIC had the idea to build a 4-bit computer based on 7400 series ICs (like the 74HC273, 74HC193, and 74HC125), but other responsibilities got in the way of this becoming a reality for quite some time. Finally, with the Retro Computer Festival at the Centre for Computing History in Cambridge, England held earlier this month, he went ahead and started the project in hopes of creating a working computer in under 30 days.

The resulting homebrew CPU is known as the ‘Cambridge-1,’ comprised mostly of 7400 series ICs, wiring, and an SRAM chip for storage carefully arranged on a set of breadboards. In addition to the other components, an Arduino Micro is also implemented. While not technically a retro device, the Arduino allowed him to “change the control logic on-the fly,” and gave him the flexibility to finish the project in his compressed time scale.


  • Newsletter

    Sign up for the PlanetArduino Newsletter, which delivers the most popular articles via e-mail to your inbox every week. Just fill in the information below and submit.

  • Like Us on Facebook