Posts | Comments

Planet Arduino

Archive for the ‘Circuit Sculpture’ Category

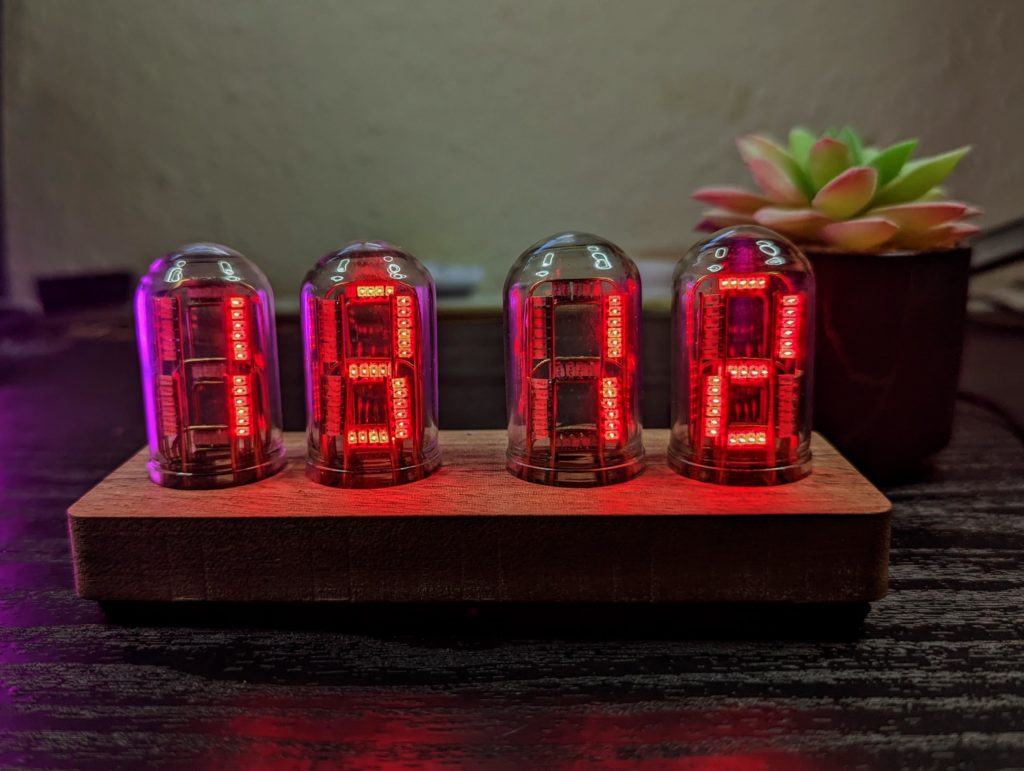
Everyone loves a nice Nixie tube clock, but Nixie tubes are expensive and difficult to find. Even if you can source a working set, driving the vintage tubes is a complicated undertaking by modern standards. Nixie tubes require high voltage and multiplexing, which is a pain. To solve these problems while retaining the aesthetic, 4Dcircuitry built this clock that utilizes freeform circuit faux Nixie tubes.

Each of the “Nixie tubes” used in this project is actually made entirely with 1206 SMD (surface-mount device) LEDs. But instead of soldering those onto PCBs, 4Dcircuitry attached them to formed 0.8mm brass rods to create tiny circuit sculptures. Those plug into custom PCBs which arrange the circuit sculptures, each a single segment, in a horizontal stack. Glass tubes cover each stack, making them look like Nixie tubes when viewed from the front.

An Arduino Nano board controls the LEDs. It doesn’t have enough pins for every segment, so the circuit uses shift registers. A DS3231 RTC (real-time clock) module provides accurate timekeeping. The base of the unit is a piece of wood milled on a CNC router, adding to the minimalist retro aesthetic. While it isn’t a requirement, 3D-printed jigs help to form the brass rods into the proper shapes, which would be difficult to do well entirely by hand.

The post This beautiful clock features circuit sculpture faux Nixie tubes appeared first on Arduino Blog.

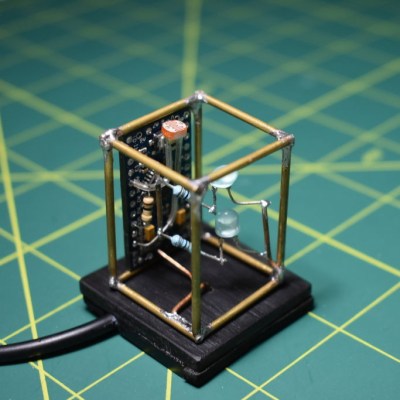
If you’re planning to get into circuit sculpture one of these days, it would probably be best to start with something small and simple, instead of trying to make a crazy light-up spaceship or something with a lot of curves on the first go. A small form factor doesn’t necessarily mean it can’t also be useful. Why not start by making a small automatic night light?

The circuit itself is quite simple, especially because it uses an Arduino. You could accomplish the same thing with a 555, but that’s going to complicate the circuit sculpture part of things a bit. As long as the ambient light level coming in from the light-dependent resistor is low enough, then the two LEDs will be lit.

We love the frosted acrylic panels that [akshar1101] connected together with what looks like right angle header pins. If you wanted to expose the electronics, localize the light diffusion with a little acrylic cover that slips over the LEDs. Check it out in the demo after the break.

There’s more than one way to build a glowing cuboid night light. The Rubik’s way, for instance.

We sure wish we’d had a teacher like [Volos Projects]. He built this beautiful circuit sculpture to teach his students how to count in binary and convert it to decimal and hexadecimal. If you don’t already know binary, you get to learn it on DIP switches and a dead-bugged ATMega328 in the video after the break. Lucky you!

Once the students have the hang of entering binary input on the switches, they can practice it on the four-banger calculator. This educational sculpture can also take text input and scroll it, but it takes a bit of work. You have to look up the ASCII value of each character, convert the decimal to binary, and program it in with the switches. There’s one more function on the menu — a one-player PONG game to help the students relax after a long day of flipping switches.

Funny enough, this project came to be after [Volos Projects] came upon the DIP switch in his parts box and wasn’t quite sure what it was called. How great is it that he learned something about this part, and then used that knowledge to build this machine that uses the part to teach others? It’s surely the best fate that parts bin curiosities can hope for.

Don’t have the patience for circuit sculpture? You can make a pretty nice binary calculator with a bit of paper and a lot of compressed air.

Via [r/arduino]

Do you want to make your own springs? Yeah, that’s what we thought. Well, blow the dust off of that spare Arduino and keep reading. A few months ago, we let you know that renowned circuit sculptor [Jiří Praus] was working on a precision wire-bending machine to help him hone his craft. Now it’s real, it’s spectacular, and it’s completely open source.

Along with that ‘duino you’ll need a CNC shield and a couple of NEMA 17 steppers — one to feed the wire and one to help bend it. Before being bent or coiled into springs, the wire must be super straight, so the wire coming off the spool holder runs through two sets of rollers before being fed into the bender.

[Jiří]’s main goal for this build was precision, which we can totally get behind. If you’re going to build a machine to do something for you, ideally, it should also do a better job than you alone. It’s his secondary goal that makes this build so extraordinary. [Jiří] wanted it to be easy to build with commonly-available hardware and a 3D printer. Every part is designed to be printed without supports. Bounce past the break to watch the build video.

You can also make your own springs on a lathe, or print them with hacked g-code.


  • Newsletter

    Sign up for the PlanetArduino Newsletter, which delivers the most popular articles via e-mail to your inbox every week. Just fill in the information below and submit.

  • Like Us on Facebook