Posts | Comments

Planet Arduino

Archive for the ‘guitar’ Category

Playing the guitar requires speed, strength, and dexterity in both hands. Depending on your mobility level, rocking out with your axe might be impossible unless you could somehow hold down the strings and have a robot do the strumming for you.

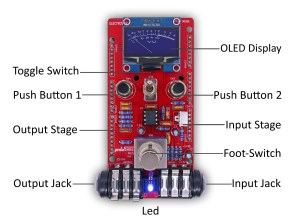
[Jacob Stambaugh]’s Auto Strummer uses six lighted buttons to tell the hidden internal pick which string(s) to strum, which it does with the help of an Arduino Pro Mini and a stepper motor. If two or more buttons are pressed, all the strings between the outermost pair selected will be strummed. That little golden knob near the top is a pot that controls the strumming tempo.

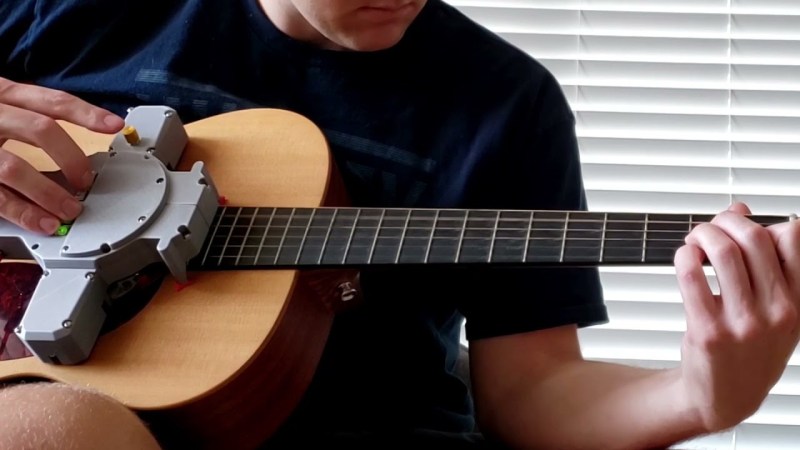
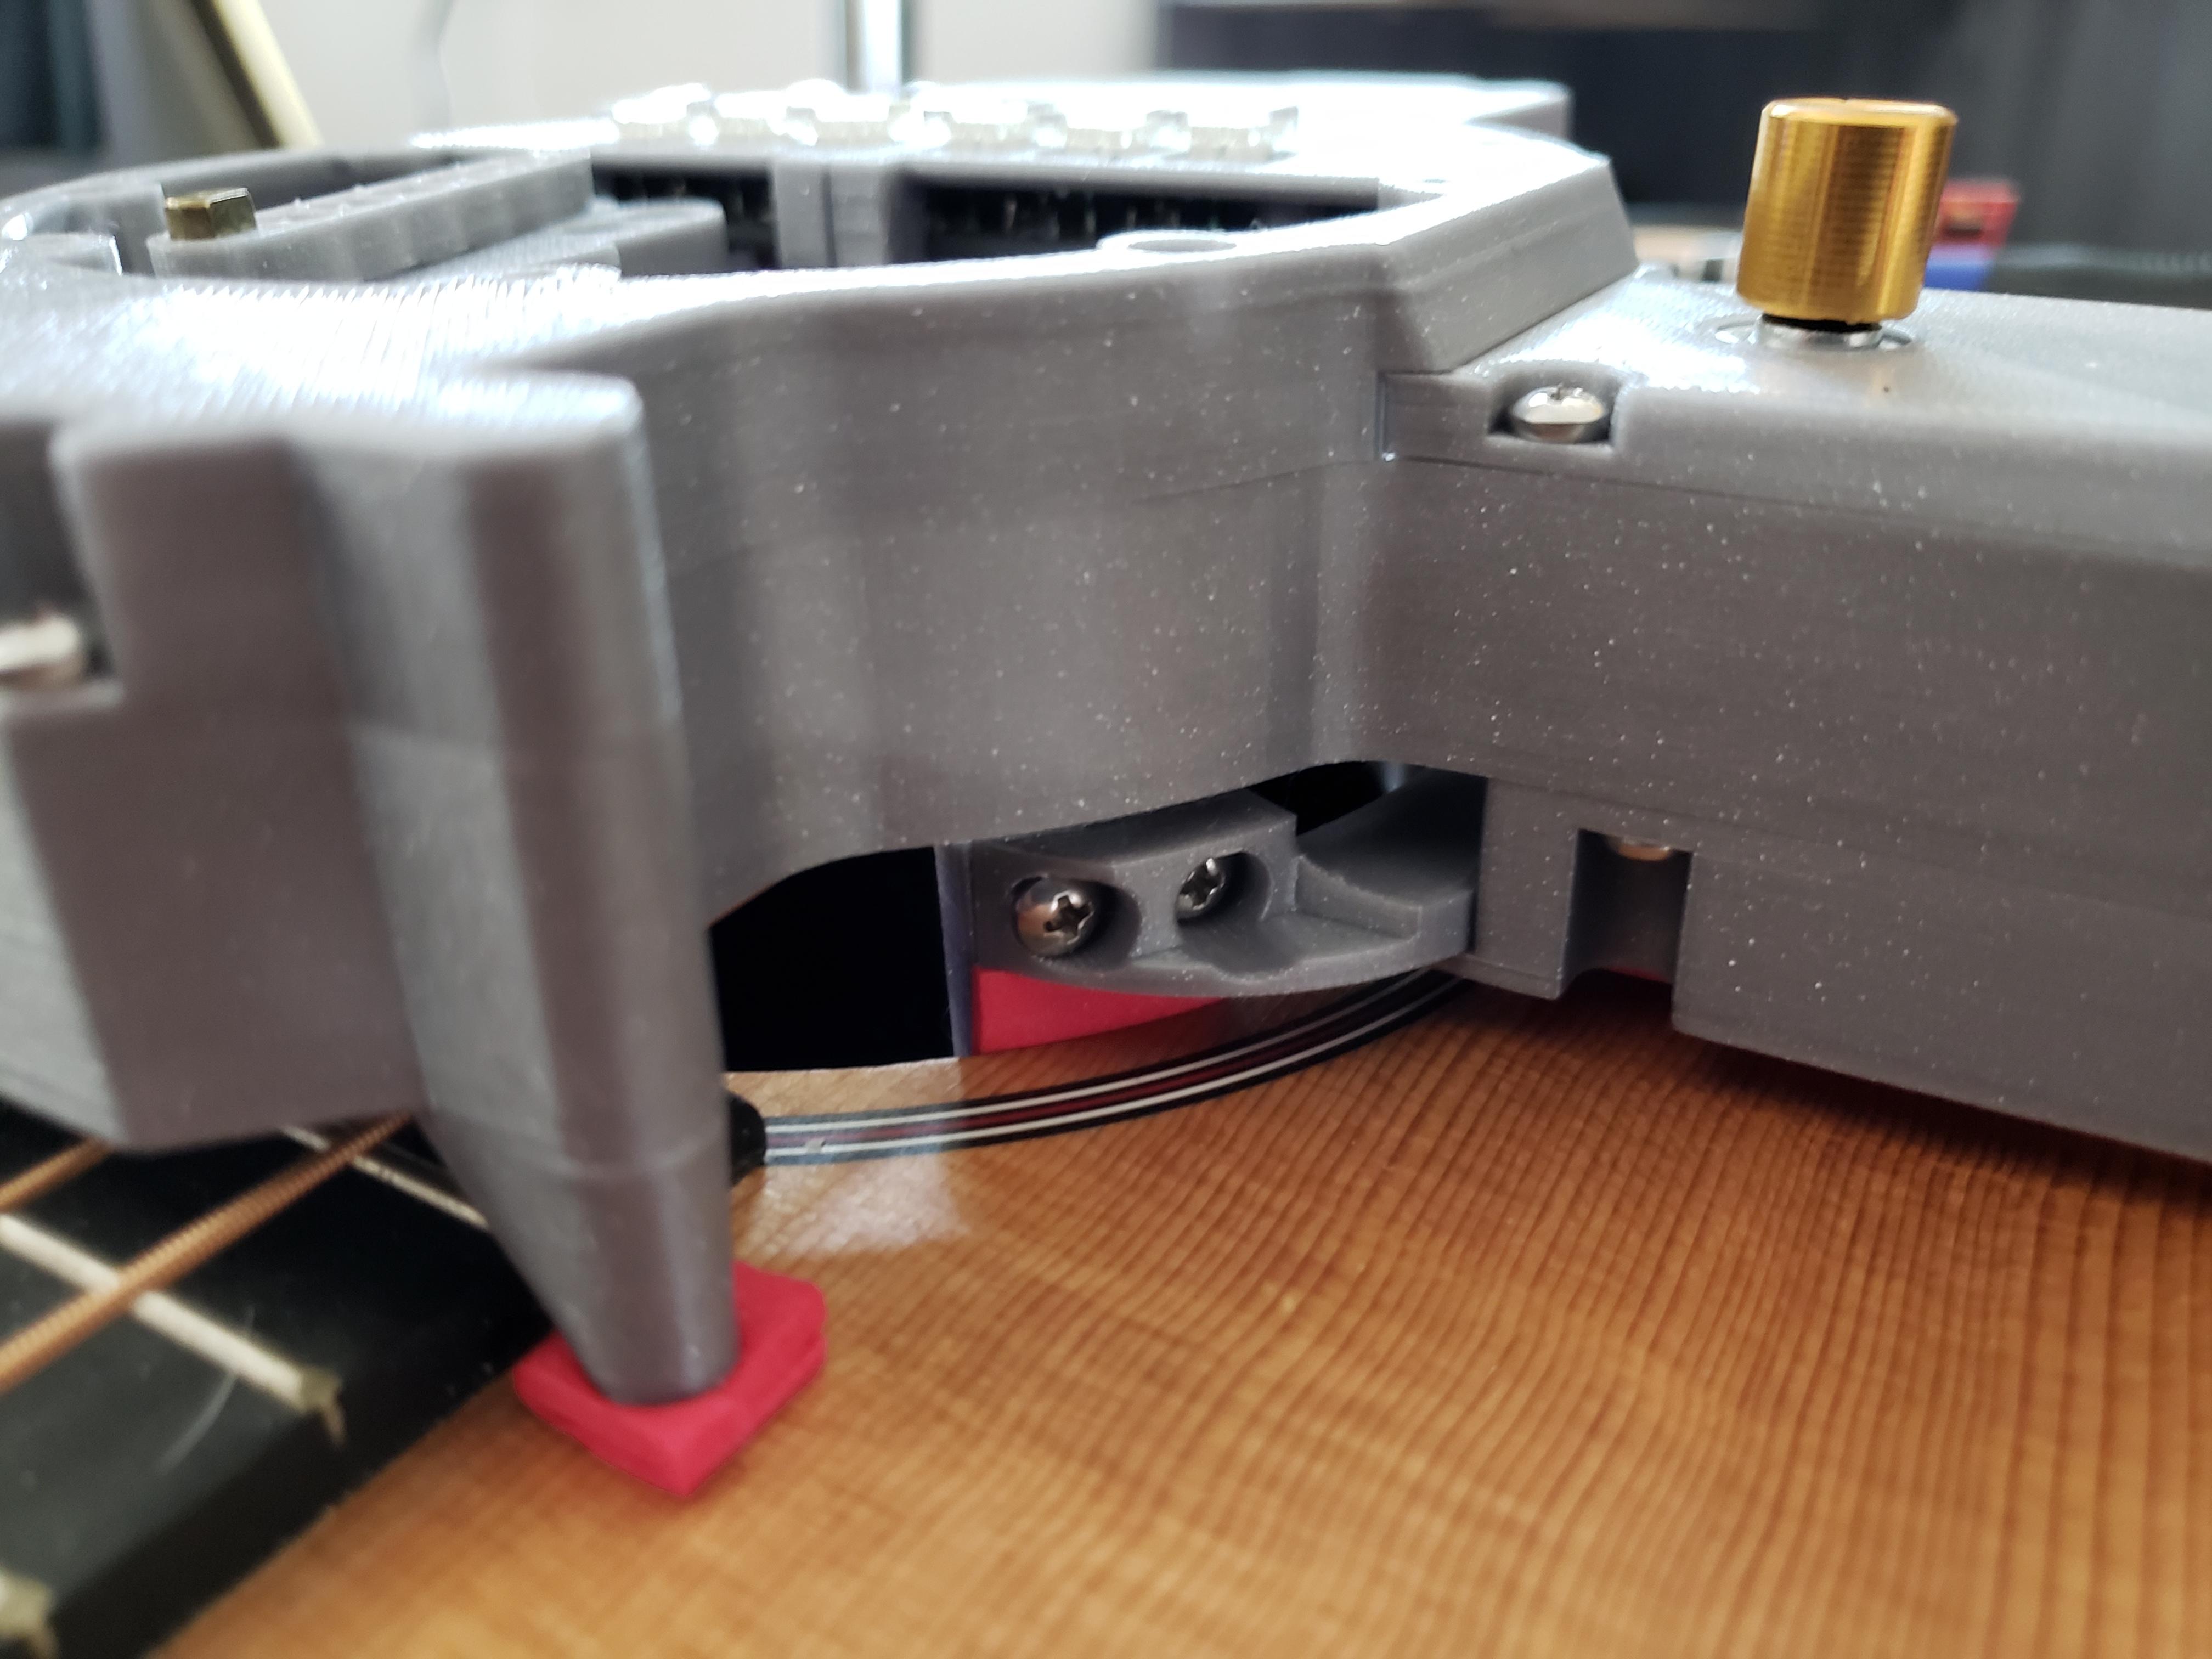
[Jacob]’s impressive 3D-printed enclosure attaches to the guitar with a pair of spring-loaded clamps that grasp the edge of the sound hole. But don’t fret — there’s plenty of foam padding under every point that touches the soundboard.

We were worried that the enclosure would block or muffle the sound, even though it sits about an inch above the hole. But as you can hear in the video after the break, that doesn’t seem to be the case — it sounds fantastic.

Never touched a real guitar, but love to play Guitar Hero? There’s a robot for that, too.

One of our favorite things about the rise of hobbyist development ecosystems such as the Arduino is that it’s now possible to make a MIDI controller out of almost anything, as long as you have the the shields and the dedication. We’re glad that [James Bruton] takes the occasional break from making robots to detour into instrument making, because his latest creation turns it up to 11.

This awesome guitar uses a barcode scanner to play notes, and various arcade controls to manipulate those notes. The barcodes themselves scan as ASCII values, and their equivalent integers are sent to an external MIDI device. This futuristic axe is built on an Arduino Mega, with a USB shield for the barcode scanner, and a MIDI shield on top that [James] connects to various synths in the video after the break.

In between shooting barcodes, the right hand also controls octave shifting and changing MIDI channels with the joystick, and doing pitch-bends with the rotary encoder. The array of arcade buttons on the bottom neck let him switch between single player for monophonic synths, and multiplayer for polys. The other three buttons are press-and-scan programmable single-note sounders that assist in chord-making and noodling.

We particularly dig the construction, which is a combination of 20/20 and 3D printed boxes. [James] found some angled PVC to serve as fretboards for the four necks, and a nice backgrounds for bar codes.The only thing we would change is the native beep of the barcode scanner — either silence it forever or make it mutable, because it doesn’t jive with every note. It might be nice to get the gun to scan continuously so [James] doesn’t get trigger finger. Or better yet, build the scanner into a glove.

Want to do something more useful with that barcode scanner in your parts bin? Use it to manage your household inventory. But first, reacquaint yourself with the history of the humble barcode as presented by [Adam Fabio].

Thanks for the tip, [baldpower]!

Effects pedals: for some an object of overwhelming addiction, but for many, an opportunity to hack. Anyone who plays guitar (or buys presents for someone who does) knows of the infinite choice of pedals available. There are so many pedals because nailing the tone you hear in your head is an addictive quest, an itch that must be scratched. Rising to meet this challenge are a generation of programmable pedals that can tweak effects in clever ways.

With this in mind, [ElectroSmash] are back at it with another open source offering: the pedalSHIELD MEGA. Aimed at musicians and hackers who want to learn more about audio, DSP and programming, this is an open-hardware/open-software shield for the Arduino MEGA which transforms it into an effects pedal.

The hardware consists of an analog input stage which amplifies and filters the incoming signal before passing it to the Arduino, as well as an output stage which does the DAC-ing from the Arduino’s PWM outputs, and some more filtering/amplifying. Two 8-bit PWM outputs are used simultaneously to make pseudo 16-bit resolution — a technique you can read more about in their handy forum guide.

The list of effects currently implemented covers all the basics you’d expect, and provides a good starting point for writing custom effects. Perhaps a library for some of the commonly used config/operations would be useful? Naturally, there are some computational constraints when using an Arduino for DSP, though it’s up to you whether this is a frustrating fact, or an opportunity to write some nicely optimised code.

[ElectroSmash] don’t just do pedals either: here’s their open source guitar amp.

[Clare] isn’t the most musically inclined person, but she can strum a guitar. Thanks to a little help from an Arduino, she doesn’t even have to do that.

She built the strumbot, which handles the strumming hand duties of playing the guitar. While [Claire] does believe in her strumbot, she didn’t want to drill holes in her guitar, so hot glue and double-sided foam tape were the order of the day.

The business end of the strumbot is a micro servo. The servo moves two chopsticks and draws the pick across the strings. The tiny servo surprisingly does a great job getting the strings ringing. The only downside is the noise from the plastic gears when it’s really rocking out.

Strumbot’s user interface is a 3D-printed case with three buttons and three LEDs. Each button activates a different strum pattern in the Arduino’s programming. The LEDs indicate the currently active pattern. Everything is powered by a USB power pack, making this a self-contained hack.

[Clare] was able to code up some complex strum patterns, but the strumbot is still a bit limited in that it only holds three patterns. It’s good enough for her rendition of “Call Me Maybe”, which you can see in the video after the break. Sure, this is a simple project, not nearly as complex as some of the robotic guitar mods we’ve seen in the past. Still, it’s just the ticket for a fun evening or weekend project – especially if you’re introducing the Arduino to young coders. Music, hacking, and modding – what more could you ask for?


There’s a lot more to learning how to play the guitar than just playing the right notes at the right time and in the right order. To produce any sound at all requires learning how to do completely different things with your hands simultaneously, unless maybe you’re a direct descendant of Eddie Van Halen and thus born to do hammer ons. There’s a bunch of other stuff that comes with the territory, like stringing the thing, tuning it, and storing it properly, all of which can be frustrating and discouraging to new players. Add in the calluses, and it’s no wonder people like Guitar Hero so much.

[Jake] and [Jonah] have found a way to bridge the gap between pushing candy colored buttons and developing fireproof calluses and enough grip strength to crush a tin can. For their final project in [Bruce Land]’s embedded microcontroller design class, they made a guitar video game and a controller that’s much closer to the experience of actually playing a guitar. Whether you’re learning to play for real or just want to have fun, the game is a good introduction to the coordination required to make more than just noise.

In an interesting departure from standard stringed instrument construction, plucking is isolated from fretting.  The player fingers notes on four strings but plucks a special, fifth string with a conductive pick that closes the plucking circuit. By contrast, the fretting strings are normally high. When pressed, they contact the foil-covered fingerboard and the circuit goes low. All five strings are made of carbon-impregnated elastic and wrapped with 30AWG copper wire.

All five strings connect to an Arduino UNO and then a laptop. The laptop sends the signal to a Bluefruit friend to change Bluetooth to UART in order to satisfy the PIC32. From there, it goes out via 2-channel DAC to a pair of PC speakers. One channel has the string tones, which are generated by Karplus-Strong. To fill out the sound, the other DAC channel carries undertones for each note, which are produced by sine tables and direct digital synthesis. There’s no cover charge; just click past the break to check it out.

If you’d like to get into playing, but don’t want to spend a lot of money to get started, don’t pass up those $30-$40 acoustics for kids, or even a $25 ukulele from a toy store. You could wind your own pickup and go electric, or add a percussive solenoid to keep the beat.


Filed under: Arduino Hacks, Microcontrollers, Musical Hacks

Construct an Arduino guitar pedal stompbox with easy-to-find parts and you'll be having fun creating your own sounds in not time.

Read more on MAKE

The post Build an Arduino Guitar Pedal Stompbox appeared first on Make: DIY Projects and Ideas for Makers.

[fichl] plays electric guitar, and with that hobby comes an incredible amount of knob twisting and dial turning. This comes at a cost; he can’t change the settings on his small amp without taking his hands off the guitar. While larger, more expensive amps have multiple channels and footswitches, this tiny amp does not. Instead of upgrading, [fichl] came up with a device that turns his single channel amp into a completely programmable one, with just an Arduino and a handful of servos.

The amp in question – an Orange Dark Terror head – has just three knobs on the front of the chassis, volume, shape, and gain. [fichl] had the idea of controlling these knobs electronically, and the simplest solution he came up with is cheap hobby servos. These servos are mounted in an aluminum box, and mount to the knobs with a few shaft couplings.

The footswitch is the brains of the setup, with three buttons, four LEDs, and a DIN-5 output jack that delivers power, ground, and three PWM signals to the servo box. With the help of an Arduino Nano, [fichl] can change any of the knobs independently, or switch between twelve programmed settings. It’s an interesting setup, and something that could serve as a prototype for a much larger system on a much larger amp.


Filed under: Arduino Hacks, musical hacks

coverNicole Grimwood is working towards a dual degree in engineering from Columbia University and liberal arts from Scripps College.

Read more on MAKE

The post Interview: NIcole Grimwood on Electronics (and Cake) appeared first on Make: DIY Projects, How-Tos, Electronics, Crafts and Ideas for Makers.

Jul
13

Solenoid drum machine and bass running on Arduino

arduino, arduino uno, community, Featured, guitar, Hardware, music, prototyping, solenoids, uno Comments Off on Solenoid drum machine and bass running on Arduino 

solenoidbass
Arduino user named Muiota shared with us an experimental DIY music project running on Arduino Uno and  solenoids.

Take a look at the video to hear how it sounds:

Rune wirelessly rocking Maker Faire TrondheimOriginally prototyped using an Arduino, Aalberg Audio's guitar delay pedal and Bluetooth LE remote control now looks like a product, not a prototype.

Read more on MAKE


  • Newsletter

    Sign up for the PlanetArduino Newsletter, which delivers the most popular articles via e-mail to your inbox every week. Just fill in the information below and submit.

  • Like Us on Facebook