Posts | Comments

Planet Arduino

Archive for the ‘CPU Monitor’ Category

There is an old joke response in the programming industry for whenever you’re caught slacking off: “I’m waiting for the code to compile.” That still holds up, because even today’s blazing fast computers can take ages to compile. That’s true even when the compiler can run tasks across multiple CPU cores. To find out if that is as efficient as it could be, Lex built this analog gauge array that displays the utilization of each core.

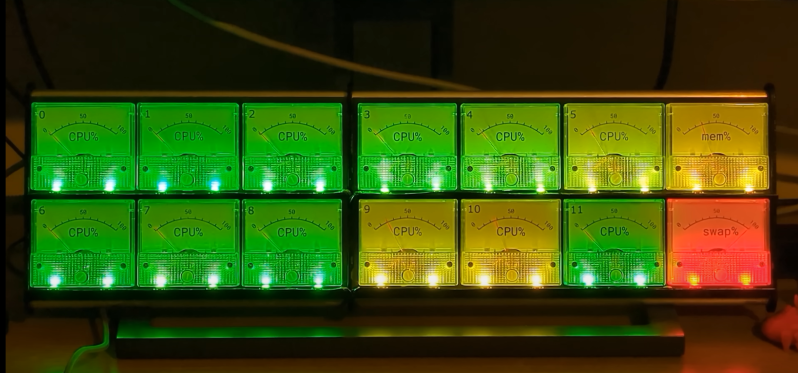
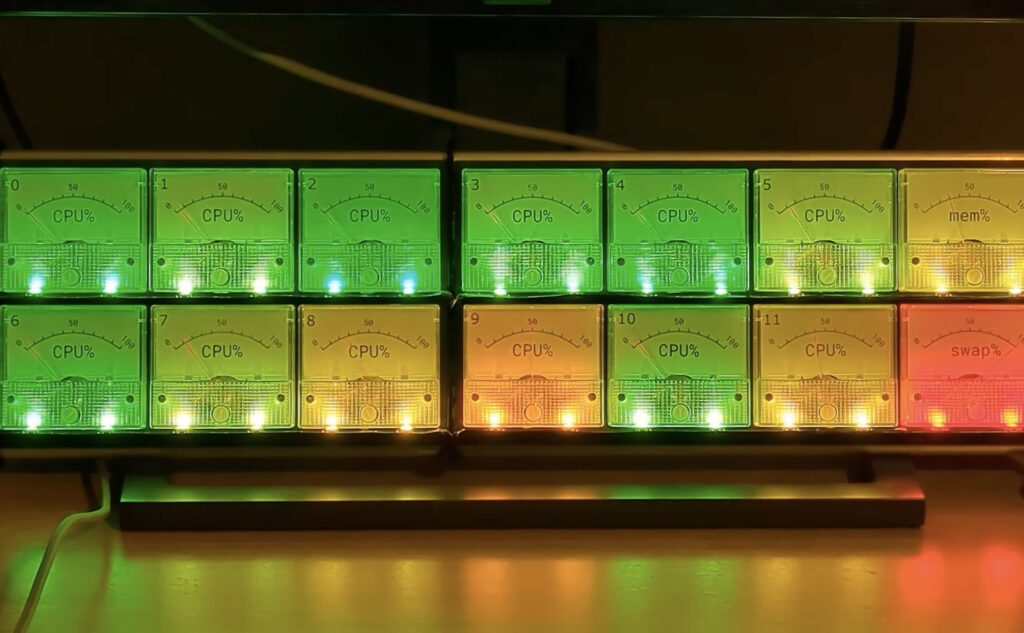
Lex created this for their own computer, which has a 12-core CPU. There is one gauge for each of those cores, plus an additional gauge for swap memory and another for RAM. The same basic idea could apply to computers that have CPUs with fewer cores — the device would just need a number of gauges equal to the number of CPU cores, plus two.

The device contains an Arduino Mega 2560 board and it receives utilization data through serial from a PC running a custom Rust program. That program uses some resources, but it is trivial compared to everything else. The Arduino employs pulse-width modulation (PWM) to control the positions of the gauge needles. There is also a strip of WS2812B individually addressable RGB LEDs illuminating the gauges, with the colors corresponding to utilization. So high utilization will move a gauge’s needle to the right and cause it to light up red.

This gives Lex a quick and easy way to visualize how their computer distributes tasks across the CPU cores. That is interesting when compiling code, but it is also useful for other jobs that attempt to parallelize tasks.

The post Analog gauge array helps evaluate compilation efficiency appeared first on Arduino Blog.

[Lex] over at Computing: The Details loves to make fun projects. Recently, he’s created a hardware CPU monitor that allows him to see how well his PC is parallelizing compile tasks at a glance. The monitor is built from 14 analog meters, along with some WS2812 RGB LEDs.

Each meter represents a core on [Lex]’s CPU, while the final two meters show memory and swap usage. The meters themselves are low-cost 5 mA devices. Of course, the original milliamps legends wouldn’t do much good, so [Lex] designed and printed graduations that glue over the top. The RGB LED strip is positioned so two LEDs fit under each meter. The LEDs allow a splash of color to draw attention to the current state of the machine. The whole bank going red would sure get our attention!

The system is controlled by an Arduino Mega, with the meters driven using the PWM pins. The only extra part is a 1 K resistor. The Arduino wrangles the LEDs as well. Sadly [Lex] did not include his software. He did describe it though. Basically he’s using a Rust program to call systemstat, obtaining the current CPU utilization data in Linux. A bit of math converts this into pointer values and LED colors. The data is then sent via USB-serial to the Arduino Mega. The software savvy will say it’s pretty easy to replicate, but the hardware only hackers among us might need a bit of help.

This isn’t the first custom meter we’ve seen on Hackaday. Your author’s first project covered by Hackaday was for a meter created using an automotive gauge stepper motor. I didn’t include source code either – but only because [Guy Carpenter]’s Switec X25 library had me covered.

Thanks for the tip, [TubeTime]!

Iron Man Arc Reactors have brought joy to makers of all ages, whether as something cool on a movie screen, as a hacked together light assembly, or even a cosplay prop created from a DIY kit. Michael Klements decided to turn one of these kits into something more, by hooking it up to act as a CPU performance monitor for his computer.

His handy desktop device runs a Python script on the monitored PC, which passes along CPU information over serial to an Arduino Uno. The Uno pulses the Arc Reactor in proportion to the computer load using a transistor, with higher frequency pulses indicating a heavily loaded CPU and lower frequencies for lower CPU usage. An OLED display is also implemented for numerical feedback, and everything is housed in a nice 3D-printed stand.

More details, including files and code, are available in Klements’ blog post


  • Newsletter

    Sign up for the PlanetArduino Newsletter, which delivers the most popular articles via e-mail to your inbox every week. Just fill in the information below and submit.

  • Like Us on Facebook