Posts | Comments

Planet Arduino

Archive for the ‘game controllers’ Category

Steven Goodwin wrote a JavaScript game called Space Bounce where a character in a space suit has to jump from one side of a mine shaft to another, collecting roughly star-shaped objects, while avoiding spikes. It’s a simple yet rather entertaining game, and since there’s really only one type of interaction (jumping) he decided to make things a bit more interesting by adding a physical controller.

His custom device employs a pair of pressure mats on the ground to sense a player standing on one or the other, and when one’s feet leave the mat, the on-screen player jumps to the opposite wall. Players must then recover and balance on the other mat, and jump back when needed.

An Arduino senses this interaction using the standard Firmata firmware, whilee a PC running the Johnny Five library and a Node server passes commands on to the game itself via WebSockets.

YouTuber “Insert Controller Here” has been creating gaming controllers out of a variety of objects, like bananas, mayonnaise, and meat. For his latest iteration, the YouTuber decided to convert a VTech Turn and Learn Driver into—what else?—a Mario Kart: Double Dash steering console.

As seen in the video below, the build consists of disassembling the toy, then soldering wires to the correct points to recreate steering wheel input, braking, and throttle. An Arduino Leonardo is used for the gaming interface, allowing Mario and Luigi to make it around the track by turning the wheel and applying brakes, while the accelerator is simply “shifted” into place.

Apparently unsatisfied with existing video game input devices, game designer Rob Santos created his own using, what else, fidget spinners. His system combines a spinner and five buttons on a pair of controllers to interface with Flock Off, an arcade game loosely based on Flappy Bird.

To register spinner input, a magnet is embedded on each lobe, triggering a Hall effect sensor three times per revolution when spun. An Arduino in each control box reads these signals, then sends this information, along with button inputs, to the game via USB accessible through a serial port.

Although using the Uno means that the game must be programmed especially for this type of input, Santos notes that using an HID-capable board, such as the Leonardo, would give it the capability to act as keyboard input by itself.

at-at

Dave Stein is a software engineer during the day and a tinkerer on Arduino projects in his free time after work. He submitted on the blog his first Arduino project with the goal of powering his old AT-AT Walker toy (mid 1980s) with Arduino Uno and make it walk and perform some of the functions we see in the Star Wars movies.

AT-AT (All Terrain Armored Transport) are four-legged combat walkers 22.5mt (73.8ft) tall of the Galactic Empire, one of its most famous military symbols introduced  in “Star Wars V: The Empire strikes back”, and we may see them again in the next weeks on “Star Wars: The Force Awakens” the upcoming episode of the saga opening December 18th.

The AT-AT walker toy updated by Dave is controlled by a wired Xbox 360 controller that interfaces with a computer and transports a signal to the Arduino Uno for walker movement:

The left and right triggers move the walker forward and backward while the right stick moves the head horizontally. If you have ever played with this toy you may remember it was clumsy and difficult to move. In my project I wanted to learn about and conquer the difficulties of quadrupedal movement. The realization process for my project involved a massive amount of trial and error, research, and failures. I have to say that I failed many more times than I succeeded with configuring the servos with the Arduino. I went down many long roads to learn about prototyping with the breadboard, soldering, and redesigns of the final product. The most difficult part of the project aside from adjusting the gait of the walker for balance and movement was providing enough power to the servos without frying the microcontroller or any of the components. I was finally able to overcome these difficulties by implementing the Adafruit servo shield.

Check AtAt Project website for all info, parts list and upcoming tutorial!

dsc09451

Developed by Robin Baumgarten during a 48-hour game jam,  Line Wobbler is a one-dimensional dungeon crawler game running on Arduino Uno. Robin was inspired watching a cat interacting with a door stopper and having fun!

The game is played using a unique wobble controller made out of a door-stopper spring and a several meter long ultrabright LED strip display. All the movement is controlled by bending the Wobble controller left and right, while enemies are attacked by wobbling:

Using a spring, an accelerometer and a rigid surface, the Wobble controller is a tactile and surprisingly precise joystick with a unique ‘wobble’ action (pull it back and let go to make it oscillate back and forth rapidly). It is this wobble action that is core to the experience and the game we have created for it. Initially made out of a shoe-tree, I’m now using door-stopper springs, since they’re easier to use. Fun fact: the original inspiration for the controller came from this cat video.

Since it was created, it’s been exhibited during Experimental Gameplay Workshop at GDC 2015, at Burning Man 2015 and other city around the world (London, Chicago and Oslo). Line Wobbler won also two prizes at the AMAZE Awards 2015 in Berlin and has been nominated as a finalist for the IndieCade 2015 awards last October!

Apr
18

Let’s go german with Arduino video Tutorials – auch auf Deutsch

arduino, controllers, Esplora, game controllers, german, languages, supertux, tutorial, video, video game Comments Off on Let’s go german with Arduino video Tutorials – auch auf Deutsch 

Arduino Esplora Video Tutorial

(Den Text auf Deutsch findet Ihr weiter unten)

Today we are announcing the first of a series of video tutorials in german created in collaboration with our friend Max, founder of MaxTechTV and published on Arduino channel on Youtube.

The tutorial of this month explains how to turn your Arduino Esplora into a customized computer gamepad to play any of your videogames. And it’s just the beginning to start the real fun of personalizing the controller: what about configuring it to start a special weapon with a shout using the microphone, included in the board? The options are endless! (here’s the tutorial in english)

For this example we configured the code to be suitable for SuperTuxKart, an open-source racing game we love to play during our breaks!

Enjoy the video below and share with us your new projects made with Esplora, or other Arduino boards, joining our official Flickr Group.

————————————————-

Wir freuen uns heute das erste Video einer Reihe von Videotutorials auf deutsch veröffentlichen zu können. Die Tutorials werden in Zusammenarbeit mit unserem Freund Max, Gründer von MaxTechTV produziert und auf dem Arduino YouTube-Kanal veröffentlicht .

Das Tutorial des Monats April erklärt wie man den Arduino Esplora  in ein individuelles Gamepad für den Computer verwandeln kann, um jedes beliebige Videospiel damit zu steuern. Und das ist nur eine von vielen tollen Möglichkeiten den Controller zu personalisieren und anzupassen: Wie wäre es das eingebaute Mikrofon zu nutzen, um über einen Sprachbefehl eine ‘Special Weapon’ abzufeuern ? Die Möglichkeiten sind endlos! (Hier das Tutorial auf Englisch)

Für dieses Beispiel haben wir den Code angepasst, um damit das open-source Spiel SuperTuxKart zu steuern, ein Rennspiel, das wir auch gern mal in unseren Pausen spielen.
Viel Spaß mit dem Video! Ihr könnt Eure Projekte mit dem Esplora oder einem anderen Arduino Board in unserer offiziellen Flickr Gruppe teilen.


————————————————- Ankündigung

Du sprichst deutsch und möchtest uns dabei unterstützen einen Teil der Arduino Dokumentation in deine Sprache zu übersetzen? Wir haben schon angefangen und hier kann man unseren Fortschritt beobachten: http://arduino.cc/de/Main/Products.

Wenn Du uns helfen willst, schreibe Max (max @ maxtechtv.de) und er wird Dir erklären wie Du in das Gemeinschafts-Übersetzungsprojekt eingebunden werden kannst. Danke!


Jan
25

Learning Game Programming with Esplora at the Iron Yard

community, education, Esplora, game controllers Comments Off on Learning Game Programming with Esplora at the Iron Yard 

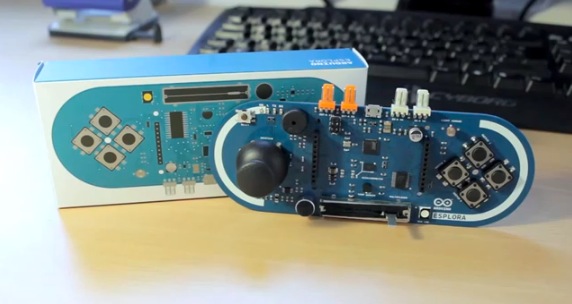
Anne Mahaffey is an engineer with Analog Devices and was one of the beta testers for the Arduino Due. Anne’s been an ardent advocate for Arduino at Analog, and recently contacted us about a workshop she was planning with the Iron Yard, an accelerator in her hometown of Greenville, South Carolina. The workshop was to introduce kids to programming in Scratch, and to let them build their own game controller with Arduino. She had plans to do it the way many Arduino workshops go: introduce the kids to a little electronics, then a little code, then get them building. She happened to reach us about the time we were putting the finishing touches on the new Esplora, and since we had a good reationship with her as a beta tester, we suggested that she try the Esplora instead. We had a good feeling about it, but no one had used it for a class yet. But Anne’s game for anything, so she said yes.

Anne Mahaffey teaching with the Esplora

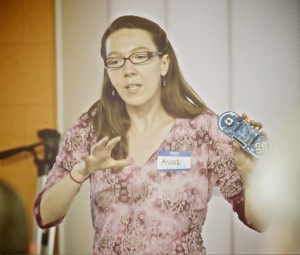
Anne Mahaffey teaching with the Esplora. Photo: Chris Brank


When she got the boards in hand, she was a bit skeptical:

“I won’t lie. The Esplora was not at all what I had in mind… what about the breadboard? The wires? The hookup diagrams? Isn’t that the fun part? Is it possible likely certain that my perceptions/opinions are being colored by my extremely specialized professional experience as an Analog/RF-centric Electrical Engineer?”

But she gave it a try. The results were promising:

“My first class was last night. I had 17 kids, mostly aged 10-12, if I had to guess. Each child (or sometimes, pair of siblings) had a parent. I had 5 or so volunteers, as I anticipated the first class would be the most challenging.

“It only took about 10 minutes to hand out Esploras, connect them, select correct board and port, and upload EsploraBlink. We had two Windows machines that we had to work with b/c they had many COM ports, so we needed to investigate which COM port was associated with the Esplora.”"

“In an hour and a half, I was able to send everyone home with a known working Esplora, which had run EsploraBlink, EsploraAccelerometer, and EsploraMusic; knowledge of how to select board, port, open example, upload to board, and open serial port; my e-mail, and a link to my tumblr… with the ability to ask me questions via both…

“Everyone, including parents were very engaged. They were very attentive, and I think everyone had a really good time!”

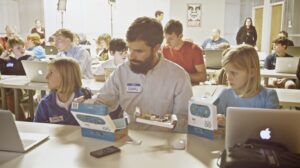
The Iron Yard Arduino Class. Photo: Chris Brank

We’re excited about this because it bears out what we’d hoped would happen with the Esplora: sometimes you want to learn about microcontrollers only a little bit, without a lot of time spent on the electronics. After her second class, Anne notes:

“It’s interesting now, to look at the differences in the approach that I’m able to take with the Esplora, vs. the approach I would have to take with [other boards and an electronics kit]… when working with breadboards, wires, etc, what’s you’re teaching is the hookup, and then you’re just loading an example, and hitting upload.  [you don't] really go into much detail on the program, and how it works.

Alternatively, I’m teaching the Esplora class with minimal focus on the “electronics,” and am able to focus on the programming.  I think this is going to work out well in the end… when we move on from the Esplora, the kids will have a much stronger understanding of all the programming aspects, and can focus on the electronics.”

We’re thankful that Anne was willing to take a risk with a brand new product, and we’re eager to hear more about her classes as they go along. We’re hoping this opens the doors for teachers who want to get students thinking about the relationship between software, physical interface, and hardware without having to run an electronics class. Keep an eye on Anne’s blog posts on the Iron Yard blog for further updates.

Dec
10

Meet The Arduino Esplora

arduino, Esplora, game, game controller, game controllers, Kids Comments Off on Meet The Arduino Esplora 

Here’s a new piece of hardware from your beloved OSHW project. The Arduino Esplora is meant for newbies and anybody willing to enter in the world of Arduino, without having to deal with breadboards or soldering. Shaped like a game controller, it’s designed to be used out of the box without extra parts since it comes with many sensors and actuators already on it.

Have a look at the Esplora Page on the Arduino site, you will find Arduino Esplora at Radioshack’s in its Retail Version (like the one you see on top) and soon on the Arduino Store and from our distributors in both Standard and Retail versions.

[Timothy Zandelin], a 15 years old Arduino enthusiast has sent us his first Arduino Project, an arcade interface based on Arduino Leonardo.

The cabinet is made of 4mm HDF and were laser cut at “Fabriken” in Malmö. The red arcade sign in the top is produced in 5mm translucent acrylic. All design and construction drawings were made in Illustrator. I used an Arduino Leonardo to connect the joystick, buttons and the LED light.  The game installed, Superstar Chefs, is an old game developed by my dad’s cousins.

On the other hand, Timothy also built his own prototyping board to learn about how to use different inputs and outputs.

My prototype board was made with Fritzing.

It includes:

- 6 green 3mm LED’s,

- 11 resistors (6 330 ohm, 4 10K ohm and one 100 ohm),

-1 dip8 socket with an ATtiny45,

- 1 potentiometer,

- 4 pushbutton and header sockets.

I created this prototype board to easily get started with Arduino.

Timothy, welcome on board!


  • Newsletter

    Sign up for the PlanetArduino Newsletter, which delivers the most popular articles via e-mail to your inbox every week. Just fill in the information below and submit.

  • Like Us on Facebook