Posts | Comments

Planet Arduino

Archive for the ‘fft’ Category

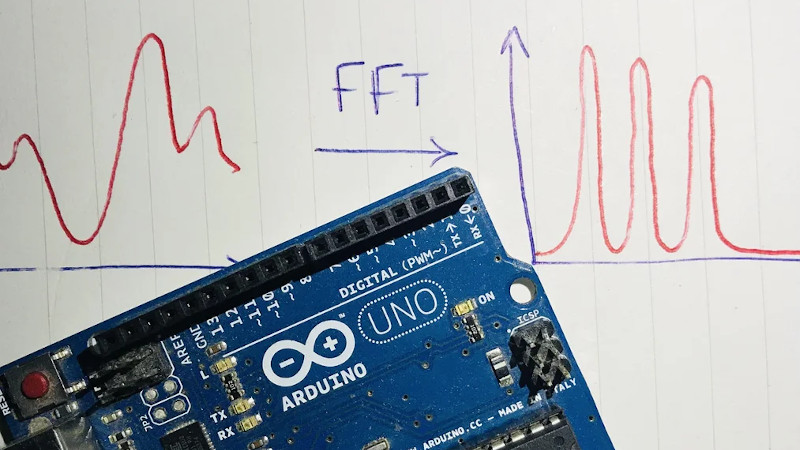
An interesting aspect of time-varying waveforms is that by using a trick called a Fourier Transform (FT), they can be represented as the sum of their underlying frequencies. This mathematical insight is extremely helpful when processing signals digitally, and allows a simpler way to implement frequency-dependent filtration in a digital system. [klafyvel] needed this capability for a project, so started researching the best method that would fit into an Arduino Uno. In an effort to understand exactly what was going on they have significantly improved on the code size, execution time and accuracy of the previous crown-wearer.

A complete real-time Fourier Transform is a resource-heavy operation that needs more than an Arduino Uno can offer, so faster approximations have been developed over the years that exchange absolute precision for speed and size. These are known as Fast Fourier Transforms (FFTs). [klafyvel] set upon diving deep into the mathematics involved, as well as some low-level programming techniques to figure out if the trade-offs offered in the existing solutions had been optimized. The results are impressive.

Fastest FFT code benchmarking results in ms
Benchmarking results showing speed of implementation versus the competition (ApproxFFT)

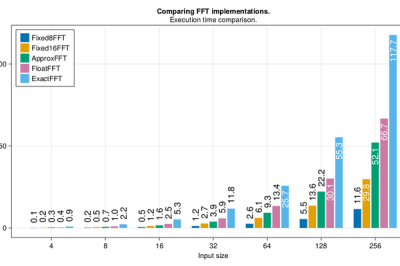
Not content with producing one new award-winning algorithm, what is documented on the blog is a masterclass in really understanding a problem and there are no less than four algorithms to choose from depending on how you rank the importance of execution speed, accuracy, code size or array size.

Along the way, we are treated to some great diversions into how to approximate floats by their exponents (French text), how to control, program and gather data from an Arduino using Julia, how to massively improve the speed of the code by using trigonometric identities and how to deal with overflows when the variables get too large. There is a lot to digest in here, but the explanations are very clear and peppered with code snippets to make it easier and if you have the time to read through, you’re sure to learn a lot!  The code is on GitHub here.

If you’re interested in FFTs, we’ve seen them before around these parts. Fill your boots with this link of tagged projects.

You would think the hard part about creating a spectrum analyzer using a pint-sized ATTiny85 would be the software. But for [tuenhidiy], we suspect the hard part was fabricating an array of 320 LEDs that the little processor can drive. The design does work though, as you can see in the video below.

The key is to use a TPIC6B595N which is an 8-bit shift register made to drive non-logic outputs. With all outputs on, the driving FETs can supply 150 mA per channel and the device can handle 500 mA per channel peak. At room temperature, the part can go over 1W of total power dissipation, although that goes down with temperature, of course. If you need higher power, there’s a DW-variant of the part that can handle a few hundred milliwatts more.

A fixed-point FFT library does the actual work. The program simply reads samples, processes the FFT, and drives the LEDs through the shift registers.

The construction technique is also a bit interesting as much of the wiring is left over LED leads. We admire the neat work, but we think we’d have had better luck with PCB traces.

Although billed as a spectrum analyzer, a device like this is really more of a music visualizer. If you want a real spectrum analyzer, they have become reasonably cheap. As impractical as the LED grid is for practical output, it beats ping pong balls.

400

[Zoltán] sends in his very interesting implementation of a NumPy-like library for micropython called ulab.

He had a project in MicroPython that needed a very fast FFT on a micro controller, and was looking at all of the options when it occurred to him that a more structured approach like the one we all know and love in CPython would be possible on a micro controller too. He thus ended up with a python library that could do the FFT 50 times faster than the the pure Python implementation while providing all the readability and ease of use benefits that NumPy and Python together provide.

As cool as this is, what’s even cooler is that [Zoltan] wrote excellent documentation on the use of the library. Not only can this documentation be used for his library, but it provides many excellent examples of how to use MicroPython itself.

We really recommend that fans of Python and NumPy give this one a look over!


We spent a little bit of time at the TI booth at Maker Faire to film a pair of interviews. The first is with [Bill Esposito] who is grinding away on his PhD. at Stanford. He’s showing off an Analog Shield for Arduino. He describes it as “an attempt to bring the analog bench to an Arduino shield”. We think this is a fantastic idea as most who are learning digital electronics through Arduino have little or no experience with analog circuitry. This is a nice gateway drug for the concepts.

The analog shield has a supply good for +/- 7.5 volts, 4-channel ADC, 4-channel DAC, and gets 100k samples at 16-bits. He showed us a spectrum analyzer using Fast Fourier Transform on the incoming signal from a microphone. He also built a function generator around the shield. And finally a synthesizer which plays MIDI files.

In the second half of the video we take a look at [Trey German's] work on a PCB-based quadcopter. His goal is to reduce the power consumption which will equate to longer flying times. To this end he chose the DRV8312 and a Piccolo to control each sensorless, brushless DC motor. The result should be 10% lower power consumption that his previous version.


Filed under: Arduino Hacks, drone hacks
Nov
30

Color LED matrix VU meter shows how to use FFT with Arduino

arduino hacks, digital audio hacks, fft, Fourier, VU meter Comments Off on Color LED matrix VU meter shows how to use FFT with Arduino 

If you’ve ever wanted to make your own VU meter but were scared off by the signal process you need to study this tutorial.

Hackaday Alum [Phil Burgess] developed the device using an RGB LED matrix, microphone, and an Arduino. You’ll notice that is doesn’t include an MSGEQ7 chip which we see in most of these types of projects. We have seen a few that use the Fast Fourier Transform to map the audio signal on the display as this one does. But [Phil's] choice of an assembly language Library for ATmega chips makes this really simple to roll into your own projects.

The one drawback to the hardware choices made here is that there are only eight bits of vertical resolution. It takes a little creative interpretation to make this look good, but the use of color mixing really makes a difference. See for yourself in the demo after the break.

[Thanks PT]


Filed under: arduino hacks, digital audio hacks


  • Newsletter

    Sign up for the PlanetArduino Newsletter, which delivers the most popular articles via e-mail to your inbox every week. Just fill in the information below and submit.

  • Like Us on Facebook