Posts | Comments

Planet Arduino

Archive for the ‘Kids’ Category

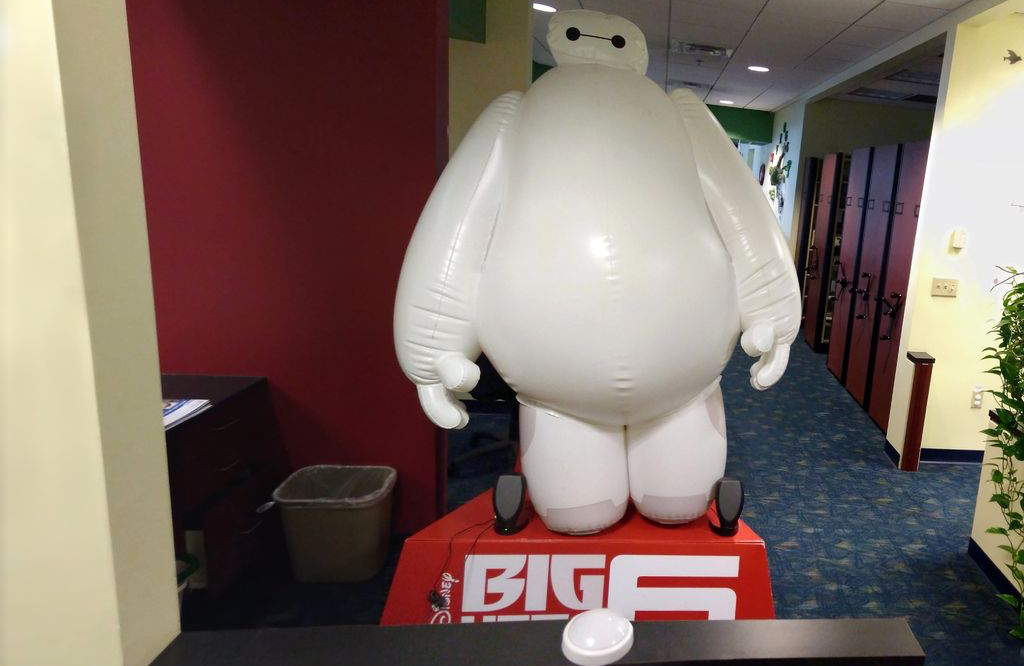
At Jason Poel Smith’s local pediatrician’s office, they have a variety of movie posters and displays to help make the environment more welcoming to kids. The most popular of them all is a huge inflatable Baymax robot character from the Disney movie Big Hero 6. 

While a beautiful display, Smith decided that what would make it even better is if it could talk, and went to work adding this functionality with an Arduino Uno, an MP3 shield, and a very large button. 

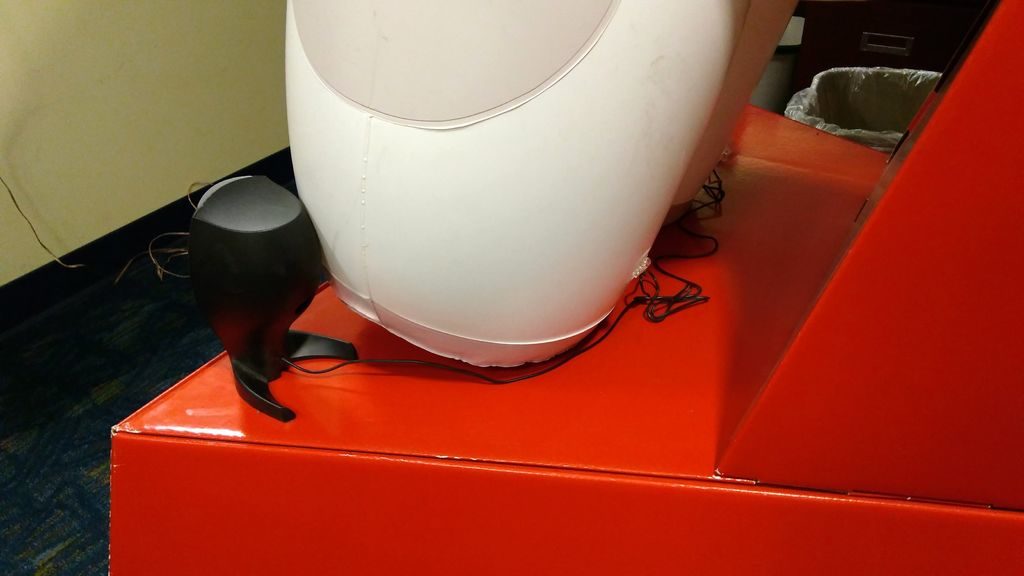
Now when kids arrive, they can hit the button to hear Baymax welcome them to the office as their “personal healthcare companion” via a pair of powered speakers. 

Arduino code and more info is available here, if you’d like to build something similar!

[JohnathonT] has a two-year-old who can’t reliably tell time just yet. Every morning, he gets up before the rooster crows and barges into his parents’ room, ready to face the day.

In an effort to catch a few more Zs, [JohnathonT] built a simple but sanity-saving clock that tells time in a visual, kid-friendly way. Sure, this is a simple build. But if a toddler is part of your reality, who has time to make one from logic gates? The hardware is what you’d expect to see: Arduino Nano, a DS1307 RTC, plus the LEDs and resistors. We think an RGB LED would be a nice way to mix up the standard stoplight hues a bit.

At a glance, little Mr. Rise and Shine can see if it’s time to spread cheer, or if he has to stay in his room and play a bit longer. At 6:00AM, the light powers on and glows red. At 6:50, it turns yellow for 10 minutes. At the first reasonable hour of the day, 7:00AM, it finally turns green. In reading the code, we noticed that it also goes red at 8:00PM for 45 minutes, which tells us it also functions as a go-to-sleep indicator.

When his son is a little older, maybe [JohnathonT] could build him  a clock that associates colors with activities.

18

Photosynthesis is an interactive installation for primary school children created, designed and developed by Moritz von Burkersroda and exhibited at P3 Ambika, University of Westminster.

It’s a  learning  experience to understand the abstract process of photosynthesis in a hands-on way.  Thanks to a physical interaction  kids can easily understand what  plants convert light into chemical energy to fuel their activities.

The installation uses an Arduino to measure data from a photoresistor and a hacked Wii-remote to connect the objects with the video feedback on the screen triggered by a Processing sketch. On the page of the project you can download a Design Research Document about Contextual study theory to understand the relationship between interactivity, learning and educational institutions, like museums.

SONY DSC

step

The Interaction Awards  published the shortlisted projects for 2016 and up to five finalists in each category will be announced during the event on Friday evening, March 4, 2016. In the Expressing category, showcasing projects enabling self expression and/or creativity there is a project called Step representing an innovative and engaging way of approaching music production for children between 6 and 100 years old.

Step runs on an Arduino and has been created by Federico Lameri, Sandro Pianetti at the Master of Advanced Studies in Interaction Design in Lugano under the supervision of Massimo Banzi and Giorgio Olivero of Todo.

To prototype the user experience we’ve used an Arduino Leonardo connected to a processing sketch that handle the recording and playback features. Using a Mux Shield 2 we managed connecting 25 IR sensors, 16 LEDs, 1 knob and a button to a single Arduino board. We needed a quick and effective way to test the experience and by using Arduino we managed to design and build the whole product in three weeks.

Most of the music toys on the market are trying to fake the sounds and the experience of real instruments. Step has a different approach as it’s designed to give children the opportunity to create real loops and beats using whatever sounds they like from objects of everyday life.

Players can record any sounds and match them with  coloured tags, and then  create melodies, loops and and beats by placing tags on the track and by adjusting the tempo!

Check the video below to see it in action:

mbloc

It’s cute, it’s fun and easy to assemble, it’s mBot by Makebloc, the new educational robot joining Arduino AtHeart program!

mBot it’s an all-in-one solution for kids and beginners to enjoy the hands-on experience about robotics, programming, and electronics.

You can program it with drag-and-drop graphical programming software based on Scratch 2.0 and the magic happens: the robots can follow lines, kick balls and push objects, avoid walls and more. You can also switch from graphical to text-based programming in Arduino mode as it can be coded with Arduino IDE environment.

Watch the video of their successful Kickstarter campaign:

mBot supports wireless communication, standard Arduino boards like Arduino Uno, Leonardo boards, Arduino Nano, Arduino Mega 2560, Makeblock mCore (based on Arduino Uno).

The main control board’s design, mCore of mBot, is based on Arduino UNO: with intuitional color labels and easy-to-use RJ25 connectors, the board can get wired easily so students can then get more time to focus on creating all kinds of interactive stories and projects.

To help teachers, parents, and kids get started easier and faster the robot kit has two free tutorial e-books and online manuals are provided and increasing continually.

Take a look at mBot on Makeblock website and discover how to use 2.4GHz wireless module and Bluetooth module with mBot:

mblocTeamBanzi

Massimo Banzi with Makeblock team

Last spring [Mike] built a foam rocket launchpad which was a hit with the kids in his neighborhood. But the launch system was merely a couple of buttons so the early enthusiasm quickly wore off. He went back to the drawing board to make improvements and really hit the jackpot!

The original launch system had one button for building up air pressure with a second big red button of doom for launching the rocket. The problem was a complete lack of user feedback; all the kids could do is guess how long they needed to hold the button to achieve the highest launch. This revision adds flashing LEDs to hold the attention of the wee ones but to also function as a gauge for the new pressure control system. The visually fascinating control board also includes a removable key to prevent accidental launches.

The particulars of this are as you’d expect: it’s a bunch of plumbing to manage the air pressure, an Arduino to control it all, and additional electronics in between to make them work together.

We’re especially impressed by the leap in features and quality from the first version to this one. It’s a testament to the power of quick proofs-of-concept before committing to a more involved build. Great work [Mike]!

We’ve seen rocket launchers for adults and some neat mission control panels but [Mike’s] kid friendly launch controller really is out of this world (sorry, couldn’t resist). You’ll find a video demo of this launcher after the break.


Filed under: Arduino Hacks, misc hacks
Jun
06

From robotics to learning by doing

arduino, Arduino Robot, competition, education, Featured, Kids, Robots, video Comments Off on From robotics to learning by doing 

nerea
Creative Mornings is a series of talks given by creative types all over the world and recorded for everyone to see online.

Last May, 22-year-old Nerea de la Riva Iriepa, one of the worlds most promising young talents in Robotics gave an inspiring talk about her journey in the world of robotics, her discovery of Arduino, how to work in team and also how to deal with a male-dominated robot world.

robot-prototypes

She is currently student of Electronic Communications at the University of Alcalá in Madrid and also an intern at Arduino in Malmö where she is creating educational content for beginners and finding ways to make coding easier for young users.

robotics-kids

May
19

Students bring new ideas and innovation at CTC Castilla

arduino, Arduino Verkstad, castilla, education, events, Featured, Kids Comments Off on Students bring new ideas and innovation at CTC Castilla 

ctc2

Creative Technologies in the Classroom* gives us a lot of joy whenever we visit students’ fairs. Each iteration of CTC (Madrid, Castilla, Barcelona and so forth) has its own technology fair and it is meant to award and congregate students and their projects. Arduino Verkstad, teachers, school and government representatives join as well to celebrate and share what students have learned along the program.

This year is the third edition of CTC Castilla and the fair had 140 projects, 936 students and 70 teachers. We have noticed that:

  • Teachers learned along with the students since they are not reproducing the CTC projects as the final projects, they have innovating by bringing new ideas
  • We got told that teachers are forced by the students to open the labs late after school hours because they want to spend more time working on their projects
  • Students have become pretty good at pitching projects, not only their production is excellent, but also their presentation skills

Some of the most impressive projects are:

robotic hand controlled from a phone that even had an app with the sign language alphabet so that the hand would “talk” for you, and an R2D2 made of recycled materials. All the pictures and many videos of the projects can be seen here. Thanks to Centro Regional de Formación del Profesorado, Castilla La Mancha and congratulations to all CTC participants!

*Creative Technologies in the Classroom (CTC) is a collection of experiments aimed at transforming the way technology is taught in schools around the world. These experiments introduce basic concepts in programming, electronics, and mechanics.

(The news was originally posted on Arduino Verkstad blog by Laura Balboa)

May
11

Scratch extension for Arduino (experimental release)

arduino, education, Featured, Firmata, Kids, Scracth, scratch Comments Off on Scratch extension for Arduino (experimental release) 

arduino-scratch-extension

With the new (experimental) Arduino extension for Scratch, you can create visual programs to control sensors and actuators connected to Arduino boards. Try it on the new ScratchX site.

Scratch allows kids (and everyone) to create their own games, interactive stories, and animations using a visual programming environment. Scratch is made by the Lifelong Kindergarten (LLK) group at the MIT Media Lab. The ScratchX.org site is a place for trying out new, experimental extensions to Scratch — e.g. for connecting to hardware or web services. As a member of both Arduino and LLK, I’m especially excited about this possibility to combine Scratch with Arduino.

This Scratch extension, created by Kreg Hanning and me (mostly Kreg), communicates with the Firmata firmware on an Arduino board. This allows you to send the Arduino commands using special Scratch blocks. To start, we have blocks for working with LEDs, servo motors, buttons, rotation knobs (potentiometers), light sensors, and temperature sensors. There are also more general (and Arduino-like) blocks for doing analog and digital input and output. For more information, see the documentation.

If you have any trouble using the Arduino extension or have any suggestions, please open an issue on the extension repository.

Of course, this isn’t the first attempt to connect Scratch and Arduino. For other approaches, see S4A, s2a_fm, and Catenary. For even more options, see SparkFun’s discussion of alternative programming interfaces for Arduino.

Apr
07

Creative Technologies in the Classroom goes to Ecuador

arduino, Arduino CTC, ctc, education, Featured, Kids, technology Comments Off on Creative Technologies in the Classroom goes to Ecuador 

EcuadorCTC

We are happy to announce that Creative Technologies in the Classroom has been successfully implemented in Ecuador since the fall of 2014 in 40 different places along the country, to more than 600 participants and thanks to the Telefonica Foundation Ecuador.

Creative Technologies in the Classroom (CTC) is a collection of experiments aimed at transforming the way technology is taught in schools around the world for participants going from 10 to 18 years old. These experiments introduce basic concepts in programming, electronics, and mechanics and consists of four phases:

  • Teacher Training (1 week)
  • Themed Modules (4 modules)
  • Student Projects (9 weeks)
  • Technology Fair

CTC Ecuador has also been implemented within the Pro Niño Project that helps employed children to attend to educational activities and learn about technology. This aims to open an opportunity for them to study at the technical universities in the area (many of them also support the project). The teachers for CTC/Pro Niño are social workers instead of regular school teachers. Here are some pictures of the program in El Oro and the South of Quito.

Some CTC Ecuador projects were also presented at an exhibition in Cuenca about society, art and technology hosted by Telefonica Movistar Ecuador.

(The news was originally posted on Arduino Verkstad blog)


  • Newsletter

    Sign up for the PlanetArduino Newsletter, which delivers the most popular articles via e-mail to your inbox every week. Just fill in the information below and submit.

  • Like Us on Facebook