Posts | Comments

Planet Arduino

Archive for the ‘Lilypad’ Category

Feb
04

Sew electric with Leah Buechley – Interview

arduino, Lilypad, Wearable Computing Comments Off on Sew electric with Leah Buechley – Interview 

sew electric

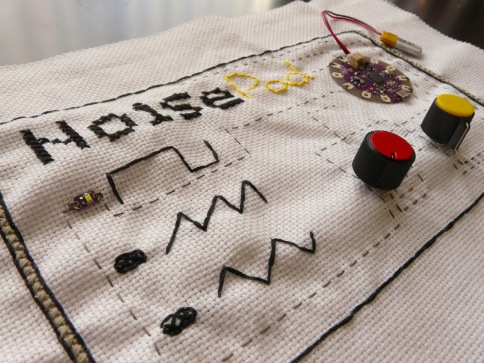
Leah Buechley, the creator of the LilyPad Arduino and my former advisor, recently published a great new book based on that platform, together with Kanjun Qiu and Sonja de Boer. Sew Electric is a collection of DIY e-textile projects that introduce electronics and programming through textile crafts. The projects include a sparkling bracelet, a singing monster, a light-up bookmark, and a fabric piano. Through these activities, readers are introduced to the fundamentals of electronics and programming as well as craft and design practices. The projects are beautifully illustrated and the instructions are clear and detailed. This is a wonderful resource for showing potential uses of electronics and the Arduino platform, specifically in ways that appeal to audiences not traditionally associated with these technologies.

I was privileged to work with Leah for a number of years and am always impressed with her dedication, ideals, and accomplishments. Zoe and I put together this interview to ask Leah about the new book and her thoughts on technology:

How was the idea of the book born and what’s its main aim?

We want the book to get people excited about electronics and programming. We hope it will help people play, tinker, hack, and learn.

There are very few engineering resources that are appealing to young women and girls. We wanted to create an electronics introduction that looks and feels different from anything else that’s out there.

In terms of the history, my student Kanjun Qiu built a series of lovely LilyPad projects & wrote DIY tutorials for them for her master’s thesis. In collaboration with NCWIT (the National Center for Women and Information Technology), we tested the tutorials with kids and teachers and got lots of positive feedback. We decided to publish the series as a book and website to make them more visible and accessible. We’d like to connect to as many people as possible.

How did you manage to design a book for adults but also good for kids?

When I was a kid I found many of the toys and books designed especially for children to be terribly patronizing. Kids are smart, savvy, and skilled. For the book, we aimed to design projects that are fun and whimsical but also complex and challenging. We focused on using direct and straightforward, but never childish, language. We assume that our readers have no previous experience, but limitless ability.

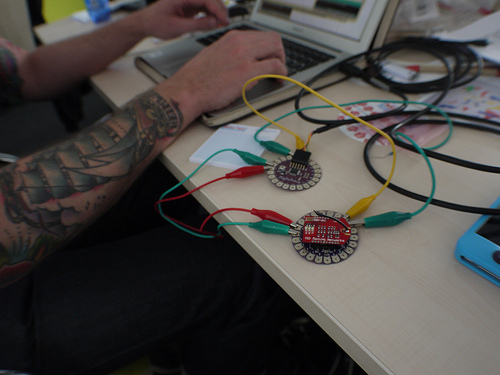
You’ve been working on the LilyPad Arduino for a number of years now. What have been the most interesting developments in that time?

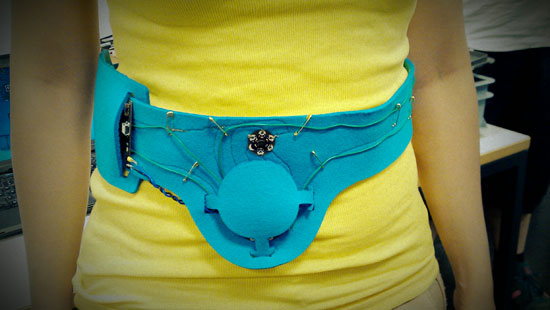
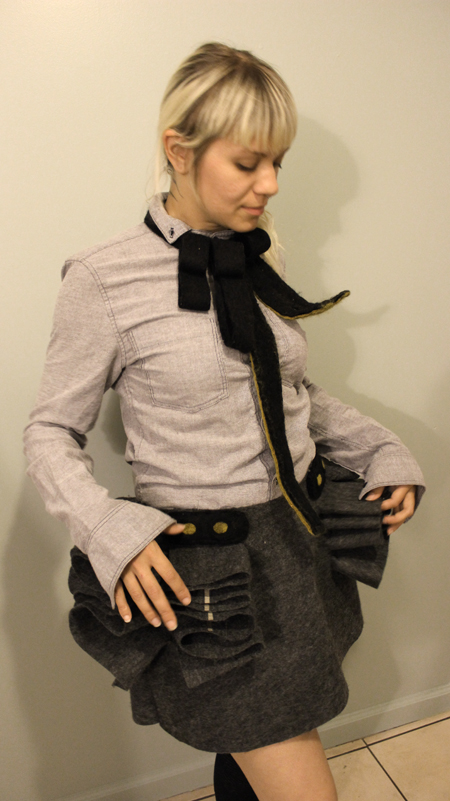
It’s been a delight to see what different people do with it! It’s been used in haute couture fashion, sculpture, dog shows, dance costumes, fabric robots…an enchanting collection of stuff.

It’s also been fascinating to research and begin to understand who is using LilyPad. A study I did in 2010 found that while only about 2% of people who build Arduino projects are women, about 65% of LilyPad builders are female. A spectacular discrepancy!

I think this shows that the Arduino community can benefit tremendously from tools that connect to different materials, communities, and creative traditions.

What do you think are the broader goals and implications of the book and the LilyPad platform?

Bringing more diversity to the Arduino community and the larger technology community is a driving force. It’s disgraceful how few women & people of color participate in technology creation. But, our community can also benefit from more diversity in the materials it employs and the types of projects it works on. For instance, I’d love to see grandmothers building Arduino projects that involve gardens and food.

leah at makerfaire rome

Compared to when you started working on the LilyPad, it seems that are now many more electronics projects aimed at people without a technical background. What do you think about this trend?

I think it’s great!

Wearable computing has been defined by many mainstream commenters as a big trend in which to invest in the next years. What’s your opinion on that?

I’m skeptical about wearables hype. Wearables & e-textiles have many marvelous qualities. They give new expressive tools to fashion designers, industrial designers, and artists. They embody appealing juxtapositions–of male and female, soft and hard, new and old. And they’re fantastic vehicles for technological fantasies–bringing to mind the magic cloaks and carpets from fairy tales, the flashy costumes of comic book superheros, and countless scifi eutopias/distopias.

But, companies that try to bring wearables, especially e-textiles, to market face significant hurdles. The manufacturing processes for the electronics and textile industries are very different and integration is extremely challenging. The timescales of the fashion and electronics worlds are out of sync–though we think of technology as fast moving, clothing styles change much faster, every couple of months. Moreover, for a range of environmental and engineering reasons, it doesn’t make sense to embed electronics into most everyday items of clothing. Do we want chips and batteries in every t-shirt? There have been some modest successes (blinky sneakers, heated winter wear, and body-sensing sports apparell), but the most compelling e-textiles work has taken place on smaller scales in the art and design worlds.

E-textiles hold more promise as a creative artistic medium than as a vehicle for mass produced products.

What do you plan to work on in the future?

Right now, I’m very excited to be transitioning from my position as an Associate Professor at the MIT Media Lab into full-time design practice. The Media Lab was amazing, but I didn’t have time to do any of my own creative work there. So, after a lot of soul searching, I decided to leave. (I’m formally resigning this spring.)

At the moment, I’m especially interested in large scale architectural work. My partner and I are designing and building a home and studio and I’m working on interactive mural projects. It’s wonderful to be soldering, programming, sewing, and painting again!

Thank you Leah!

LEYLA 01

Leyla is an interactive Niqab that reveals facials expressions on textile recreating the movement of facial muscles involved in smile and frown. The project was created by Patrizia Sciglitano and sent to us through our blog submission form. We got in touch with her to know more about it.

How come you started working at this project?

I started my BA graduation project in February 2012. I’m not Muslim but I’ve always lived in environment influenced by Islamic culture and I’ve been fascinated by it. Some months ago I participated to  a workshop in Prato about Wearable Technology with Riccardo Marchesi of Plug&Wear and I started to understand this new technology and to have real answers to my questions.

Leyla - schema circuito

How does it work?
Leyla’s circuit is composed by two facial-muscle sensors detecting micro-facial movements. The Arduino Lilypad receives data from them and sends the processed information to the Nitinol wires (muscle wires)  that are sewn into the fabric,  creating curls of the expressions hidden under the veil.

Leyla - inside

Have you got yet any reactions from girls wearing the veil?

I kept working on my research project while attending an association for non-EU women in my city, organized by a Muslim friend of mine since childhood. I met several women there, both young and old who’ve helped me understanding better their culture.  I explained the project to them and from the very first concept ideas I received a positive feedback.
Not very often designers create accessories suited for their necessities and thorough this object they could gain more “emotional communication” capabilities while maintaining their decency and this new opportunity  made them very happy.
They were both intrigued by the new technology I showed them (muscle Wires), and on how I was materializing my new idea of communication. Muslim women thought that my idea was very cool. It was a chance to give voice to a new way of communicating their emotions without needing to “undress”.

Until now I haven’t had the chance to test “Leyla” in Saudi Arabia, although I would love to do it in the future. Thanks to a friend of mine, however, I had the chance to show “Leyla” to some women wearing the Niqab staying in Istanbul for Erasmus program: they even asked me if I was selling it!

——

In the video and picture below you can see  the result, from left to right: Relaxed muscle – Contracted muscle: smile – Relaxed muscle – Contracted muscle: anger.

Leyla - expressions

Jul
15

Meet the maker – Afroditi experiments with embroidery, soft circuits and diy electronics

arduino, embroidery, Interview, Lilypad, MakerFaire, music, Processing, Sinthesizer Comments Off on Meet the maker – Afroditi experiments with embroidery, soft circuits and diy electronics 

afroditi psarra

The work of Afroditi Psarra includes experimentation with embroidery, soft circuit and diy electronics. I got in touch with her after discovering she was holding a workshop in Barcelona around sound performances using Lilypad Arduino along with a really cool embroidered synthesizer (…and also submitting her project to Maker Faire Rome !).

Even if her background is in fine arts, as a little girl she got interested in creative ways of expression: on one side she was lucky enough to have all sorts of after-school activities that included painting, theater games and learning but also how to program using LOGO and QBasic. That was in the days of black-and-white terminals and MS-DOS commands:

I still remember the excitement of not knowing what to expect at the opposite side of the screen. So for me, technology has always been a major part of my life.

Lilytron

Below you can find my questions to her:

Zoe Romano: In which way you started mixing art, technology and craft?
Afroditi Psarra: I had the chance to spend a year in Madrid as an ERASMUS student and there I encountered the work that was done at the Medialab Padro and had my first physical media art experience at the  ”The making of Balkan Wars: The Game” exhibition.  Two years later I went back to Madrid to do a post-graduate course on Image, Technology and Design and there I got familiar with Processing. I started working on interactive applets, but after some time I felt like I was missing the manual, hands-on labour of creating, so while I was coding I was also working on simple embroideries oriented around women and technology. These embroidery skills were passed on to me by my grandmother who taught me everything about knitting.

How did you get to know Arduino?
At the various media art workshops that I attended at the Medialab-Prado I was always hearing about Arduino, but for me electronics was something totally unknown and was always connected to robotics and automation processes. About two years ago a friend and very talented media-artist, Maria Varela, who was studying in London told me that she had attended a LilyPad Arduino workshop and that this was an Arduino implementation designed to be used with conductive threads instead of wires.

I was really excited by the idea that this would allow me to combine my work in embroidery with coding, so I bought myself a kit and started to experiment with some basic examples and tutorials I found in Instructables and started to follow the work of Hannah Perner-Wilson (Plusea, Kobakant), Lynne Bruning and Becky Stern. At the time I was still living in Madrid so me and another girl from Medialab, Francesca Mereu, formed a small group called SmartcraftLab and posted our experiments on-line.

Lilykorg

I remember that one of my first experiments was using the conductive thread as a pressure sensor that created tones, and when I heard that primitive digital sound I instantly felt that it was something that I wished to explore further. I think that this interest in physical computing, e-textiles and sound brought all of the things that I was working on earlier together, and the Arduino allowed me to do that.

As for the production of my projects, it is always done by me, but often look to the Arduino community for solutions to problems that I may encounter and ask for other people’s help on hardware and software issues. I do not see myself as a very skilled programmer just yet, but I certainly am evolving. After all, I believe that workshops, hands-on experience and collaborations with other people are the things that allow you to grow as a Maker.
afroditi psarra

A couple of years ago Paola Antonelli, senior curator in the Department of Architecture and Design at the Museum of Modern Art, said “The two most important introductions for art in the past 20 years have been the Arduino and Processing”, how do you see it?

I totally agree with the quote. Processing and Arduino are the two things that have allowed artists with no previous background in computing and electronics work with tools that where only available to specialists before. These two languages have created a tendency towards interactive art and we are now experiencing a revolution in DIY digital fabrication, hacking and tinkering on so many different levels. I think that the increasing spread of Medialabs, Hackerspaces and Fab labs around the world is the living proof of that.

In which ways are you experimenting with the Lilypad?
The LilyPad has allowed me to explore the relation between crafts connected with women’s labour such as knitting, sewing and embroidery, with electronics and creative coding, as well as the creation of soft interfaces of control. In my project Lilytronica I am currently using the LilyPad to create my own embroidered synthesizers that I use to perform live.

Considering that the LilyPad is not designed for creating sound, and you only have digital outputs and 8 MHz clock speed, the result is a very rough, primitive sound quality, which I personally like a lot. In my interactive performance Idoru() I am exploring the body as an interface of control of sound though the use of wearables. In this project the LilyPad acts as a controller, and the sound is produced in SuperCollider.

Idoru - data flow

I am also participating in conferences around open source technologies and organizing workshops on e-textiles and the use of the LilyPad, because I want to transmit my passion and because I want to get more people involved in this exciting new artistic field.

Are you releasing your work in open source?
Ever since I started to work with the Arduino I try to publish my work on-line so that I can have feedback on everything and until now I have been releasing the code on my personal website, but I am thinking of creating a Github account and releasing the code there so that everything is easily accessed by anyone interested. I firmly believe in releasing one’s work in open source, because this way you can evolve your work more rapidly and share your creation process with other like-minded individuals.

Where do you see wearable computing most interesting developments going towards?
I think it is a bit early to tell. Technology evolves at a very fast pace and multinationals sometimes reject certain developments because of their lack of economic interest. Seeing all the fuss around the Google glasses, one would argue that wearable computing is heading to connect the physical body with the Internet of Things. I personally feel that we can certainly expect developments around wearables and locative media and various medical applications.

Noisepad

For now, the most interesting applications in wearables are around fashion, art and music, and they require a certain craftsmanship to be made. As Kobakant argue in their paper ”Future Master Craftsmanship: where we want electronic textile crafts to go“  we never know what can happen when industrial automation kicks in. When our skills become devalued because machines can produce work faster, cheaper and better, we will still enjoy the craft process. But instead of sitting back to become E-Textile grandmothers, perhaps competition from the automated machines will encourage us to move on.

Pictures courtesy of Afroditi Psarra

Jul
11

Measuring pollution and health: wearable project wins a prize

arduino, Competition(s), data tracking, Enviroment, health, Lilypad, Wearable Computing, Wearables Comments Off on Measuring pollution and health: wearable project wins a prize 

Lead Inventor David Kuller wearing the winning Conscious ClothingTM prototype

My Air, My Health was the title of a Challenge calling innovators to work on a wearable project integrating air-quality measurement with heart rate and breathing.

The promoters of the challenge, the U.S. Environmental Protection Agency (EPA) and the National Institute of Environmental Health Services (NIH), launched it because they think that the possibility of understanding the relations between air pollution and people’s health in real-time could have an important impact in preventing disease and illness in the population. In the description you can read:

The required system design must be capable of linking air pollutant concentrations with physiological data, providing geocoded and time-stamped files in an easy to use format, and transmitting this data via existing networks to a central data repository. Due to the interdisciplinary nature of this challenge, solvers are highly encouraged to form teams drawing on multiple relevant expertise…

At the beginning of June they finally announced the winner of the prize of $100.000, it’s called Conscious Clothing and is a project developed by David Kuller, Gabrielle Savage Dockterman, and Dot Kelly.

Inventor David Kuller wearing the Conscious ClothingTM winning prototype.

The team created a system around self data-tracking, specifically calculating particulate matter inhaled and collecting basic health data,  transmitting them real-time to any Bluetooth-enabled device and allow their visualization in different format.  The prototype was made using Arduino Lilypad connected to a particulate matter air sensor that hangs near the neck and a series of stretchy strips of silver-knitted yarn wrapping around the chest to measure breathing.

We had a chat with David (in the pictures), who developed both hardware and software, and asked him what was, in his opinion the feature which made them win: ” I think that Conscious Clothing was the project that was most comfortable, truly wearable and also affordable, compared to the others”.

You can watch  the video below to see the prototype in action!


Photo Courtesy of Angel Devil Productions, Inc. and Conscious ClothingTM

May
10

Visual report of “Arduino meets wearables” workshop in Berlin

arduino, Interaction Design, Lilypad, textile, Wearable Computing, Wearables, Workshops Comments Off on Visual report of “Arduino meets wearables” workshop in Berlin 

arduino meets wearables

Yesterday we spent 8 hours learning and experimenting with Arduino Lilypad and 20 cool participants during our workshop, organized in collaboration with Kobakant! Here you can take a look at some pictures and below a  short video report made by Makerfaire Rome crew.


Are you working at a wearable project and you want to share it with us? Join us on Arduino Projects Flickr group, we are looking for nice projects to feature on this blog.

Apr
27

An interactive corset teaching you how to breathe

arduino, breathing, Fashion, Lilypad, Wearable Computing, Wearables Comments Off on An interactive corset teaching you how to breathe 

ruah

RUAH is an interactive corset powered by Arduino Lilypad and created by Giulia Tomasello for her BA graduation project. Its main aim is to help people into learning the importance and the benefits of a deep diaphragmatic breathing.

The circuit is composed by a sensor sewn on an elastic belt and an actuator placed inside the corset.
The stretch sensor catches the move of diaphragmatic breath and sends a feedback from Lilypad to muscle wire, a flexinol spring, inflating and deforming the centre of the structure.
Through this interaction between user and bustier, user becomes conscious about his body and his
breathe, increasing his sensory abilities and his physical endurance.
The slow controlled breathing, which balances body and mind, is acquired only after a long workout.
As the wearer feels it like a real second skin, RUAH transmits and receives emotional feedback, contrasting a continuous sense of stillness and movement, opposite feelings that surround us and join up to ecstasy.

ruah

ruah circuit


If you are interested in checking out the details of the project, you can explore Giulia’s pictures of the work in progress and her github code repository, after watching the video below with the Ruah in action!


Apr
21

Arduino meets Wearables: workshop at Codemotion Berlin

arduino, berlin, codemotion, Lilypad, Wearables Comments Off on Arduino meets Wearables: workshop at Codemotion Berlin 

wearables arduino

After  participating to Codemotion Rome last month, from the 9th of  May we’ll be spending a couple of days at Codemotion Berlin,  an innovative tech event engaging developers of all languages and technologies.

We’re having an Arduino wearables workshop organized together with Kobakant duo (Mika Satomi and Hannah Perner-Wilson) and focused on the use of Lilypad.

In these 8 hours workshop we’ll explore how computing can be made wearable using the Arduino Lilypad and a selection of conductive materials to make textile sensors and sew electrical connections.

In order to quickly prototype interactive wearables within the workshop, we’ll provide a selection of open source lasercut felt designs that can readily be assembled to garments and accessories. The textiles sensors and fabric circuits can be stitched into felt and powered by battery to make final stand-alone objects.

The cool thing is that no previous experience in programming or sewing is required to participate, so don’t be shy! Check the details and the earlybird offer on Codemotion website!

codemotion  berlin

The next day, Massimo Banzi, thanx to Maker Faire Rome, is opening the Conference with a keynote speech titled: “People over megahertz”.

Come and join us in Berlin!

**UPDATE**

On the 11th you can join the conversation in the panel starting at 5.20pm with Mika Satomi, Hannah Perner Wilson and Cecilia Palmer:

Makers movement and fashion are getting closer than we think

What happens when fashion and technology get combined? During the panel we’ll explore how the use of low-cost devices and machines is multiplying possibilities of participation and is transforming the way we approach our garments.

Mar
06

BioCircuit by Dana Ramler


I’m reblogging from Core77 this interesting wearable project because I’d like to highlight the using of Arduino Lilypad board:

Bio Circuit stems from our concern for ethical design and the creation of media-based interactions that reveal human interdependence with the environment. With each beat of the heart, Bio Circuit connects the wearer with the inner workings of their body.

It was created at Emily Carr University by Industrial Design student Dana Ramler, and MAA student Holly Schmidt and provides a form of bio feedback using data from the wearer’s heart rate to determine what “sounds” they hear through the speaker embedded in the collar of the garment. Here’s the schematic of technology:

BioCircuit - Technology


Have a look at the video below to see how it works and don’t miss BioCircuit Project page on Dana’s Portfolio:


Oct
11

Wear Your Musical Interface

Electronic Instruments, gallery, Lilypad, Midi, Wearable Computing Comments Off on Wear Your Musical Interface 

Ruffletron is a prototype of a wearable musical interface and an experiment in performative interaction.

The project has been developed by a textile designer, Lara Grant, in collaboration with the sound engineer Cullen Miller.


For prototyping purpose, Lara used a LilyPad Arduino, Maxuino, Osculator and Ableton Live.

Project details here.


A pillow clock? How? Read on…

Updated 18/03/2013

Time for another instalment in my irregular series of irregular clock projects. In contrast with the minimalism of Clock Two, in this article we describe how to build a different type of clock – using the “lilypad” style of Arduino-compatible board and components designed for use in e-textiles and wearable electronics. As the LilyPad system is new territory for us, the results have been somewhat agricultural. But first we will examine how LilyPad can be implemented, and then move on to the clock itself.

The LilyPad system

By now you should have a grasp of what the whole Arduino system is all about. If not, don’t panic – see my series of tutorials available here. The LilyPad Arduino boards are small versions that are designed to be used with sewable electronics – in order to add circuitry to clothing, haberdashery items, plush toys, backpacks, etc. There are a few versions out there but for the purpose of our exercise we use the Protosnap Lilypad parts which come in one PCB unit for practice, and then can be ‘snapped out’ for individual use. Here is an example in the following video:

The main circular board in the Arduino-type board which contains an ATmega328 microcontroller, some I/O pins, a header for an FTDI-USB converter and a Li-Ion battery charger/connector. As an aside, this package is  good start – as well as the main board you receive the FTDI USB converter, five white LEDs, a buzzer, vibration module, RGB LED, a switch, temperature sensor and light sensor. If you don’t want to invest fully in the LilyPad system until you are confident, there is a smaller E-Sewing kit available with some LEDs, a battery, switch, needle and thread to get started with.

Moving forward – how will the parts be connected? Using thread – conductive thread. For example:

This looks and feels like normal thread, and is used as such. However it is conductive – so it doubles as wire. However the main caveat is the resistance – conductive thread has a much higher resistance than normal hook-up wire. For example, measuring a length of around eleven centimetres has a resistance of around 11Ω:

So don’t go too long with your wire runs otherwise Ohm’s Law will come into play and reduce the available voltage. It is wise to try and minimise the distance between parts otherwise the voltage potential drop may be too much or your digital signals may have issues. Before moving on to the main project it doesn’t hurt to practice sewing a few items together to get the hang of things. For example, run a single LED from a digital output – here I was testing an LED by holding it under the threads:

Be careful with loose live threads – it’s easy to short out a circuit when they unexpectedly touch. Finally for more information about sewing LilyPad circuits, you can watch some talent from Sparkfun in this short lesson video:

And now to the Clock!

It will be assumed that the reader has a working knowledge of Arduino programming and using the DS1307 real-time clock IC. The clock will display the time using four LEDs – one for each digit of the time. Each LED will blink out a value which would normally be represented by the digit of a digital clock (similar to blinky the clock). For example, to display 1456h the following will happen:

  • LED 1 blinks once
  • LED 2 blinks four times
  • LED 3 blinks five times
  • LED 4 blinks six times

If a value of zero is required (for example midnight, or 1000h) the relevant LED will be solidly on for a short duration. The time will be set when uploading the sketch to the LilyPad, as having two or more buttons adds complexity and increases the margin for error. The only other hardware required will be the DS1307 real-time clock IC. Thankfully there is a handy little breakout board available which works nicely. Due to the sensitivity of the I2C bus, the lines from SDA and SCL to the LilyPad will be soldered. Finally for power, we’re using a lithium-ion battery that plugs into the LilyPad. You could also use a separate 3~3.3 V DC power supply and feed this into the power pins of the FTDI header on the LilyPad.

Now to start the hardware assembly. First – the RTC board to the LilyPad. The wiring is as follows:

  • LilyPad + to RTC 5V
  • LilyPad – to RTC GND
  • LilyPad A4 to RTC SDA
  • LilyPad A5 to RTC SCL
Here is an our example with the RTC board soldered in:

At this stage it is a good idea to test the real-time clock. Using this sketch, you can display the time data on the serial monitor as such:

Sewing it together…

Once you have the RTC running the next step is to do some actual sewing. Real men know how to sew, so if you don’t – now is the time to learn. For our example I bought a small cushion cover from Ikea. It is quite dark and strong – which reduces the contrast between the conductive thread and the material, for example:

However some people like to see the wires – so the choice of slip is up to you. Next, plan where you want to place the components. The following will be my rough layout, however the LilyPad and the battery will be sewn inside the cover:

The LilyPad LEDs have the current-limiting resistor on the board, so you can connect them directly to digital outputs. And the anode side is noted by the ‘+’:

For our example we connect one LED each to digital pins six, nine, ten and eleven. These are also PWM pins so a variety of lighting effects are available. The cathode/negative side of the LED modules are connected together and then return to the ‘-’ pad on the LilyPad. The actual process of sewing can be quite fiddly – so take your time and check your work. Always make note to not allow wires (threads) to touch unless necessary. It can help to hold the LilyPad up and let the cloth fall around it to determine the location of the LilyPad on the other side, for example:

As this was a first attempt – a few different methods of sewing the parts to the cloth were demonstrated. This becomes evident when looking on the inside of the slip:

… however the end product looked fair enough:

After sewing in each LED, you could always upload the ‘blink’ sketch and adapt it to the LEDs – a simple way to test your sewing/wiring before moving forward.

The sketch…

As usual with my clock projects the sketch is based around the boilerplate “get time from DS1307″ functions. There is also the function blinkLED which is used to control the LEDs, and the time-to-blinking conversion is done in the function displayTime. For those interested, download and examine the sketch.

The results!

Finally in the video clip below our pillow clock is telling the time – currently 1144h:

So there you have it, the third of many clocks we plan to describe in the future. Once again, this project is just a demonstration – so feel free to modify the sketch or come up with your own ideas.

In the meanwhile have fun and keep checking into tronixstuff.com. Why not follow things on twitterGoogle+, subscribe  for email updates or RSS using the links on the right-hand column? And join our friendly Google Group – dedicated to the projects and related items on this website. Sign up – it’s free, helpful to each other –  and we can all learn something.

The post Project: Clock Three – A pillow clock appeared first on tronixstuff.


  • Newsletter

    Sign up for the PlanetArduino Newsletter, which delivers the most popular articles via e-mail to your inbox every week. Just fill in the information below and submit.

  • Like Us on Facebook