The NeoRGB is a no-soldering, plug-and-play STEMMA board with a 2mm JST PH connector on one end, and a 5-pin 0.1″ screw terminal block on the other. It can convert standard 800KHz NeoPixel signal using a WS2811F chip to AO3406 N-channel FETs that are high efficiency and can sink a chunk of current – 3 Amps a piece with 50milliOhm Ron!
The Adafruit NeoRGB Stemma guide has everything you need to get started with using this breakout. There’s pages for overview, pinouts, CircuitPython, Arduino and resources for download.
As an introduction to embedded electronics and programming in a straightforward environment, there isn’t much out there that can hold a torch to the Arduino Uno. Cheap (especially if you count the clones), easy to find, and quick to deploy, with countless support libraries, it’s a go-to for many a hack. This scribe simply can’t remember how many he’s bought, hacked, and deployed over the years. But can it be improved? [John Loeffler] thinks so, and his 2023 Hackaday Prize entry, the Uno Plus+ could be the one.
If this is too much bling for you, there is a version with LEDs adjacent to non-illuminated headers.
After clearing the top deck of extraneous components (by shoving them on the bottom) there was much more space to expand the header labeling, so there can be no accidental misplacement of those DuPont wires this thing will inevitably sprout randomly.
The board also has an additional Stemma/Qwiic connector and a Neopixel LED for indication duties. Also sitting on the PCB bottom are a ton of opamps, to drive the header indicators. Yes, this board has a full set of colour-coded LED bling indicators, showing the logical state of each and every pin on all headers, giving an easy way to check the desired activity is occurring. Plus it looks cool. Illuminated headers? YES!
Think the Uno too light on resources to perform any meaningful modern workloads? Think again!
If you’re writing a screenplay or novel, there will likely be points along the way at which you can’t get enough encouragement from friends and family. While kind words are kind, acts such as [scubabear]’s can provide a push like no other. By commissioning another 3D designer friend to model a character from the first friend’s screenplay so he could print and animate it, [scubabear] fed two birds with one scone, you might say.
Designer friend [Sean] modeled the mighty Braomar in Maya and Z-brush, and [scubabear] did test prints on a Formlabs Form2 as they went along to keep an eye on things. Eventually, they had a discussion about making space for wires and such, so [Sean] took to Blender to make Braomar hollow enough for wires, but not so empty that he would collapse under the stress of being (we presume) the main character.
Braomar stands upon a sigil that changes color thanks to an RGB LED ring in the base that’s driven by an Arduino Nano. A single pixel in the fireball is wired through Braomar’s body and flickers with the help of an addressable LED sequencer board.
Our favorite part of this build has to be the power scheme. Not content to have a wire running out from the base or even a remote control for power-draining concerns, [scubabear] used disc magnets in the base to switch on the 9 V battery when Screenplay Friend rotates it.
Of course, if you need inspiration to even thing about beginning to write a screenplay or novel, maybe you should lead with the maquette-building and then construct a story around your creation.
We never did crack open our Etch-a-Sketch, but we did scrape out a window large enough to really check out the mechanism inside. [MrLangford] is bringing the Etch-a-Sketch into the 21st century while at the same time, bringing an even bigger air of mystery, at least for the normies.
Instead of scraping aluminum powder off of plastic by driving a stylus on an x-y gantry with a pair of knobs, this bad boy uses rotary encoders to move the cursor around and put down squares of colored light. The familiar movements are there — the left knob moves the cursor left and right, and the right knob moves it up and down. But this wouldn’t be a 21st century toy without newfangled features. Push the left encoder down and it cycles through eight color choices, or push the right one down to go through them backwards. We hope one of the colors is setting it back to darkness in case you screw up. And while we’re dreaming up improvements, it would be awesome to add an accelerometer so you could shake it clear like a standard Etch-a-Sketch.
Inside the requisite red enclosure with white knobs are an Arduino Nano and a 16×16 RGB LED matrix. The enclosure is four sheets of 6mm MDF glued together, and we like the use of protoboard to distribute GND and 5 V in the name of keeping the thing slim.
Let’s face it — eating different colored candy like M&Ms or Skittles is just a little more fun if you sort your pile by color first. The not-fun part is having to do it by hand. [Jackofalltrades_] decided to tackle this time-worn problem for engineering class because it’s awesome and it satisfies the project’s requirement for sensing, actuation, and autonomous sequencing. We’d venture to guess that it satisfies [Jackofalltrades_]’ need for chocolate, too.
Here’s how it works: one by one, M&Ms are selected, pulled into a dark chamber for color inspection, and then dispensed into the proper cubby based on the result. [Jackofalltrades_] lived up to their handle and built a color-detecting setup out of an RGB LED and light-dependent resistor. The RGB LED shines red, then, green, then blue at full brightness, and takes a voltage reading from the photocell to figure out the candy’s color. At the beginning, the machine needs one of each color to read in and store as references. Then it can sort the whole bag, comparing each M&M to the reference values and updating them with each new M&M to create a sort of rolling average.
We love the beautiful and compact design of this machine, which was built to maximize the 3D printer as one of the few available tools. The mechanical design is particularly elegant. It cleverly uses stepper-driven rotation and only needs one part to do most of the entire process of isolating each one, passing it into the darkness chamber for color inspection, and then dispensing it into the right section of the jar below. Be sure to check out the demo after the break.
Need a next-level sorter? Here’s one that locates and separates the holy grail of candy-coated chocolate — peanut M&Ms that didn’t get a peanut.
Like many of us, [Michael] needed a way to let the family know whether pants are required to enter the room — in other words, whenever a videoconference is in progress. Sure he could hang a do not disturb sign, but those are easy to forget. There’s no need to worry about forgetting to change status because this beautiful wall-mounted sign can be controlled with Alexa.
Inside the gorgeous box made from walnut, curly maple, and oak is an ESP32, some RGB LEDs, and three MOSFETs. [Michael] is using the fauxmoESP library to interface the ESP32 with Alexa, which emulates a Phillips Hue bulb for the sake of using a protocol she already knows. [Michael] can change the color and brightness percentage with voice commands.
The sign is set up as four different devices — one default, and one for each color. Since talking to Alexa isn’t always appropriate, [Michael] can also change the color of the LEDs using sliders on a website that’s served up by the ESP. Check out the full build video after the break.
Have you ever wanted to experiment with MIDI, but didn’t know where to start? Or perhaps you didn’t think you could afford to properly outfit your digital beat laboratory, especially given the average hacker’s penchant for blinkenlights? Well worry no more, as [Johan von Konow] has unveiled a collection of DIY MIDI devices that anyone with a 3D printer can build on the cheap.
The LEET modular synthesizer is made up of a keyboard, drum pad, chord keyboard, arpeggiator and a step sequencer that plug into your computer and interface with industry standard digital audio workstation (DAW) programs. The down side is that they don’t do anything on their own, but this simplification allowed [Johan] to really streamline the design and bring the cost of the build down to the bare minimum.
Integrated wire channels mean no PCB is required.
You don’t need to build all the components either, especially if you’re just testing the waters. The keyboard is a great starting point, and even if you have to buy all the components new from eBay, [Johan] says it shouldn’t cost you more than $10 USD to build. You just need an Arduino Pro Micro, some tact switches, and a section of WS2812 RGB LED strip. There’s an excellent chance you’ve already got some of that in the parts bin, which will make it even cheaper.
There is one missing element though: the PCB. But not because you have to source it yourself. Like his clever Arduboy clone we covered earlier in the year, the 3D printed bodies for all of the LEET devices have integrated wiring channels that serve as a stand-in for a traditional circuit board. Simply place all your components, push some stiff 0.3 mm diameter wire down into the channels, and solder the ends. It’s a very neat approach, and something we could see becoming more popular as desktop 3D printers become an increasingly common sight in the home workshop.
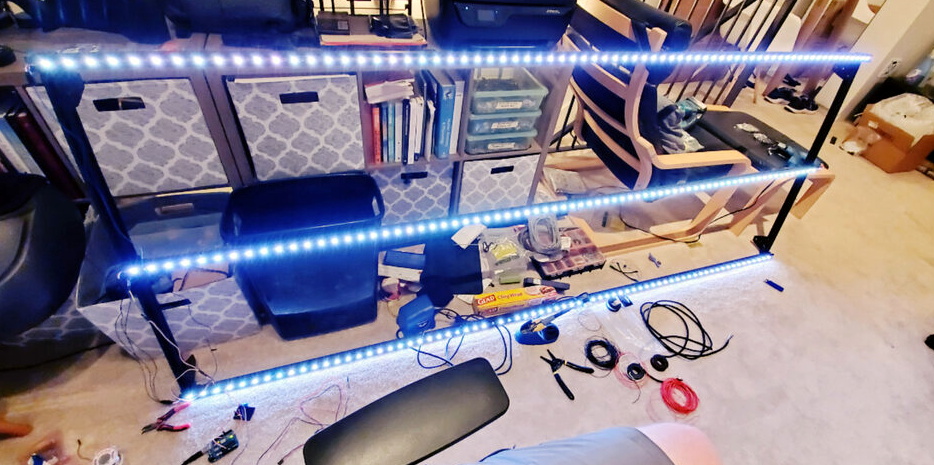
When we see RGB LEDs used in a project, they’re often used more for aesthetic purposes than as a practical source of light. It’s an easy way to throw some color around, but certainly not the sort of thing you’d try to light up anything larger than a desk with. Apparently nobody explained the rules to [Brian Harms] before he built Light[s]well.
Believe it or not, this supersized light installation doesn’t use any exotic hardware you aren’t already familiar with. Fundamentally, what we’re looking at is a WiFi enabled Arduino MKR1000 driving strips of NeoPixel LEDs. It’s just on a far larger scale than we’re used to, with a massive 4 x 8 aluminum extrusion frame suspended over the living room.
Onto that frame, [Brian] has mounted an undulating diffuser made of 74 pieces of laser-cut cardstock. Invoking ideas of waves or clouds, the light looks like its of natural or even biological origin while at the same time having a distinctively otherworldly quality to it.
The effect is even more pronounced when the RGB LEDs kick in, thanks to the smooth transitions between colors. In the video after the break, you can see Light[s]well work its way from bright white to an animated rainbow. As an added touch, he added Alexa voice control through Arduino’s IoT Cloud service.
Many of us have been inspired by the videos of the Falcon 9 booster, tall as an office building, riding a pillar of flame down to a pinpoint landing at Kennedy Space Center or on one of SpaceX’s floating landing pads in the ocean. It’s not often that we get to see science fiction fantasy become reality on such a short timescale, and while they might not be sold on the practicality of reusable rockets, even the most skeptical of observers have to admit it’s an incredible feat of engineering.
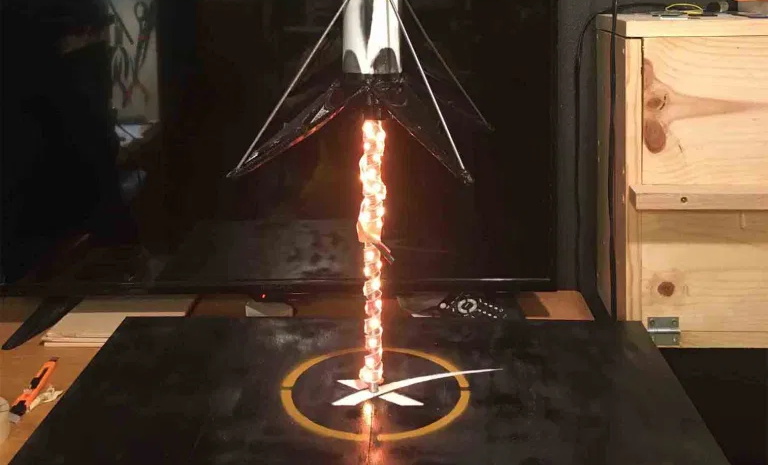
Though it can’t quite compare to the real thing, this 1:60 scale Falcon 9 lamp by [Sir Michael II] promises to bring a little of that excitement home every time you flick on the light. Combining a scratch built model of the reusable booster with some RGB LEDs, the hovering tableau recreates the tense final seconds before the towering rocket comes to a rest on its deployable landing legs. We imagine those last moments must seem like an eternity for the SpaceX engineers watching from home as well.
The LED “exhaust” without the fluff.
[Michael] walks readers through assembling the Falcon 9 model, which cleverly uses a 2 inch white PVC pipe as the fuselage. After all, why waste the time and material printing a long white cylinder when you can just buy one at the hardware store for a few bucks?
Dressed up with 3D printed details from Thingiverse user [twuelfing] and splashed with a bit of paint, it makes for a very convincing model. While the diameter of the pipe isn’t quite right for the claimed 1:60 scale, unless Elon Musk is coming over your place to hang out, we don’t think anyone will notice.
The rocket is attached to the pad with a piece of threaded steel rod, around which [Michael] has wrapped one meter of RGB LEDs controlled by an Arduino Uno. With some polyester fiber filler as a diffuser and a bit of code to get the LEDs flickering, he’s able to produce a realistic “flame” that looks to be coming from the Falcon 9’s center engine. While we admit it may not make a very good lamp in the traditional sense, it certainly gets extra points for style.
Just when we think we’ve seen all possible combinations of 3D printing, microcontrollers, and pretty blinkenlights coming together to form DIY clocks, [Mukesh_Sankhla] goes and builds this geometric beauty. It’s kaleidoscopic, it’s mosaic, and it sorta resembles stained glass, but is way cheaper and easier.
The crucial part of the print does two jobs — it combines a plate full of holes for a string of addressable RGB LEDs with the light-dividing walls that turn the LEDs into triangular pixels. [Mukesh] designed digits for a clock that each use ten triangles. You’d need an ESP8266 to run the clock code, or if you’d rather sit and admire the rainbow light show unabated by the passing of time, just use an Arduino Uno or something similar.
Most of the aesthetic magic here is in the printed pieces and the FastLED library. It has a bunch of really cool animations baked in that look great with this design. Check out the demo video after the break. The audio is really quiet until the very end of the video, so be warned. In our opinion, the audio isn’t necessary to follow along with the build.
The humble clock takes many lovely forms around here, including pop art.
Planet Arduino is, or at the moment is wishing to become, an aggregation of public weblogs from around the world written by people who develop, play, think on Arduino platform and his son. The opinions expressed in those weblogs and hence this aggregation are those of the original authors. Entries on this page are owned by their authors. We do not edit, endorse or vouch for the contents of individual posts. For more information about Arduino please visit www.arduino.cc
You are currently browsing the archives for the RGB LED category.