Posts | Comments

Planet Arduino

Archive for the ‘TFT Display’ Category

Don’t know about you, but over the last year or so, we have gone from spending ten or twelve hours a day at this computer to upwards of sixteen or eighteen. Fortunately there’s a window behind the monitor for taking those 20/20/20 breaks that are supposed to prevent eye strain, but it’s so hard to remember (and boring) to do it. And nobody needs yet another thing to remember in the name of self-care.

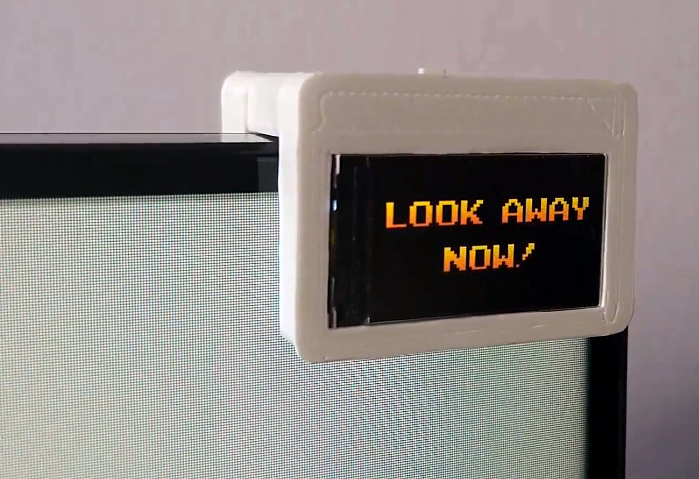
[Daniel Hingston] certainly agrees. As you’ll see in the delightful video after the break, [Daniel] has made a game out of the whole process of stopping every twenty minutes to spend twenty seconds looking at a point that’s at least twenty feet away. Once the break is over, [Daniel] uses the dual-purpose start button to acknowledge having looked away for 20 seconds. The device is meant to clip onto the corner of any monitor, and [Daniel] has provided several sizes of the bridge piece so that everyone can find their fit.

The Guardian’s guts are pretty simple — an Arduino Pro Mini runs the stop watch and a TFT display to show the graphics that live on an SD card. This is a great way to preserve your eyesight by gamifying something we all know we should be doing. It might be nice to add a break timer that counts up to 25 or thereabouts so you have time to stand up and come back. If you press the button too soon, it scolds you and you have to start your eye break over.

Need some more self-care lately? Our own [Jenny List] has your back in these interesting times.

A little over a a year ago, we covered an impressive battery monitor that [Timo Birnschein] was designing for his boat. With dedicated batteries for starting the engines, cranking over the generator, and providing power to lights and other amenities, the device had to keep tabs on several banks of cells to make sure no onboard systems were dipping into the danger zone. While it was still a work in progress, it seemed things were progressing along quickly.

But we know how it is. Sometimes a project unexpectedly goes from having your full attention to winning an all-expense-paid trip to the back burner. In this case, [Timo] only recently put the necessary finishing touches on his monitor and got it installed on the boat. Recent log entries on the project’s Hackaday.io page detail some of the changes made since the last time we checked in, and describe the successful first test of the system on the water.

Certainly the biggest issue that was preventing [Timo] from actually using the monitor previously was the lack of an enclosure and mounting system for it. He’s now addressed those points with his 3D printer, and in the write-up provides a few tips on shipboard ergonomics when it comes to mounting a display you’ll need to see from different angles.

The printed enclosure also allowed for the addition of some niceties like an integrated 7805 voltage regulator to provide a solid 5 V to the electronics, as well as a loud piezo beeper that will alert him to problems even when he can’t see the screen.

Under the hood he’s also made some notable software improvements. With the help of a newer and faster TFT display library, he’s created a more modern user interface complete with a color coded rolling graph to show voltages changes over time. There’s still a good chunk of screen real estate available, so he’s currently brainstorming other visualizations or functions to implement. The software isn’t using the onboard NRF24 radio yet, though with code space quickly running out on the Arduino Nano, there’s some concern about getting it implemented.

As we said the first time we covered this project, you don’t need to have a boat to learn a little something from the work [Timo] has put into his monitoring system. Whether you’re tracking battery voltages or temperatures reported by your BLE thermometers, a centralized dashboard that can collect and visualize that data is a handy thing to have.

While those of us stuck sailing desks might not be able to truly appreciate the problem, [Timo Birnschein] was tired of finding that some of the batteries aboard his boat had gone flat. He wanted some way to check the voltage on all of the the batteries in the system simultaneously and display the information in a central location, and not liking anything on the commercial market he decided to build it himself.

Even for those who don’t hear the call of the sea, this is a potentially useful project. Any system that has multiple batteries could benefit from a central monitor that can show you voltages at a glance, but [Timo] is actually going one better than that. With the addition of a nRF24 module, the battery monitor will also be able to wireless transmit the status of the batteries to…something. He actually hasn’t implemented that feature yet, but some way of getting the data into the computer so it can be graphed over time seems like a natural application.

The bill of materials is pretty short on this one. Beyond the aforementioned nRF24 module, the current version of the monitor features an Arduino Nano clone, a 128×160 SPI TFT display, and a handful of passives.

Knowing that a perfboard wouldn’t last long on the high seas, [Timo] even routed his own PCB for this project. We suspect there’s some kind of watertight enclosure in this board’s future, but it looks like things are still in the early phases. It will be interesting to follow along with this one and see how it eventually gets integrated in to the boat’s electrical system.

If you’re looking for a way to keep an eye on the voltages aboard your land ship, this battery monitor disguised as an automotive relay is still the high-water mark in our book.

We can race against the clock when assembling jigsaw puzzles online but what about competing against each other in the real world? [HomeMadeGarbage] came up with the simplest of solutions with his jigsaw puzzle timer that stops only when the puzzle’s completely assembled.

Copper strip on back of puzzle

His simple solution was to attach copper foil tape to the back of the pieces, with overlap. He did this in a serpentine pattern to ensure that all pieces had a strip of the tape. The puzzle he used comes with a special container to assemble it in. At two corners of that container, he put two more pieces of copper foil, to which he soldered wires. Those two act as a switch. Only when the puzzle is completed will those two pieces be connected through the serpentine strip on the back of the puzzle.

Next, he needed a timer. The two wires from the puzzle container go to an Arduino UNO which uses an ILI9325 touch panel TFT display for both the start, stop, and reset buttons, and to show the time elapsed. Press the touch screen when it says START and begin assembling the puzzle. When the last piece is inserted, the serpentine strip of copper tape completes the circuit and only then does the Arduino program stop the timer. As you can see from the video below, the result makes doing the puzzle lots of fun.

Naturally, it takes some work to apply the copper tape and you wouldn’t likely do this for puzzles with a thousand pieces but most online puzzles don’t have many pieces either. It’s the fun of the race that matters, and with people taking turns, you want it to be quick anyway.

If you have a printed photo that you want to turn into a puzzle with suitably sized pieces, then you can use this online program that produces an SVG file to tell your laser cutter how to cut out the puzzle. Or maybe you’d prefer to make a robot to make the puzzle for you? In that case, you can start with [thomasgruwez]’s pick and place jigsaw puzzle aid.

Instagram Photo


Filed under: Arduino Hacks

Reader [Jasper] writes in with glowing praise for the TFT_eSPI library for the ESP8266 and the various cheap 480×320 TFT displays (ILI9341, ILI9163, ST7735, S6D02A1, etc.) that support SPI mode. It’s a drop-in replacement for the Adafruit GFX and driver libraries, so you don’t need to rework your code to take advantage of it. If you’re looking to drive an LCD screen with an ESP8266 and Arduino, check this out for sure.

As a testbed, [Jasper] ported his Tick Tock Timer project over to the new library. He got a sevenfold increase in draw speed, going from 500 ms to 76 ms. That’s the difference between a refresh that’s visibly slow, and one that looks like it happens instantly. Sweet.

Improving software infrastructure isn’t one of the sexiest or most visible hacks, but it can touch the lives of many hackers. How many projects have we featured with an ESP8266 and a screen? Thanks, [Bodmer] for the good work, and [Jasper] for bringing it to our attention.


Filed under: Arduino Hacks, Microcontrollers
Jun
02

Optimizing AVR LCD Libraries

arduino hacks, AVR, C, LCD, Microcontroller, microcontrollers, SPI, TFT, TFT Display Comments Off on Optimizing AVR LCD Libraries 

A while ago, [Paul Stoffregen], the creator of the Teensy family of microcontrollers dug into the most popular Arduino library for driving TFT LCDs. The Teensy isn’t an Arduino – it’s much faster – but [Paul]’s library does everything more efficiently.

Even when using a standard Arduino, there are still speed and efficiency gains to be made when driving a TFT. [Xark] recently released his re-mix of the Adafruit GFX library and LCD drivers. It’s several times faster than the Adafruit library, so just in case you haven’t moved on the Teensy platform yet, this is the way to use one of these repurposed cell phone displays.

After reading about [Paul]’s experience with improving the TFT library for the Teensy, [Xark] grabbed an Arduino, an LCD, and an Open Workbench Logic Sniffer to see where the inefficiencies in the Adafruit library were. These displays are driven via SPI, where the clock signal goes low for every byte shifted out over the data line. With the Adafruit library, there was a lot of wasted time in between each clock signal, and with the right code the performance could be improved dramatically.

The writeup on how [Xark] improved the code for these displays is fantastic, and the results are impressive; he can fill a screen with pixels at about 13FPS, making games that don’t redraw too much of the screen at any one time a real possibility.


Filed under: Arduino Hacks, Microcontrollers
Dec
20

TFTweet – Displaying Tweets on an Arduino Shield with the Raspberry Pi

AlaMode, arduino, DIY Projects, Raspberry Pi, TFT Display, twitter Comments Off on TFTweet – Displaying Tweets on an Arduino Shield with the Raspberry Pi 

20121202_031332Drew Fustini recently got his hands on an AlaMode and used it display tweets from his Raspberry Pi to an 2.8" TFT LCD Touchscreen Shield. The AlaMode and shield are connected to the Raspberry Pi which runs the Arduino IDE and a bit of Python code to make it all happen.

Read the full article on MAKE


  • Newsletter

    Sign up for the PlanetArduino Newsletter, which delivers the most popular articles via e-mail to your inbox every week. Just fill in the information below and submit.

  • Like Us on Facebook