We’ve noticed a rash of builds of [ FedorSosnin’s] do-it-yourself 3D-printed mechanical keyboard, SiCK-68 lately. The cost is pretty low — SiCK stands for Super, Inexpensive, Cheap, Keyboard. According to the bill of materials, the original cost about $50. Of course, that doesn’t include the cost of the 3D printer and soldering gear, but who doesn’t have all that already?
The brains behind this is a Teensy that scans the hand-wired key matrix. So the only electronics here are the switches, each with a companion diode, and the Teensy. The EasyAVR software does all the logical work both as firmware and a configuration GUI.
If you look at the many different builds, each has its own character. Yet they look overwhelmingly professional — like something you might buy at a store. This is the kind of project that would have been extremely difficult to pull off a decade ago. You could build the keyboard, of course, but making it look like a finished product was beyond most of us unless we were willing to make enough copies to justify having special tooling made to mold the cases.
PCBs are cheap now and we might be tempted to use one here. There are quite a few methods for using a 3D printer to create a board, so that would be another option. The hand wiring seems like it would be a drag, although manageable. If you need wiring inspiration, we can help.
The latest itty bitty powerhouse from PJRC has been released this week. The teensy line of dev boards has hit 4.0! They have managed to keep a tiny footprint, like you’ve come to expect from the Teensy. They’ve gained some serious horsepower thanks to the ARM Cortex-M7 running running at […]
The first Arduino was serial, and over the decade and a half, this has been the default way to upload code to an Arduino board. In 2008, support for in-circuit programmers was added, and later port detection was added. The latest version of the Arduino IDE adds something new: pluggable discovery. Now any protocol is supported by the Arduino IDE.
This feature is the brainchild of [Paul Stoffregen], creator of the Teensy. If you’ve ever used a Teensy, you’ll remember the Teensyduino application used to upload code to the board. The Teensy uses HID protocol instead of serial for uploading. After working to improve the integration between the Teensy and Arduino IDE, [Paul] stated extending the DiscoveryManager. After some discussion with the Arduino developers, this feature was then added to Arduino 1.8.9, released a month or so ago.
There are some issues with Pluggable Discovery, most importantly that it doesn’t yet exist in the Arduino Command Line Interface (yeah, that exists too). If you’re looking to contribute to Open Source, that would be a nice project to pick up.
With the right JSON, and configuration, it is now theoretically possible to extend the Arduino IDE to any sort of protocol. This means (again, theoretically), it’s possible to update the firmware in your DIY MIDI synth over SysEx message, or a parallel port, maybe. Someone is going to upload to an Arduino board over PCIe, eventually.
Despite the title, this isn’t a tale of conversing with Michael Jackson’s chimp. Rather, it is about [KyungYun]’s machine that transforms speech into whimsical bubbles. While the speech control is novel, we were more fascinated with how the mechanism uses a system of strings to blow bubbles, along with the workmanship to make the device portable.
The rate of fire isn’t that great, so the bubbles appear to simply get larger the longer you talk. Essentially, the device increases the size of the iris — the part that blows the bubble — until you pause speaking. Then it burps out a bubble.
The iris mechanism has borrowed ideas from a much larger bubble machine, though the actual build is much smaller and uses both laser-cut and 3D printed pieces. A Teensy provides the brain, and there’s a pump for transferring bubble solution into the iris.
As best we can tell, soapy liquid drips down the strings which are touching. When the strings separate, it forms a soap film between them. A burst of air, then, can produce a bubble. It is possible to make colored bubble solution and we were trying to think of a way to make different colors for different kinds of sounds, although, having three iris mechanism would make the device much less portable. Perhaps it would be more practical to have multiple tanks of the solution and mix them differently based on sound analysis. In any event, this would be a fun project to extend with some creative additions.
Even on the go, there is no substitute for a physical keyboard with buttons that move and click. Sure, you could solder a bunch of tactile switches to some perfboard, but how about going all out and making something robust as [Anthony DiGirolamo] did for his Teensy Thumboard. Everything is insertion-mount so it is an approachable project for anyone who knows the dangerous end of a soldering iron, and that also makes it easy to hack on.
Each pin of the Teensy has an adjacent empty hole tied to it for easy access, and the serial data pins are exposed at the top of the board. All the holes use standard 0.1″ (2.54mm) spacing. The I/O points used by the keyboard are labeled, and the rest of them can use the space under the controller where proto-board style holes add some extra space for an IMU or whatever sensors suit your slant.
Most impressive is the shell, which is freely available on Thingiverse, where you can also find a bill of materials with links to everything you will need in case you don’t have drawers full of those tactile switches.
If this looks familiar, you have probably seen the PocketCHIP, and it is no secret that this project is an homage to that versatile pocket computer. We appreciate this kind of love for PocketCHIP, especially since they are now a limited commodity.
Once upon a time, there was a music venue/artist collective/effects pedal company that helped redefine industry in Williamsburg, Brooklyn. That place was called Death By Audio. In 2014, it suffered a death by gentrification when Vice Media bought the building that DBA had worked so hard to transform. From the ashes rose the Death By Audio Arcade, which showcases DIY pinball cabinets made by indie artists.
Their most recent creation is called A Place To Bury Strangers (APTBS). It’s built on a 1959 Gottlieb Mademoiselle table and themed around a local noise/shoegaze band of the same name that was deeply connected to Death By Audio. According to [Mark Kleeb], this table is an homage to APTBS’s whiz-bang pinball-like performance style of total sensory overload. Hardly a sense is spared when playing this table, which features strobe lights, black lights, video and audio clips of APTBS, and a fog machine. Yeah.
[Mark] picked up this project from a friend, who had already cut some wires and started hacking on it. Nearly every bit of the table’s guts had to be upgraded with OEM parts or else replaced entirely. Now there’s a Teensy running the bumpers, and another Teensy on the switches. An Arduino drives the NeoPixel strips that light up the playfield, and a second Uno displays the score on those sweet VFD tubes. All four micros are tied together with Python and a Raspi 3.
If you’re anywhere near NYC, you can play the glow-in-the-dark ball yourself on July 15th at Le Poisson Rouge. If not, don’t flip—just nudge that break to see her in action. Did we mention there’s a strobe light? Consider yourself warned.
[Micah Elizabeth Scott] needed a custom USB keyboard that wrapped around a post. She couldn’t find exactly what she wanted so she designed and printed it using flexible Nijaflex filament. You can see the design process and the result in the video below.
The electronics rely on a Teensy, which can emulate a USB keyboard easily. The keys themselves use the old resistor divider trick to allow one analog input on the Teensy to read multiple buttons. This was handy, but also minimized the wiring on the flexible PCB.
The board itself used Pyralux that was milled instead of etched. Most of the PCB artwork was done in KiCAD, other than the outline which was done in a more conventional CAD program.
We always enjoy seeing practical use of hacker-grade 3D printers. After all, there are only so many keychains you can make. Of course, you probably don’t need exactly this keyboard layout. But the techniques of creating the flexible PCB, printing the keypad itself and integrating everything with the electronics would be a great road map for any similar project.
As far as we can tell, the cat made no actual contribution to the final design. Unless you count inspiring flexibility, perhaps.
[Otermrelik] wanted to experiment with the Teensy audio library and adapter. That, combined with his 3D printer, led to a very cool looking build of the teensypolysynth. The device looks like a little mini soundboard with sliders and 3D printed knobs. You can see (and hear) it in the video below.
The Teensy audio library supports several output devices including several built-in options and external boards like the audio adapter used here. The library does CD-quality sound, supports polyphonic playback, recording, synthesis, mixing, and more.
Even more interesting is there is an audio design tool that runs in your web browser for building the audio portion of your code graphically. Even though it is in a browser, it isn’t tied back to a server so you can run the tool offline and you don’t have to worry about your world-changing audio design leaking out on the Internet. Browsing the tool is a good way to get a feel for just how much capability the library provides.
The tool can export code you add to your project and can import it again, too, if you need to make changes. Overall, it is very slick. Of course, the library does all the work, as you can see from this simple exported code:
The build details are a little light, but between the code, the pictures, and the 3D printable files you can probably figure it out. Your layout might be a little different, but you’d probably want that anyway.
We’ve talked about the Teensy audio library before, and we are still impressed. If music synthesis isn’t your thing, don’t worry. You can’t help but love this voice changer.
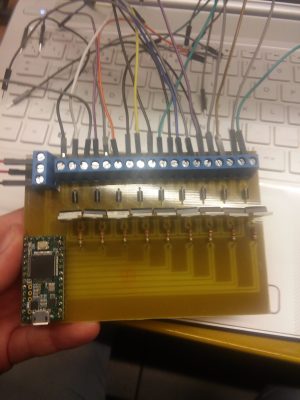
We aren’t sure this technically qualifies as music synthesis, but what else do you call a computer playing music? In this case, the computer is a Teensy, and the music comes from a common classroom instrument: a plastic recorder. The mistaken “flute” label comes from the original project. The contraption uses solenoids to operate 3D printed “fingers” and an air pump — this is much easier with a recorder since (unlike a flue) it just needs reasonable air pressure to generate sound.
A Teensy 3.2 programmed using the Teensyduino IDE drives the solenoids. The board reads MIDI command sent over USB from a PC and translates them into the commands for this excellent driver board. It connects TIP31C transistors, along with flyback diodes, to the solenoids via a terminal strip.
On the PC, a program called Ableton sends the MIDI messages to the Teensy. MIDI message have three parts: one sets the message type and channel, another sets the velocity, and one sets the pitch. The code here only looks at the pitch.
This is one of those projects that would be a lot harder without a 3D printer. There are other ways to actuate the finger holes, but being able to make an exact-fitting bracket is very useful. Alas, we couldn’t find a video demo. If you know of one, please drop the link in the comments below.
Planet Arduino is, or at the moment is wishing to become, an aggregation of public weblogs from around the world written by people who develop, play, think on Arduino platform and his son. The opinions expressed in those weblogs and hence this aggregation are those of the original authors. Entries on this page are owned by their authors. We do not edit, endorse or vouch for the contents of individual posts. For more information about Arduino please visit www.arduino.cc
You are currently browsing the archives for the Teensy category.


 A Teensy 3.2 programmed using the Teensyduino IDE drives the solenoids. The board reads MIDI command sent over USB from a PC and translates them into the commands for this excellent driver board. It connects TIP31C transistors, along with flyback diodes, to the solenoids via a terminal strip.

