Another Instructables by Jan Henrik, a police light with a Attiny25/45/85. He writes:
Hello, in this project I want to show you how to build a multi functional Police Light with a Attiny25/45/85 .
It will have several animations , which can be changed with a button on the circuit board, it has 2 channels, which can be controlled with PWM. That allows us to add serval animations or police light flashing sequences. The maximum rated current per channel is 500mA, that allows us to control high power LED´s, LED stripes or old Light Bulbs!
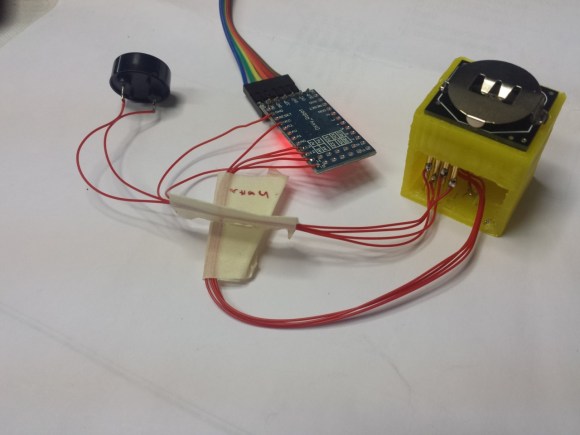
[Mastro Gippo] hit Shenzhen back in April and organized a challenge for himself: could he develop an electronic device from idea to product in only 24 hours? The result is the Grillino, a simple clone of the Annoy-a-Tron: a small, concealable device that makes chirping sounds at random intervals. It’s name was derived from a mix of the Italian word for a cricket—”grillo”—and, of course, “Arduino.”
Shenzhen was the perfect setting for his experiment, especially because [Mastro Gippo] was in town for the Hacker Camp we mentioned a few months ago. The build is pretty simple, requiring only a microcontroller, a battery, and a piezo speaker. What follows is a detailed journey of dizzying speed through the production process, from bags stuffed full of components, to 3D-printing a test jig, to searching for a PCB manufacturer that could fulfill his order overnight. Video and more below.
In his haste to arrive at a finished product, [Mastro Gippo] chose a faint-sounding buzzer, which turned out not to be piezo buzzers at all, but small speakers. Though this and other problems prevented him from completing the final version in under 24 hours, we’re impressed with [Mastro Gippo's] enthusiastic sprint through this build and with his stories of the Shenzhen environment. Check out his blog for the rest of the project details and some fond memories of his trip abroad.
arduino, ATTINY85, USBComments Off on The Smallest ATtiny85 Based USB Board
Possibly the smallestest ATtiny85 based ‘duino derivative.
Recently, Olimex anncounced the Olimexino 85s, claimed to be the “World’s smallest Arduino ever“. Now, that looks like a challenge. I guess it is about time to show off what has been on my desk since some time last year: The Nanite, pictured below.
I designed this board for fun after the Digispark and, subsequentally, the Adafruit Trinket were announced. The motivation was to have my own ATtiny85 based development board based on a USB bootloader and optimized for the ubiquitous 170 point mini-breadboards. In contrast to the Digispark it even sports a reset button. However, it lacks an integrated voltage converter as it is supposed to be powered by USB.
“Possibly the smallest ATtiny85 based ‘duino derivative”. Indeed! When Olimex announced the Olimexino 85s as the smallest Arduino ever, [Tim] took that as a challenge. His very small Arduino based USB devboard is quite a bit smaller than the Olimexino!
The Nanite 85 was carefully designed to be both small and functional. Not only is it 20% smaller than the Olimexino, but also sports a reset button! One of the coolest aspects of this design is that it has the same pinout and size as a DIP ATtiny85. This means that you can use the Nanite 85 for developing your code with the USB bootloader, and then you can directly replace it with a standard (pre-programmed) ATtiny85. The major downside to using this device over the aforementioned devices, is that it does not include a voltage regulator for powering the device via USB (or battery), the device is simply hooked directly to the 5V rail from the USB connector.
We can’t help but be impressed with this well-thought-out design. It is also easy to assemble since it uses larger surface mount components. If smaller components were used, even more features (such as a regulator) could be included. Do you have an even smaller USB Arduino? The race is on for the smallest Arduino ever!
Use a ATTiny85 (can be ATTiny45, ATTiny44) to make an Arduino just for US3.00 and name it as Tiny Arduino.
Tiny Arduino have only eight pins as shown in figure above, Pin4 is ground (Gnd), Pin8 is 5V (Vcc), Pin1 is Reset, Pin2 and Pin3 originally used to connecting the Crystal. In order to utilize all the IO, the internal oscillator (RC Oscillator) is used to replace the external clock which require a crystal. Therefore the Tiny Arduino is now come with five IO. Below shows the Arduino IO functions.
This is a complete DIY project which requires a handful of components such as the ATtiny 85, LM35, MAX7219 and a couple of resistors and capacitors running off a regulated 5 V supply.
Temperature Measurement Range : 0 to 150′C / 32 to 300’F
Controller: ATtiny 85
Display type – 4 digit multiplexed 7 segment display (Common Cathode type)
Programming Language: Arduino
The setup can display both in Celsius and Fahrenheit. By default the temperature is shown in Celsius but can be toggled to display in Fahrenheit using the push button.
7 Segment Digital Thermometer using ATtiny 85 - [Link]
Niek designed this BareDuino micro, that is available at github:
For some Arduino projects, you don’t actually need that many IO pins. That’s exactly the case when I tried to build a simple RGB throwie that would cycle through colours. I was looking for a cheaper alternative to the Arduino UNO’s ATmega328P when I stumbled across this post by MIT’s High-Low Tech lab. They developed a library for programming the 8-pins ATtiny45/85 from the Arduino IDE. It’s a very smart solution to use permanently in some low pin-usage projects, but you still need to hook up individual wires from your programmer to the ATtiny to be able to program it. That’s when I came up with the idea of the BareDuino Micro.
For relatively small (less number of pins than ATmega328) projects, ATtiny series, ATtiny45 or Attiny85 are good choice in terms of its physical size (8-DIP or 8-SOIC) and low power consumption. There are many ways to program it. One of the popular device is USBtinyISP and DASA. Both of them work very well with WinAVR (AVRdude).
Arduino is not just the chip, there is also the IDE that brings the same name and purpose. It’s open source and free, so you can use it on every microcontroller like the ones on Arduino boards. Here an example from India! Thanks [rahulkar] for submitting.
The project is a digital implementation of “book cricket game” which Indian students normally use to play in their childhood time. The heart of the project is 8 bit MCU from AVR family called ATtiny85. ATtiny85 are small and cheap microcontrollers which are convenient for running simple programs with low footprint. The software used for programming the MCU is Arduino.
If you’re interested there is a post on the [website] that explains all the step to build it, have a look!
Planet Arduino is, or at the moment is wishing to become, an aggregation of public weblogs from around the world written by people who develop, play, think on Arduino platform and his son. The opinions expressed in those weblogs and hence this aggregation are those of the original authors. Entries on this page are owned by their authors. We do not edit, endorse or vouch for the contents of individual posts. For more information about Arduino please visit www.arduino.cc
You are currently browsing the archives for the ATTINY85 category.