The Adafruit Infrared IR Remote Receiver has two selectable IR receiver chips. Usage is simple: Power the board by connecting V+ and ground to 3 to 5VDC, point a 38KHz remote control at the sensors and press some buttons. The demodulated IR envelope is piped out the Signal pin into your microcontroller which will then need to decode it.
The Adafruit Infrared IR Remote Receiver guide has everything you need to get started with using this breakout. There’s pages for overview, pinouts, CircuitPython, Arduino and resources for download.
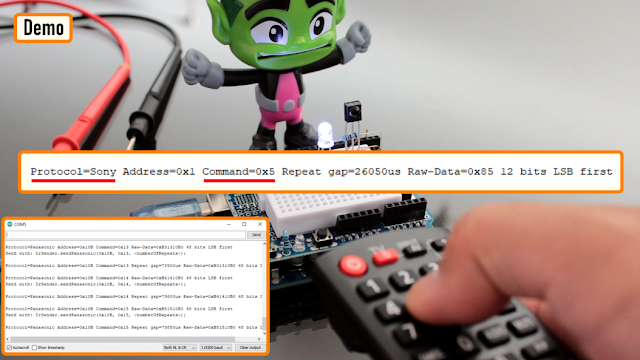
Even though some devices now use WiFi and Bluetooth, so much of our home entertainment equipment still relies on its own proprietary infrared remote control. By and large (when you can find them) they work fine, but what happens when they stop working? First port of call is to change the batteries, of course, but once you’ve tried that what do you do next? [Hulk] has your back with this simple but effective IR Remote Tester / Decoder.
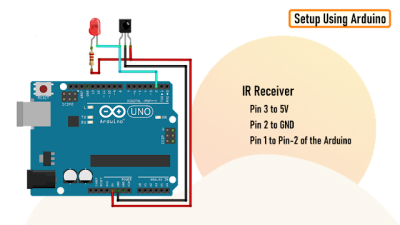
How to connect the TSOP4838 to an Arduino to read the transmitted codes
By using a cheap integrated IR receiver/decoder device (the venerable TSOP4838), most of the hard work is done for you! For a quick visual check that your remote is sending codes, it can easily drive a visible LED with just a resistor for a current-limit, and a capacitor to make the flickering easier to see.
For an encore, [Hulk] shows how to connect this up to an Arduino and how to use the “IRremote” library to see the actual data being transmitted when the buttons are pressed.
It’s not much of a leap to imagine what else you might be able to do with this information once you’ve received it – controlling your own projects, cloning the IR remote codes, automating remote control sequences etc..
It’s a great way to make the invisible visible and add some helpful debug information into the mix.
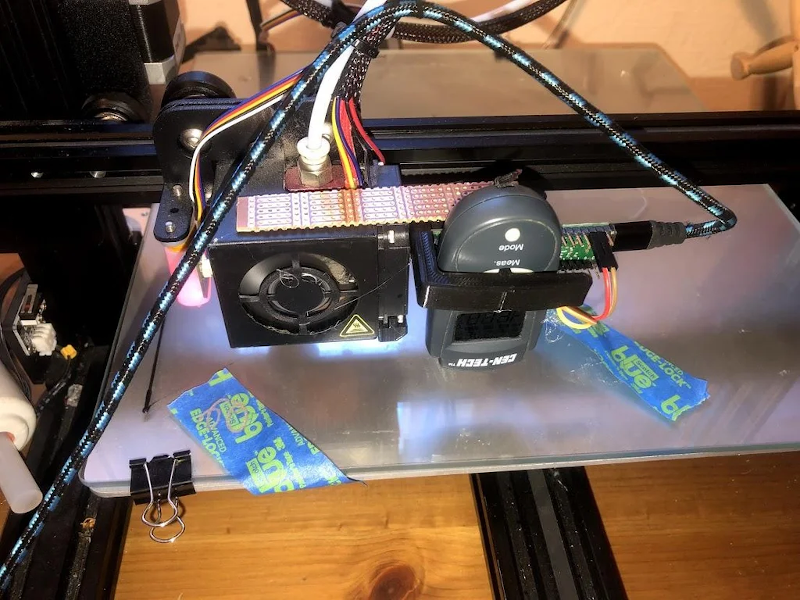
Don’t blame us for the title. [CCrome] admits it may well be the cheapest and worst IR camera available. The concept is surprisingly simple. Mount a cheap Harbor Freight non-contact thermometer on a 3D printer carriage and use it to scan the target. The design files are available on GitHub.
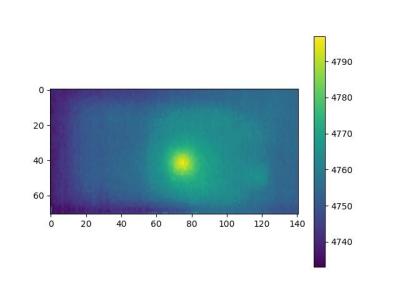
There is, of course, an Arduino to grab the data and send it to the PC. Some Python code takes care of converting it into an image.
Perhaps you don’t need a camera, but having a way to communicate with an $11 IR temperature sensor might come in handy someday. You do have to mash the measurement button down, so [CCrome] used the 3D printer to make a clamp for the button that also holds the POGO pins to the PCB. We would have been tempted to solder across the switch and also solder the wires to the pad. But, then again, you need a 3D printer for the project anyway.
Don’t expect the results you would get from a real thermal sensor. If you want that, you may have to build it yourself or open your wallet wide. If you need some inspiration for a use case, look at the thermal camera contest from a few years back.
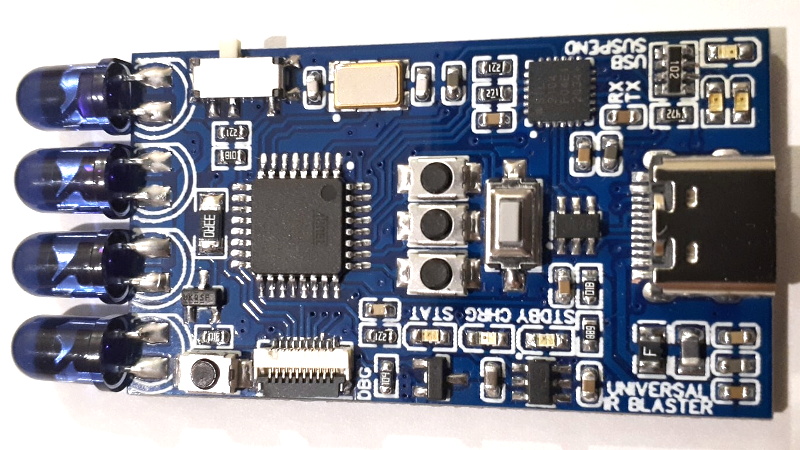
The TV-B-Gone is a well known piece of kit in hacker circles: just point it at a noisy TV in a public space, hit the button, and one of the hundreds of IR remote codes for “Power Off” that it blinks out in rapid succession is more than likely to get the intended response. Unfortunately, while a neat conversation starter, its practical use is limited to a single function. But not so with this programmable IR development board that creator [Djordje Mandic] describes as a “TV-B-Gone on steroids”.
Sure you can point it at a random TV and turn it off with a single button press, but you can also plug the board into your computer and control it directly through the serial connection provided by its CP2104 chip. Using a simple plain-text control protocol, the user can modify the behavior of the device and monitor its status. [Djordje] imagines this feature being used in conjunction with a smartphone application for covert applications. To that end, the device’s support for an onboard battery should keep it from draining the phone during extended operations.
Of course you could do something else entirely with it simply by firing up the Arduino IDE and writing some new code for the device’s ATmega328P microcontroller. As with the IR-enabled ESP8266 development board we looked at a few months ago, there are plenty of applications for an all-in-one board that allows you to communicate with the wide world of IR devices.
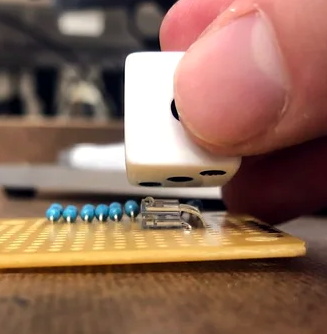
There are truisms about dice that you’ve probably already heard: if you have just one of them it’s called a “die”, opposite faces of each die always add up to seven, and those dots that you’re adding together are known as “pips”. But what about the infrared properties of those pips? It turns out they reflect less IR than the white body of the die and that trait can be used to build an automatic die reader.
Great projects have a way of bubbling to the surface. The proof of concept comes from way back in 2009, and while the source blog is now defunct, it’s thankfully been preserved by the Internet Archive. In recreating the project based on that barebones description, [Calvin] reached for a set of five IR transmitter/receiver pairs. Take a close look and you’ll see each transmitter is hidden under its partnered receiver. The light shines up through the receiver and bounces off the pip, or doesn’t if the pip is missing.
This board is only the sensor portion of the design. A 595 shift register provides the ability to control which IR pair is powered, plus five more signals heading out to the analog pins of an Arduino Uno to monitor how much light is being detected by the receivers. Hey, that’s another interesting fact about dice, you only need to read five different pips to establish the value shown!
We wish there were a demo video showing this in action, but alas we couldn’t find one. We were amused to hear [Calvin] mentioned this was a sorting assignment at University and the team didn’t want to build yet another candy sorter. Look, we love an epic M&M sorter just as much as the next electronic geek, but it’s pretty hard to one-up this dice-based random number generator which rolls 1.3 million times each day.
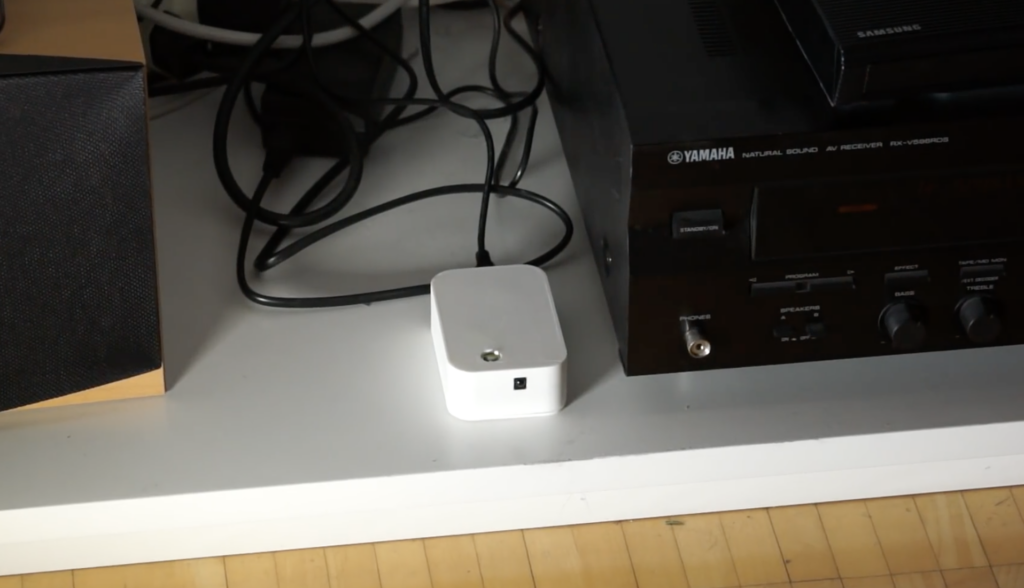
After purchasing a new television, maker Andreas Spiess’ remote no longer worked seamlessly with the controller his family had been using. While a universal remote could have solved the problem, in order to keep things simple to use, he instead came up with an infrared “babel fish” signal translator—named after the language translation animal Hitchhiker’s Guide to the Galaxy’s.
The device receives infrared signals from the original remote, then uses an Arduino Nano to pass the properly translated pulses on to his TV and receiver. A 3W IR diode transmits these new signals with the help of an N-channel MOSFET, giving it enough power to control each component, even without the proper line-of-sight orientation.
It’s a hack that could be useful in many situations, and Speiss goes over how it was made, along with design requirements in the video below.
Hackaday.io user [peterquinn] has encountered a problem with his recently unruly cat peeing under the dining table. Recognizing that the household cat’s natural enemy is the spray bottle, he built an automatic cat sprayer to deter her antics.
The build is clear-cut: an Arduino Uno clone for a brain, an MG995 servo, PIR sensor, spray bottle, and assorted electronics components. [peterquinn] attached the servo to the spray bottle with a hose clamp — ensuring that the zero position is pointing at the trigger — and running a piece of cabling around the trigger that the servo will tug on. Adding a capacitor proved necessary after frying the first Uno clone, as the servo powering up would cause the Uno to reset.
The code is set up to trigger the servo — spraying the cat twice — once the PIR detects the cat for more than ten seconds. After toying with a few options, [peterquinn] is using a 9V, 2A power supply that works just fine. For now, he hopes the auto-sprayer should do the trick. If it somehow doesn’t work, [peterquinn] has mused that a drastic upgrade to the vacuum may be necessary.
[LittleTern] — annoyed by repetitive advertisements — wanted the ability to mute their Satellite Box for the duration of every commercial break. Attempts to crack their Satellite Box’s IR protocol went nowhere, so they thought — why not simply mute the TV?
Briefly toying with the idea of a separate remote for the function, [LittleTern] discarded that option as quickly as one tends to lose an additional remote. Instead, they’re using the spare RGYB buttons on their Sony Bravia remote — cutting down on total remotes while still controlling the IR muting system. Each of the four coloured buttons normally don’t do much, so they’re set do different mute length timers — customized for the channel or time of day. The system that sends the code to the TV is an Arduino Pro Mini controlling an IR LED and receiver, with a status LED set to glow according to which button was pressed.
With the helpful documentation from [Ken Shirriff]’s research into IR remotes — yes, that [KenSchirriff] — [LittleTern] had the needed codes for their TV in hand and a programmed and ready Arduino. They were able to 3D print a project box, attach it to their TV near its IR receiver, and power it off its USB! Bonus!
[LittleTern] has provided their code in their blog post. There’s a little timing tinkering that needs to be done to ensure it works smoothly with a given setup, but otherwise, gone are the days of fumbling for the remote as your program resumes!
Once you have a track and a kart to race on it, what’s missing? A lap counter that can give your lap times in hardcopy, obviously! That’s what led [the_anykey] to create the Arduino-based Lap Timer to help him and his kids trim those precious seconds off their runs, complete with thermal printer for the results.
The hardware uses an infrared break-beam sensor module (a Velleman PEM10D) to detect when a kart passes by. This module is similar to a scaled-up IR reflective object sensor; it combines an IR emitter and receiver on one end, and is pointed at a reflector placed across the track, up to 10 meters away. When a kart breaks the beam, the module reports the event to the rest of the hardware. Only needing electronics on one side allows the unit to be self-contained.
An obvious shortcoming of this system is the inability to differentiate between multiple karts, but for timing a single driver’s performance it does the trick. What’s great about this project is it showcases how accessible hardware is today; a device like this is possible to put together with what are essentially off-the-shelf components available to any hobbyist, using an Arduino as the glue to hold it together. We’d only comment that a red-tinted piece of plastic as an overlay for the red display (and a grey-tinted one for the green) would make the LED displays much easier to read. Still, this is a very clean and well-documented build. See it in action in the video embedded below.
Planet Arduino is, or at the moment is wishing to become, an aggregation of public weblogs from around the world written by people who develop, play, think on Arduino platform and his son. The opinions expressed in those weblogs and hence this aggregation are those of the original authors. Entries on this page are owned by their authors. We do not edit, endorse or vouch for the contents of individual posts. For more information about Arduino please visit www.arduino.cc
You are currently browsing the archives for the Infrared category.