Want to sniff a remote control or other IR device's control codes? The Smart Remote Control will make quick work of that, combining an Arduino Yún with a simple solderless breadboard circuit.
Combine the Arduino Yún with a simple solderless breadboard circuit to create a homemade 'universal' remote control that you can navigate with your laptop or smartphone.
After spending some time on Arduino Forum and finding the right solutions for his project’s sketch, Connor Hubeny shared with us the infraHarp: an Arduino-powered eight-tone arpeggiator made with infrared emitters and detectors, Sparkfun’s Musical Instrument Shield, and an Arduino Mega 2560:
The InfraHarp was my first Arduino project. At first the project seemed daunting since I had no previous experience in programming and electrical engineering. Yet after spending some time with the Arduino I realized that electronics work very much the same, and by learning a few core components you are really right on the doorstep of exploring any technology you have the faintest interest in.
The InfraHarp can play in the keys of A, B, C, D, E, F, G in major, minor melodic and harmonic scales, with two octave choices. Listen to it in the video below:
The project requires basic soldering skills and Connor shared all the info and the sketch on this page.
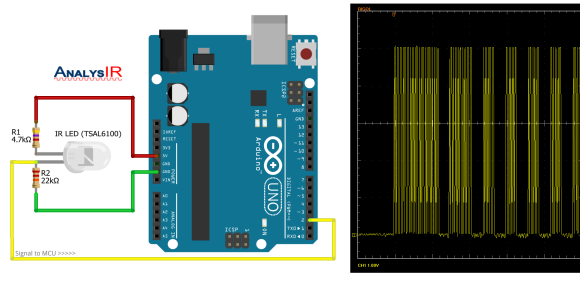
Old infrared remote controls can be a great way to interface with your projects. One of [AnalysIR's] latest blog posts goes over the simplest way to create an Arduino based IR receiver, making it easier than ever to put that old remote to good use.
Due to the popularity of their first IR receiver post, the silver bullet IR receiver, [AnalysIR] decided to write a quick post about using IR on the Arduino. The part list consists of one Arduino, two resistors, and one IR emitter. That’s right, an emitter. When an LED (IR or otherwise) is reverse biased it can act as a light sensor. The main difference when using this method is that the IR signal is not inverted as it would normally be when using a more common modulated IR receiver module. All of the Arduino code you need to get up and running is also provided. The main limitation when using this configuration, is that the remote control needs to be very close to the IR emitter in order for it to receive the signal.
What will you control with your old TV remote? It would be interesting to see this circuit hooked up so that a single IR emitter can act both as a transmitter and a receiver. Go ahead and give it a try, then let us know how it went!
Most of the buttons on a remote control are never used. So why not use them to control appliances and other electronics around your house. In this project, I am going to show you how to use an Arduino to decode the signal from your remote and use it to […]
Steve Yoshida is a systems engineer and worked on a project involving Arduino Micro and Infrared remote adapter:
My new Arduino sat on the shelf for a few weeks before I came up with a quick project that I wanted to use it for. I use XBMC a lot on both PC and Raspberry Pi and wanted a quick way to get IR keyboard inputs from a remote. I had used the IR library for Arduino in the past so I was already pretty familiar with the hardware and code involved. What made the Arduino Micro ideal for this project was the keyboard emulation supported by the board and also its compact size…
[Hlesliebole] wanted a finer degree of remote control over his time-lapse shots, so he decided to build an Arduino-driven infrared shutter. He ended up creating this killer Arduino-controlled photography rig that does a whole lot more.
This hack was built for [Hlesliebole]‘s Nikon D3100, but he says it should work with any DSLR and remote shutter. This initial build uses an LED as a stand-in for the remote shutter that he ordered. He intends to update the post once it arrives and he integrates it.
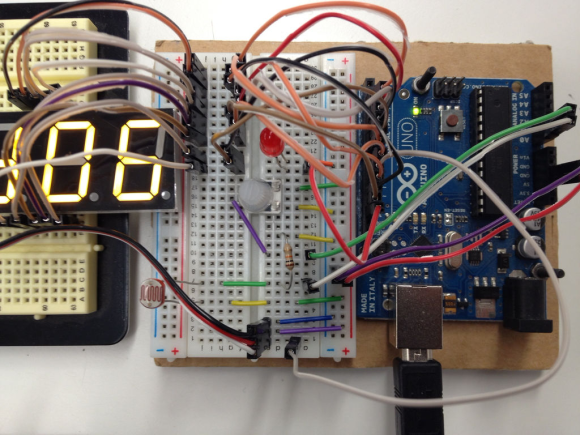
[Hlesliebole] wired a 7-segment display to show the current time delay between photos. This can be set on the fly with a potentiometer, so there’s no need to stop and reprogram the Arduino. And while you’re grabbing a beer and watching the sun slowly sink, the rig can better capture that sunset because of a photoresistor. It detects the ambient light level and minimizes the number of throwaway dark shots.
If that weren’t enough, he’s built servo functionality into the code to support remote control over the camera’s physical position, allowing for panning or rotation over a scene. [Hlesliebole] doesn’t go into detail, but he assures us that there are many tutorials out there. If you think you’re man enough, you could always work in this outstanding versatile motion dolly hack.
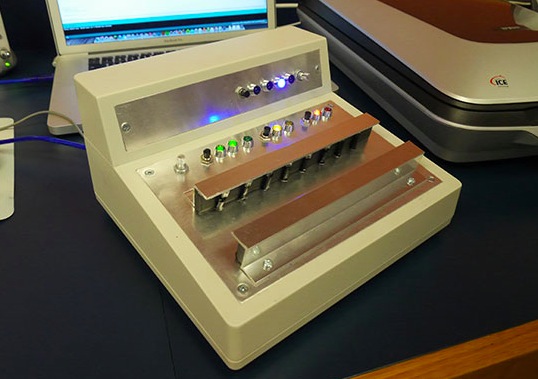
Field Lines is an interactive instrument designed by composer Charles Peck as part of his Threshold of Beauty project. On his website, Charles says that the installation is his largest piece to date:
Constructing this substantial piece of equipment drew on a number of disciplines including physical design, carpentry (an occasional hobby of mine), circuit design, and coding. As alluded in the title, this piece focuses on the magnetic field. There are three sections of magnetic material, including magnetic sand, a compass array, and zinc-plated iron. Audiences are able to manipulate these materials with a magnet in the space below each case while infrared sensors pick up their movement. The sensors send that information to an Arduino board, which then creates unique music for each section.
The instrument itself contains 3 separate cases of magnetic material, including magnetic sand, a compass array, and zinc-plated iron. Audiences are able to manipulate these materials with a magnet in the space below each case while infrared distance sensors pick up their movement. The sensors send that information to an Arduino Mega 2560 board, which then uses the Mozzi audio library to create spontaneous music. Thus providing the audience a chance to be part student, as they learn about the magnetic field, and part composer, as they craft the music.
Watch the video below:
This installation was premiered at the Bakken Museum in Minneapolis, it currently resides at the Works Museum in Bloomington and was generously supported by the McKnight Foundation and the American Composer’s Forum.
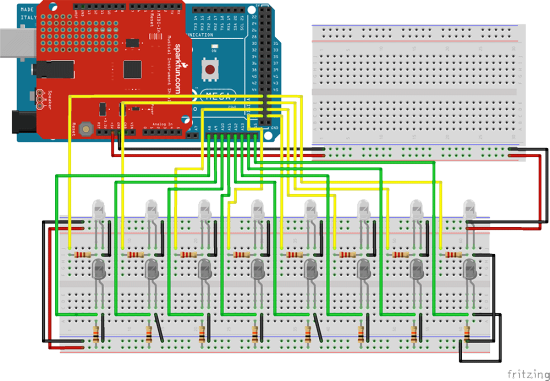
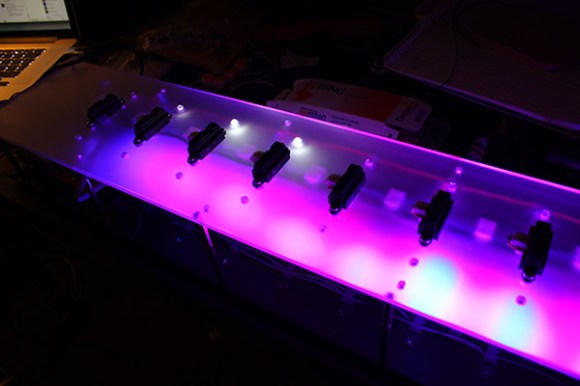
[Edward] wanted a different way to modulate notes on his MIDI controller, so he decided to go touchless. Inspired by the pressure-sensing modulation on his Edirol keyboard, [Edward] aligned eight sensors into a row of playable notes and used infrared to sense the distance of a player’s hand from the keys. He also included some function buttons to cycle through 10 octaves and RGB LEDs beneath the table that perform alongside the music.
He chose SHARP GP2D120 sensors (direct link to datasheet) for their low threshold, which allowed the board to detect distance close to the sensor. Each is mounted onto a sheet of frosted acrylic along with its own “hold note” button and an LED to indicate the key is playing. The lower panel houses an Arduino Mega that drives the system along with an RGB LED strip and its driver board. [Edward] used Maxuino and OSC-Route to interface the Mega to a Max/MSP patch which runs the show.
Learn more about the FlightDeck’s features in a video demonstration of the controller and the software after the break, then check out some other MIDI hacks like this organ pedal or the Arduino-driven MIDI sequencer.
[Jeremy] refused to settle on your typical alcohol storage options, and instead created the Boozeshelf. Like most furniture hacks, the Boozeshelf began as a basic IKEA product, which [Jeremy] modified by cutting strips of wood to serve as wine glass holders and affixing the front end of a wine rack at the base to store bottles.
In its standard operating mode the Boozeshelf lies dark and dormant. Approaching it triggers a cleverly recessed ultrasonic sensor that gently illuminates some LEDs, revealing the shelf’s contents. When you walk away, then lights fade out. An Arduino Mega running [Jeremy's] custom LEDFader library drives the RGB LED strips, which he wired with some power MOSFETS to handle current demands.
[Jeremy] didn’t stop there, however, adding an additional IR receiver that allows him to select from three different RGB LED color modes: simple crossfading, individual shelf colors (saved to the on-board EEPROM), or the festive favorite: “Dance Party Mode.” Stick around after the break to see [Jeremy] in full aficionado attire demonstrating his Boozeshelf in a couple of videos. Considering blackouts are a likely result of enjoying this hack, we recommend these LED ice cubes for your safety.
Planet Arduino is, or at the moment is wishing to become, an aggregation of public weblogs from around the world written by people who develop, play, think on Arduino platform and his son. The opinions expressed in those weblogs and hence this aggregation are those of the original authors. Entries on this page are owned by their authors. We do not edit, endorse or vouch for the contents of individual posts. For more information about Arduino please visit www.arduino.cc
You are currently browsing the archives for the Infrared category.

 Want to sniff a remote control or other IR device's control codes? The Smart Remote Control will make quick work of that, combining an Arduino Yún with a simple solderless breadboard circuit.