Posts | Comments

Planet Arduino

Archive for the ‘Photography’ Category

It’s 2017 and even GoPro cameras now come with voice activation. Budding videographers, rest assured, nothing will look more professional than repeatedly yelling at your camera on a big shoot. Hackaday alumnus [Jeremy Cook] heard about this and instead of seeing an annoying gimmick, saw possibilities. Could they automate their GoPro using Arduino-spoken voice commands?

It’s an original way to do automation, for sure. In many ways, it makes sense – rather than mucking around with trying to make your own version of the GoPro mobile app (software written by surfers; horribly buggy) or official WiFi remote, stick with what you know. [Jeremy] decided to pair an Arduino Nano with the ISD1820 voice playback module. This was then combined with a servo-based panning fixture – [Jeremy] wants the GoPro to pan, take a photo, and repeat. The Arduino sets the servo position, then commands the ISD1820 to playback the voice command to take a picture, before rotating again.

[Jeremy] reports that it’s just a prototype at this stage, and works only inconsistently. This could perhaps be an issue of intelligibility of the recorded speech, or perhaps a volume issue. It’s hard to argue that a voice control system will ever be as robust as remote controlling a camera over WiFi, but it just goes to show – there’s never just one way to get the job done. We’ve seen people go deeper into GoPro hacking though – check out this comprehensive guide on how to pwn your GoPro.


Filed under: Arduino Hacks, digital cameras hacks

leds_cpaint_028Turn a Circuit Playground into a light-generating "paintbrush" for long-exposure photography.

Read more on MAKE

The post How to Easily Build a “Light Paintbrush” appeared first on Make: DIY Projects and Ideas for Makers.

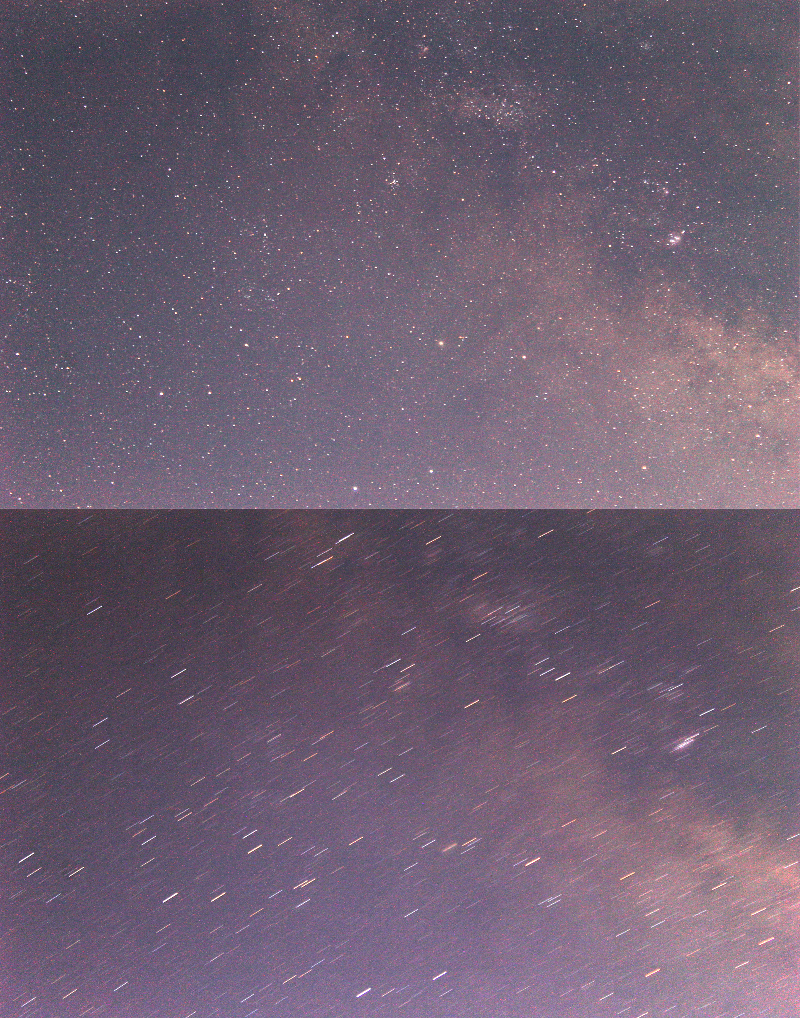
The next giant leap for mankind is to the stars. While we are mostly earthbound — for now — that shouldn’t stop us from gazing upwards to marvel at the night sky. In saying that, if you’re an amateur astrophotographer looking to take long-exposure photos of the Milky Way and other stellar scenes, [Anthony Urbano] has devised a portable tracking setup to keep your photos on point.

When taking pictures of the night sky, the earth’s rotation will cause light trails during long exposures. Designed for ultra-portability, [Urbano’s] rig uses an Arduino UNO controlled Sanryusha P43G geared stepper motor coupled to a camera mounting plate on a small tripod. The setup isn’t designed for anything larger than a DSLR, but is still capable of taking some stellar pictures.

55mm Exposure Comparison

A quartet of buttons and indicator LEDs allow [Urbano] to adjust the tracking speed and display the current speed; the key here is that it doesn’t require re-calibration for each use. The entire setup fits inside a standard camera bag, which makes for easier treks out into the wilds — away from light pollution — to truly capture the night sky.

[Urbano] has designed the project to be accessible to most amateur makers, but if you’re looking for a more involved setup, check out this star tracker — it uses 3D printed parts and has lasers!

[Thanks for sharing your project with us, Anthony Urbano!]


Filed under: Arduino Hacks, digital cameras hacks

[Ivan] likes to take time lapse videos. Using his 3D printer and a stepper motor he fashioned a rig that allows him to control the camera moving any direction on a smooth floor.

The dolly has a tripod-compatible mounting plate and scooter wheels. An Arduino runs the thing and a cell phone battery provides power. A pot sets the speed and [Ivan] provides code for both a linear pot, which he suggests, and for a logarithmic pot, which he had on hand. You can see a video of the results below.

The device looks good thanks to the 3D printed body; [Ivan] provides the STL files if you want to reproduce his work. You have to print several of the parts multiple times.

We’ve seen good looking dolly rigs made of wood, if you are better at woodworking than 3D printing. We also saw a less-polished looking set up using Makeblock.


Filed under: Arduino Hacks

If you’ve ever seen a TV commercial for any fast-food chain, then chances are you’re familiar with the burger drop shot–you know, that scene where ingredients like ketchup, lettuce, tomatoes, onions, bacon, beef patties and sesame seed buns fall from above and then stack themselves upon landing. Well, photographer/Maker Steve Giralt wanted to try capturing a shot like this on his own without the use of CGI or an expensive post-production process.

To accomplish this, Giralt created a rig with an Arduino-based timing control system (named P.A.T.R.I.C) that triggers the camera motion, as well as the drop of the burger’s ingredients so that everything falls perfectly. 

As he explains:

The final video is a synchronized work of art. In the half second of real time, multiple Arduino controlled servo motors with custom 3D printed scalpel blades cut through elastic bands holding up the top bun, pickles, onions, lettuce, tomato, bacon, meat, and lower bun while a 3D printed air powered catapult launched ketchup and mustard blobs into each other.

This all happened while the Phantom camera was moving down on the motion control robot arm at high speed, adjusting focus, as it raced the ingredients and gravity down to the landing.

When we got a perfect landing of the burger, I had a hand model slam down a freshly poured beer down next to the burger to finish off the shot. It was so much fun!

You can read all about the build here, and get a behind-the-scenes look in the video below!

(Photos: PetaPixel)


doubledriparticle-25High speed photography is great for capturing the moment when two water droplets collide and make incredibly beautiful fluid impacts.

Read more on MAKE

The post Capture Incredible Water Droplet Impacts with a High Speed Camera Rig appeared first on Make: DIY Projects and Ideas for Makers.

BMC_ArduinoBlackmagic's new 3G-SDI Arduino shield will make automating your camera and photography rig easier than ever with SDI input and output.

Read more on MAKE

The post Control Your Camera Rig with the Blackmagic SDI Arduino Shield appeared first on Make: DIY Projects and Ideas for Makers.

RTI1Using many light sources, reflectance transformation imaging (RTI) is a method for photographing that allows you to get 3D map of surfaces.

Read more on MAKE

The post Shoot Super Detailed Macro Photographs with an RTI Camera Rig appeared first on Make: DIY Projects and Ideas for Makers.

Pic-2016-02-16-23;44;53Need a quick mood lift when you're missing your pet? This treat dispensing camera rig will text you a photo of your pet.

Read more on MAKE

The post Remote Treat Dispenser Sends You Adorable Photos of Your Pet appeared first on Make: DIY Projects and Ideas for Makers.

Screen Shot 2015-12-04 at 1.45.57 PMThe purpose is clear. You don’t want your kids to steal your food from the cupboard, or from the fridge, or someone to open your locker. Or maybe you want to take pictures of your pet stealing food. Or maybe you are Dwight Schrute and you want to finally unmask […]

Read more on MAKE

The post You Can’t Touch This! Arduino Yún Alarm System appeared first on Make: DIY Projects, How-Tos, Electronics, Crafts and Ideas for Makers.


  • Newsletter

    Sign up for the PlanetArduino Newsletter, which delivers the most popular articles via e-mail to your inbox every week. Just fill in the information below and submit.

  • Like Us on Facebook