Posts | Comments

Planet Arduino

Archive for the ‘Makers’ Category

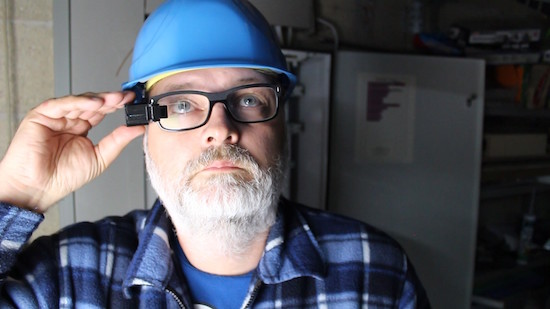
With Alain Mauer’s Arduino glasses and a Bluetooth multimeter, electrical data is always in view!

If you’re in a job where you have to take readings inside a live electrical panel, one thing that’s inconvenient, and even dangerous at times, is having to look away from your hands to read your multimeter. With hopes of “making an engineer’s life easier and safer,” Mauer solved this problem using an Arduino Pro Micro and a BLE module to show data from a Bluetooth-enabled multimeter. Now he can see data on a display that looks similar to a Google Glass device. Perhaps this method could be expanded to other devices in the future!

If you’d like to build your own glasses, a description and 3D printing files can be found on Hackaday.io.

This robotic fish is made from bent PVC pipe and moves its tail for locomotion.

If you’re going to build an underwater vehicle, propeller control is the conventional solution. Eric Dirgahayu, however, created his underwater creature in the form of a fish, complete with a tail that powers it through the water, and pectoral fins that could, in theory, steer it in the correct direction. There is also a ballast tank to adjust its buoyancy. Interestingly, control of this “fish” is accomplished via a TV remote, so the surrounding water would need to be relatively clear.

Now we already have a complete fish robot body, we need to provide it with life! We will use the Arduino Pro Mini because the shape is small and can fit into safety box. In addition, you also need Pro Mini Arduino Motor Driver for control of ballast tanks, UBEX for power protection and two cell LiPo battery 1000mAh for power.

Here’s Dirgahayu’s general project description. If you’re interested in making a fish like this yourself, the physical build is seen here, and the electronics are found on this page.

Gone are the days of fumbling with your keys! Adham Negm has come up with a way to open your door with a simple hand gesture while holding your smartphone.

To accomplish this, Negm uses an Arduino Uno, a servo motor to move the bolt, and a 1Sheeld to interface with the smartphone. The 1Sheeld reads the device’s accelerometer data, and then activates the servo when it recognizes a predefined gesture.

Sound like a hack you’d like to try for your room? You can find the entire project on Instructables.

Rather than stumble around in the dark or blind himself with a bedside lamp, Maker Scott Clandinin has come up with an Arduino-powered, motion-activated lighting system for nighttime wandering.

The setup is fairly simple. A PIR sensor detects movement, which automatically triggers a hidden strip of RGB LEDs to illuminate a path as you get out of bed. An RTC module keeps the time and ensures that the lights only turn on between 9pm and 8am. (The good news is that the strip will only stay lit for approximately two minutes, and won’t keep you up for the rest of the night.) A small capacitive touch sensor on the bottom of its case can also be used to test the lighting display outside of operational hours. 

Tired of bumping into things or having to find the switch? Then check out Clandinin’s entire project on Hackaday.io.

YouTuber “Mom Will Be Proud” and his family have a cat. And like all pets, their feline friend requires fresh food every morning. But rather than disrupt your sleep or daily routine, why not build an automated feeder using some spare parts? This is exactly what the Maker did using an Arduino, a servo, a simple button, a power supply, and two cans–one for housing the electronics, the other for the food.

Mom Will Be Proud cut little openings into each container, and connected them to a servo that rotates one on top of the other without ever getting stuck. A broken IKEA timer and a piece of plastic are used for the button, which when pressed, turn the cans until its holes match up and the food is dispensed into a bowl.

You can see how it works below!

Maker Shuang Peng has created a 13 DOF animatronic hand using an Arduino Mega, seven servo motors, and six air cylinders, along with a Leap Motion sensor for control.

As briefly described on his Instructables page:

There are various ways to control the hand. I’ve tried the Leap Motion sensor and the data glove, which catches my motion via Processing. Then the Processing communicate with the Mega via serial. Now, I’m trying to use EMOTIV Insight EEG sensor to control it.

What do you do when you find your old Game Boy? Most of us try to boot it up and reminisce the days of playing Tetris, Super Mario and Pokémon. Others like Gautier Hattenberger decide to turn it into a drone controller.

In order to do this, Hattenberger modified the Game Boy’s Game Link port with an Arduino Nano and an FTDI chip, which converts the Game Link signals to USB. Using a small piece of software on his laptop, he is able to control his Parrot ARDrone 2.0 via the classic device— A and B buttons for up or down, and the directional arrows for maneuvering.

Hattenberger has detailed his entire build here, and shared the code on GitHub.

Not only can asthma be difficult to diagnose, it can be fatal if left undetected. As a result, many kids are over-diagnosed with the disease, especially those under five, and over-treated with inhalers which leads to reduced growth and immunity. At just age nine, Arnav Sharma discovered that the best way to manage asthma is to prevent attacks by understanding their triggers and following a treatment plan. His solution? The AsthmaPi kit.

Sharma’s inexpensive device consists of an Arduino Uno, a Raspberry Pi, a Sense HAT, a MQ-135 gas sensor and a Sharp optical dust sensor. Intended for parents of children suffering from asthma and those not sure about the diagnosis, the kit sends emails and text message reminders to take their medication and to visit their physician.

The sensors track and collect data about the current temperature, humidity, dust levels and the presence of hazardous gases, all of which can be used to better understand an individual’s triggers and to avoid severe attacks. It will also enable children and their parents with better self-management of asthma.

Although the kit was developed particularly with children in mind, it can be just as helpful for adults as well. With an idea this incredible from a nine-year-old, it’s no wonder he was the recipient of this year’s Tech4Good People’s Choice and Winner of Winners awards.

A team from the University of California, Riverside has developed a LEGO-like system of blocks that enables users to make custom chemical and biological research instruments quickly, easily and affordably. The 3D-printed blocks can create various scientific tools, which can be used in university labs, schools, hospitals, or anywhere else.

The blocks–which are called Multifluidic Evolutionary Components (MECs)–are described in the journal PLOS ONE. Each unit performs a basic task found in a lab instrument, such as pumping fluids, making measurements, or interfacing with a user. Since the blocks are designed to work together, users can build apparatus—like bioreactors for making alternative fuels or acid-base titration tools for high school chemistry classes—rapidly and efficiently. The blocks are especially well-suited for resource-limited settings, where a library of blocks could be utilized to create an assortment of different research and diagnostic equipment.

The project is led by graduate student Douglas Hill along with assistant professor of bioengineering William Grover, and is funded by the National Science Foundation. You can read all about the 3D-printed system here, and check out the video below which reveals an Arduino Uno being put to work.


Created by “modulogeek,” the MonomePi is a step sequencer that uses a monome as an input controller and a toy glockenspiel as the output instrument.

The brain of the device is a Raspberry Pi 3, which runs a step sequencer program written in Python. Both the monome and an Arduino Uno are connected to the Pi via USB. The Arduino controls eight servos, each attached to a “mallet” made of LEGO bricks taped onto coffee sticks.

As modulogeek explains, the Arduino is programmed to receive serial commands from the Python program. A command is one byte or 8 bits, each bit representing ‘on’ (play the note) and ‘off’ (do nothing) states of each servo.

The monome is entirely controlled by the Python program, which sends serial commands that, for example, tell the monome which buttons need to light up or turn off. It also receives serial data from the monome, like which buttons are getting pressed and depressed.

You can see it below, as well as check out its GitHub page here.


  • Newsletter

    Sign up for the PlanetArduino Newsletter, which delivers the most popular articles via e-mail to your inbox every week. Just fill in the information below and submit.

  • Like Us on Facebook