We’ve all been there. When debugging a microcontroller project, we just want to put in a print statement to figure out what’s going on with the microcontroller in real time. However, advanced embedded programmers know that printf statements are verboten: they’re just too SLOW. While not fixing this plight entirely, [Atakan Sarioglu] has come up with a clever way to create readable debug messages with minimal runtime overhead.
[Atakan Sarioglu]’s innovation, called BigBug (Github), is a dynamically-generated codebook. The codebook translates abbreviated messages sent over serial (UART here) to longer-form human-readable messages. To generate the codebook, BigBug automatically parses your comments to create a lookup between an abbreviation and the long-form message. When you are running your program on the microcontroller, BigBug will translate the short codes to long messages in real-time as you send log/debug data over serial.
For example (not restricted to Arduino-only), if you write Serial.println("HW") //@BB[HW] Hello World!, BigBug will translate the received characters HW\n to Hello World!. In this simple example, the abbreviation uses 3 characters while the fully readable message uses 13 characters, for a savings of ~75% with no loss of clarity. More advanced usage lets you log data: Serial.println("DT 1 1") //@BB[DT] Today's Date is: {0}/{1} becomes Today's Date is 1/1. You can also use enumerated variables (last example could showToday's Date is Jan. 1 with the same print command).
In terms of real-world benefit, using a 115200 baud connection (with 8N1 encoding) this is 115200 bits per second /(8+1) bits per byte = 12800 bytes/sec = 1 byte every 80 microseconds. Sending 13 bytes of Hello World!\n (in a naive, blocking UART implementation) takes ~1 ms of CPU time. With the shortcode HW\n, it would take ~0.25 ms to send essentially the same message (then decoded by BigBug). Note that because this just operates on serial data, BigBug is language independent
I work as a software developer for a biology lab where my day job consists of creating applications to deal with big data visualisation. Recently however one of my colleagues had the need to take regular temperature measurements form a range of jars of liquids over quite an extended period. The commercial available solutions to achieve this are expensive and surprisingly lacking in features. So, as a dedicated hacker and maker, I immediately stepped in an said we could make something better ourselves. So we did. And this is how.
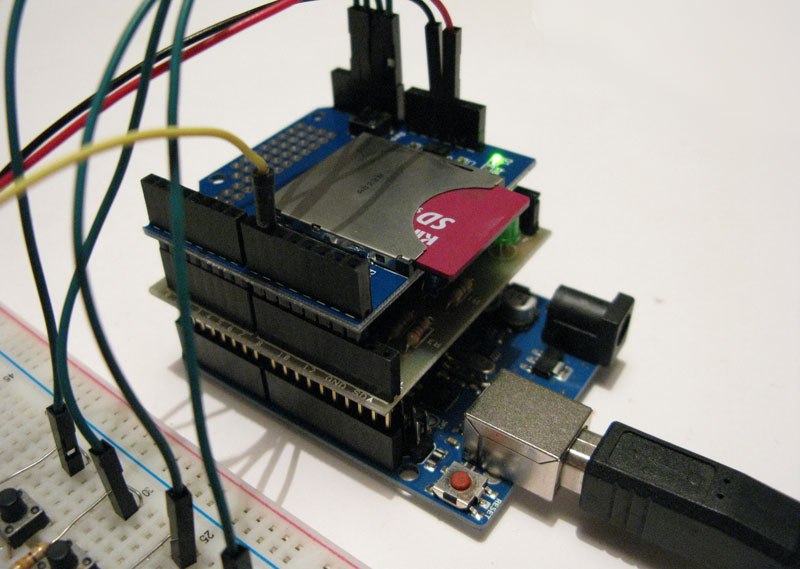
One of the best capabilities provided by Arduino regards its very high modularity, which helps users to quickly translate ideas into physical artifact, as practically demonstrated by Mauro, which shows on his blog how to build a simple data-logger by properly combining different shields. By using few additional components (mainly resistors and buttons) a fully-functional data logger can be easily implemented.
In this review we examine the new Agilent U1177A infra-red to Bluetooth adaptor for the Agilent U1272A DMM. You can also use the adaptor with the U1240-series DMMs with the optional adaptor. With some PC or Android device software you can monitor or log data from up to three DMMs. So let’s have a look and see what it’s all about.
Introduction
The adaptor arrives in a small box:
… with the following contents:
It was a relief to see the AAA cells included as we didn’t have any in stock. The yellow document is the China RoHS sheet, and the instructions are short but well detailed. The unit itself is quite small:
To fit the battery or reset the device, the front cover slides open revealing the innards to some degree:
and the rear:
The unit clips soundly to the rear of the DMM, however it does stick out quite a lot:
If you need to leave the meter unattended, you’ll need a level and vibration free surface, as the adaptor can be knocked out relatively easily from the top. The adaptor also blocks the hole at the back which some users may use with a hook or loop for positioning the DMM.
Software and Operation
You can use the U1177 with two platforms – Android and Windows, and we tested both. I’m sure if you have Mac Parallels, etc., that there may be some success there but I haven’t tested them. There are two applications available for Android devices – the mobile logger and mobile meter. You can download them both from the Google Play app – just search for ‘agilent‘, and the results should be
The third app is a game that is somewhat entertaining. We tried the applications on two Android devices – a HTC Velocity running Android 4.0.3 (which failed miserably, the software kept freezing) and a Motorola Xoom MZ601 with Android 3.2. I would say now that the software is marked “Beta” so caveat emptor. The data logging software worked on the Xoom but not the “Agilent Mobile Meter”. Moving forward, the logging software is quite good – you can display a graph, table or statistical value of the incoming data from up to three separate DMMs.
Below is a rough video of using the Xoom with data logging. We first make the Bluetooth connection, then measure resistance of a 1k ohm logarithmic pot, change the view to data table, then stop the logging and email the data. The app can email a .csv file which can be opened with any spreadsheet, etc. Using the app you can label each DMM feed to avoid confusion with the data files in the future.
Using the U1177A with a Windows 7 x64 machine was a lot more successful. You can download the Windows-based software from here (97 MB). After pairing the adaptor with the bluetooth connection software, the Agilent software loads but does not connect. You need to alter the data speed to 19200bps and select the COM port from the drop-down list in the “communication settings” on the left-hand side of the window, as shown below:
You can also use terminal software and AT commands to change the parameters of the U1177A, which is described in the user manual. Moving forward, once connected you can measure and log to your heart’s content. You can display a virtual meter:
Or choose a graphing display mode:
Note the short drop in value to zero as the graph increased on the far-right of the measurement in the image above. This occurs when the meter is changing range, just as the LCD will blink off then on due to the same phenomenon. Finally, you can also display the data as a table, for example:
Finally, you can export the data to a .csv file which can be opened with the usual spreadsheet or text editing software:
Using Windows OS Remote Multimeter UseData LoggingOther connection – hyperterminal etc.
Conclusion
For data logging to a PC that is in Bluetooth range, the U1177A fits the bill. Although you can get a serial to IR cable (and early U1272A owners should have received one when the firmware update was released), the Bluetooth module will certainly be useful when moving around a worksite, or taking remote measurements from extreme temperature or NVH environments. The Android apps need to move out of beta stage – however due to the variety of devices and OS versions in the market this may be a long journey. However considering the price (~Au$52) it is inexpensive enough to keep around just-in-case.
Note – the U1177A was purchased by myself and reviewed without notice. Residing in Australia, ours was purchased from element14.com.
In the meanwhile have fun and keep checking into tronixstuff.com. Why not follow things on twitter, Google+, subscribe for email updates or RSS using the links on the right-hand column? And join our friendly Google Group – dedicated to the projects and related items on this website. Sign up – it’s free, helpful to each other – and we can all learn something.
Planet Arduino is, or at the moment is wishing to become, an aggregation of public weblogs from around the world written by people who develop, play, think on Arduino platform and his son. The opinions expressed in those weblogs and hence this aggregation are those of the original authors. Entries on this page are owned by their authors. We do not edit, endorse or vouch for the contents of individual posts. For more information about Arduino please visit www.arduino.cc
You are currently browsing the archives for the logger category.