Posts | Comments

Planet Arduino

Archive for the ‘acrylic’ Category

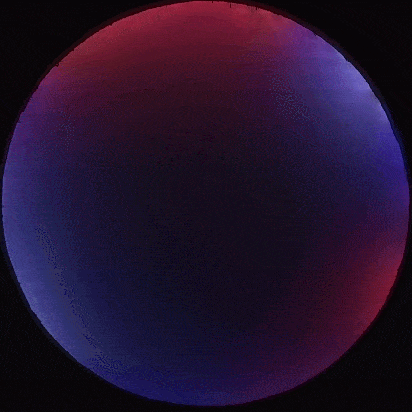
[smash_hand] had a clear goal: a big, featureless, white plastic disk with RGB LEDs concealed around its edge. So what is it? A big ornament that could glow any color or trippy mixture of colors one desires. It’s an object whose sole purpose is to be a frame for soft, glowing light patterns to admire. The disk can be controlled with a simple smartphone app that communicates over Bluetooth, allowing anyone (or in theory anything) to play with the display.

The disk is made from 1/4″ clear plastic, which [smash_hand] describes as plexiglass, but might be acrylic or polycarbonate. [smash_hands] describes some trial and error in the process of cutting the circle; it was saw-cut with some 3-in-1 oil as cutting fluid first, then the final shape cut with a bandsaw.

The saw left the edge very rough, so it was polished with glass polishing compound. This restores the optical properties required for the edge-lighting technique. The back of the disc was sanded then painted white, and the RGB LEDs spaced evenly around the edge, pointing inwards.

The physical build is almost always the difficult part in a project like this — achieving good diffusion of LEDs is a topic we talk about often. [smash_hands] did an impressive job and there are never any “hot spots” where an LED sticks out to your eye. With this taken care of, the electronics came together with much less effort. An Arduino with an HC-05 Bluetooth adapter took care of driving the LEDs and wireless communications, respectively. A wooden frame later, and the whole thing is ready to go.

[smash_hands] provides details like a wiring diagram as well as the smartphone app for anyone who is interested. There’s the Arduino program as well, but interestingly it’s only available in assembly or as a raw .hex file. A video of the disk in action is embedded below.

Making LED lighting interactive comes in many different shapes and forms, and as the disk above shows, shifting color patterns can be pleasantly relaxing.

For all the hustle and bustle of the holiday season, people still find ways to make time for their passions. In the lead up to Christmas, [Edwin Mol] and a few co-workers built themselves an LED Christmas tree that adds a maker’s touch to any festive decor.

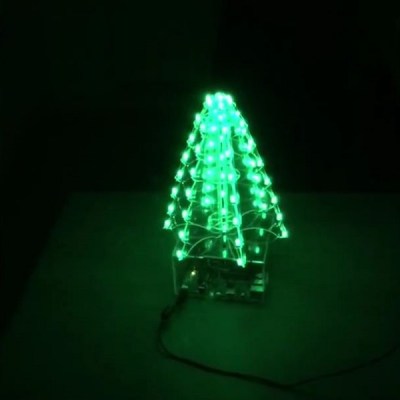
Before going too far, they cut out a cardboard mock-up of the tree. This an easy step to skip, but it can save headaches later! Once happy with the prototype, they printed off the design stencils and cut the chunks of clear acrylic using power tools — you don’t need a laser cutter to produce good stuff — and drilled dozens of holes in the plastic to mount LEDs, and run wires.

A Raspberry Pi 3 and Arduino Uno make this in league with some pretty smart Christmas trees. MAX6968 5.5V constant-current LED driver chips and MOFSETs round out the control circuit. During the build, the central LED column provided a significant challenge — how often do you build a custom jig to solder LEDs? That done, it’s time for a good ol’-fashioned assembly montage! The final product can cycle through several different lighting animations in a rainbow of colours — perfect for a festive build.

Even though Christmas has just passed, your holiday hacks are still flooding in! While you wait for us to push those out the metaphorical door, check out some of our other favorites like this massive pixel display, a free-formed LED tree, and a Raspberry Pi gingerbread house.


Filed under: Arduino Hacks, Holiday Hacks

The renaissance of Nixie tube popularity amid the nostalgia surrounding older tech has made them almost prohibitively expensive for individual projects. Seeing an opportunity to modernize the beloved devices, [Connor Nishijima] has unleashed this new, LED edge-lit display that he has dubbed Lixie.

We featured his prototype a few years ago. That design used dots to make up each character but this upgrade smooths that out with sleek lines and a look one would almost expect from a professional device — or at the very least something you’d see in a cyberpunk near-future. The color-changing Neopixel LEDs — moderated by a cleverly designed filter — allow for customization to your heart’s content, and the laser-cut acrylic panes allow for larger displays to be produced with relative ease.

The image above (and the video below) show two revisions of the most recent Lixie prototypes. There is a huge improvement on the right, as the digits are now outlines instead of single strokes and engraved instead of cut completely through the acrylic. The difference if phenomenal, and in our opinion move the “back to the drawing board” effect to “ready for primetime”. [Connor] and his team are working on just that, with a Tindie preorder in place for the first production-ready digits to roll off their line.

Considering that Nixie Tubes were originally considered too expensive for mass-produced items like clocks, it’s ironic they’re seeing a revival in hobbyist projects for just that purpose. Lixie, then, may fit the purpose for those seeing a cheaper solution without sacrificing on the quality of the result. The design is fully open-source, so get to hacking!

For a suitably cyberpunk application of a Nixie tube, check out this motorcycle speedometer. Oh, and lest you think we’re duplicating ourselves, there was another edge-lit Nixie-alike project featured here just a few weeks ago. Seems good ideas come in waves.


Filed under: Arduino Hacks, led hacks

[Stef Cohen] decided to combine three different artistic mediums for her latest project. Those are painting, electronics, and software. The end goal was to recreate the aurora borealis, also known as the northern lights, in a painting.

The first step was to make the painting. [Stef] began with a shadow box. A shadow box is sort of like a picture frame that is extra deep. A snowy scene was painted directly onto the front side of the glass plate of the shadow box using acrylic paint. [Stef] painted the white, snowy ground along with some pine trees. The sky was left unpainted, in order to allow light to shine through from inside of the shadow box. A sheet of vellum paper was fixed to the inside of the glass pane. This serves to diffuse the light from the LEDs that would eventually be placed inside the box.

Next it was time to install the electronics. [Stef] used an off-the-shelf RGB LED matrix from Adafruit. The matrix is configured with 16 rows of 32 LEDs each. This was controlled with an Arduino Uno. The LED matrix was mounted inside the shadow box, behind the vellum paper. The Arduino code was easily written using Adafruit’s RGB Matrix Panel library.

To get the aurora effect just right, [Stef] used a clever trick. She took real world photographs of the aurora and pixelated them using Photoshop. She could then sample the color of each pixel to ensure that each LED was the appropriate color. Various functions from the Adafruit library were used to digitally paint the aurora into the LED matrix. Some subtle animations were also included to give it an extra kick.


Filed under: Arduino Hacks, led hacks
Apr
23

Linear Book Scanner Does it with Arduino

acrylic, arduino hacks, arduino mega, book scanner, handheld scanner Comments Off on Linear Book Scanner Does it with Arduino 

About two and half years ago, the Google Books team open-sourced the plans for their book scanning rig, and there was much rejoicing. As [Dany Qumsiyeh] explained in the Google Tech talk we linked to at the time, the scanner uses a vacuum to lift the next page from the stack and turn it, saving hours of human labor and, admittedly, putting books in a little bit of danger.

[Chris] tipped us off about a different take on the linear book scanner created by [Forssa1] that uses server fan to turn the pages. [Forssa1]’s rig is built from laser-cut acrylic and employs two handheld scanners driven by an Arduino Mega. We don’t have a great deal of information about this build, but you can check it out after the break.

Thanks for the tip, [Chris]!


Filed under: Arduino Hacks
Mar
02

[wyojustin] was trying to think of projects he could do that would take advantage of some of the fabrication tech that’s become available to the average hobbyist. Even though he doesn’t have any particular interest in clocks, [wyojustin] discovered that he could learn a lot about the tools he has access to by building a clock.

[wyojustin] first made a clock based off of a design by [Brian Wagner] that we featured a while back. The clock uses an idler wheel to move the hour ring so it doesn’t need a separate hour hand. After he built his first design, [wyojustin] realized he could add a planetary gear that could move an hour hand as well. After a bit of trial and error with gear ratios, he landed on a design that worked.

The clock’s movement is a stepper motor that’s driven by an Arduino. Although [wyojustin] isn’t too happy with the appearance of his electronics, the drive setup seems to work pretty well. Check out [wyojustin]’s site to see the other clock builds he’s done (including a version with a second hand), and you can peruse all of his design files on GitHub.

Looking for more clock-building inspiration? Check out some other awesome clock builds we’ve featured before.


Filed under: Arduino Hacks, clock hacks

[Connor] was working on a project for his college manufacturing class when he came up with the idea for this sleek desk lamp. As a college student, he’s not fond of having his papers glowing brightly in front of him at night. This lamp takes care of the problem by adjusting the color temperature based on the position of the sun. It also contains a capacities touch sensor to adjust the brightness without the need for buttons with moving parts.

The base is made from two sheets of aluminum and a bar of aluminum. These were cut and milled to the final shape. [Connor] found a nice DC barrel jack from Jameco that fits nicely with this design. The head of the lamp was made from another piece of aluminum bar stock. All of the aluminum pieces are held together with brass screws.

A slot was milled out of the bottom of the head-piece to make room for an LED strip and a piece of 1/8″ acrylic. This piece of acrylic acts as a light diffuser.  Another piece of acrylic was cut and added to the bottom of the base of the lamp. This makes for a nice glowing outline around the bottom that gives it an almost futuristic look.

The capacitive touch sensor is a pretty simple circuit. [Connor] used the Arduino capacitive touch sensor library to make his life a bit easier. The electronic circuit really only requires a single resistor between two Arduino pins. One of the pins is also attached to the aluminum body of the lamp. Now simply touching the lamp body allows [Connor] to adjust the brightness of the lamp.

[Connor] ended up using an Electric Imp to track the sun. The Imp uses the wunderground API to connect to the weather site and track the sun’s location. In the earlier parts of the day, the LED colors are cooler and have more blues. In the evening when the sun is setting or has already set, the lights turn more red and warm. This is easier on the eyes when you are hunched over your desk studying for your next exam. The end result is not only functional, but also looks like something you might find at that fancy gadget store in your local shopping mall.


Filed under: Arduino Hacks

DIY laser cut word clock.

What is a word clock? A word clock is a clock that displays the time typographically that is also an interactive piece of art. Rather than buy one for $1500, [Buckeyeguy89] decided to build one as a present for his older brother. A very nice present indeed!

There are many different things that come into play when designing a word clock. The front panel is made from a laser cut piece of birch using the service from Ponoko. Additionally, white translucent pieces of acrylic were needed to keep each word’s light from bleeding into the neighboring letters. The hardware uses two Arduinos to control the LEDs and a DS3231 RTC for keeping accurate time. The results are very impressive, but it would sure make assembly easier if a custom PCB was used in the final version. For a one-off project, this makes a great birthday present.

The craftsmanship of this word clock is great, making it well suited for any home. What projects have you built that involve more than just electronics? Sometimes, quality aesthetics make all the difference.


Filed under: Arduino Hacks, clock hacks
Jan
09

A Transparent 7-Segment Display

7-segment, acrylic, arduino hacks, led hacks, transparent display Comments Off on A Transparent 7-Segment Display 

trans7seg

Though [Connor] labels it as a work in progress, we’re pretty impressed with how polished his transparent 7-segment display looks. It’s also deceptively simple.

The build uses a stack of seven different acrylic panes, one in front of the other, each with a different segment engraved onto its face. The assembly of panes sits on a small mount which is placed over seven rows of LEDs, with 5 LEDs per row. [Connor] left an air gap between each of the seven individual acrylic panes to clearly distinguish which was lit and to match the separation of the LED rows. To display a number, he simply illuminates the appropriate LED rows, which scatter light across the engraved part without spilling over into another pane.

You can find a brief overview and some schematics on [Connor's] website, and stick around for the video demonstration below. We’ve featured [Connor's] work before; if you missed his LCD data transfer hack you should check it out!

[Thanks Thomas]


Filed under: Arduino Hacks, led hacks
Jan
24

Stocker monitors the markets

acrylic, arduino hacks, LED, RGB, stock market Comments Off on Stocker monitors the markets 

stocker-monitors-the-market

If you can’t help but spend the day checking in on your stock prices this ambient device can help you cope. It monitors how the trading is going and illuminates an LED as feedback. Here the Apple stock is trading up so the light is green. The video after the break shows other stocks trading down, causing it to switch to red.

An Arduino interfaces with the custom application via USB. For now it looks like the two colors are all it’s capable of but we think there’s a lot more potential. Some creative coding could use factors like how much the stock has moved, trading volume, volatility, or a plethora of other data to give feedback. We could see a spectrum of colors (like on a temperature map) used to improve the level of feedback. And if the market really tanks there’s always the ability to add flashing!

The diffuser for the project is quite interesting to us. [Ali Reza Kohani] made it from a leftover scrap of acrylic. The bubbled surface was created with a heat gun before bending the sheet into an arc.


Filed under: arduino hacks


  • Newsletter

    Sign up for the PlanetArduino Newsletter, which delivers the most popular articles via e-mail to your inbox every week. Just fill in the information below and submit.

  • Like Us on Facebook