Posts | Comments

Planet Arduino

Archive for the ‘LEGO’ Category

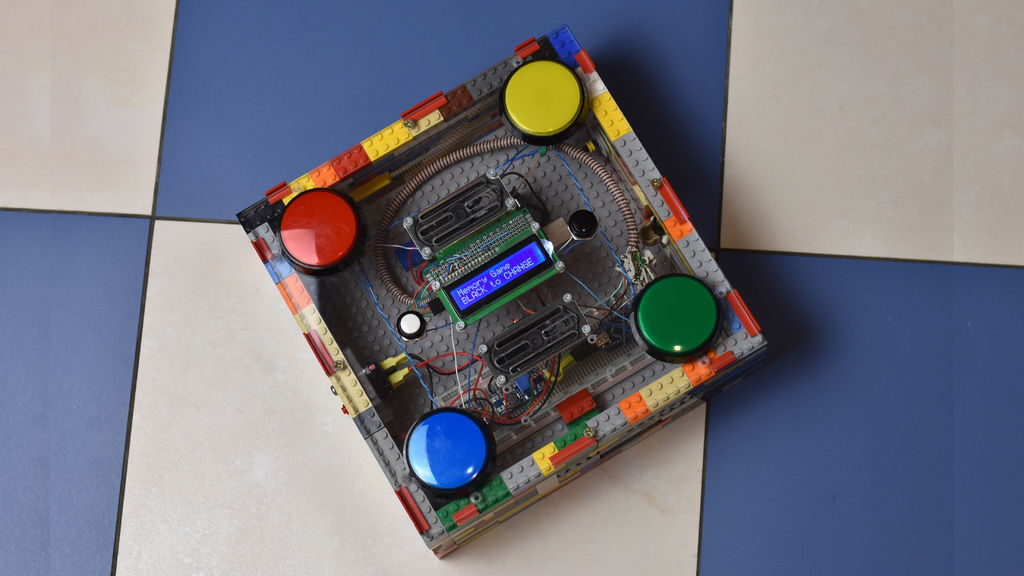
What’s the coolest thing a person can build with LEGO? Well it’s gotta be an air conditioner, right? Technically, [Manoj Nathwani] built a LEGO-fied swamp cooler, but it’s been too hot in London to argue the difference.

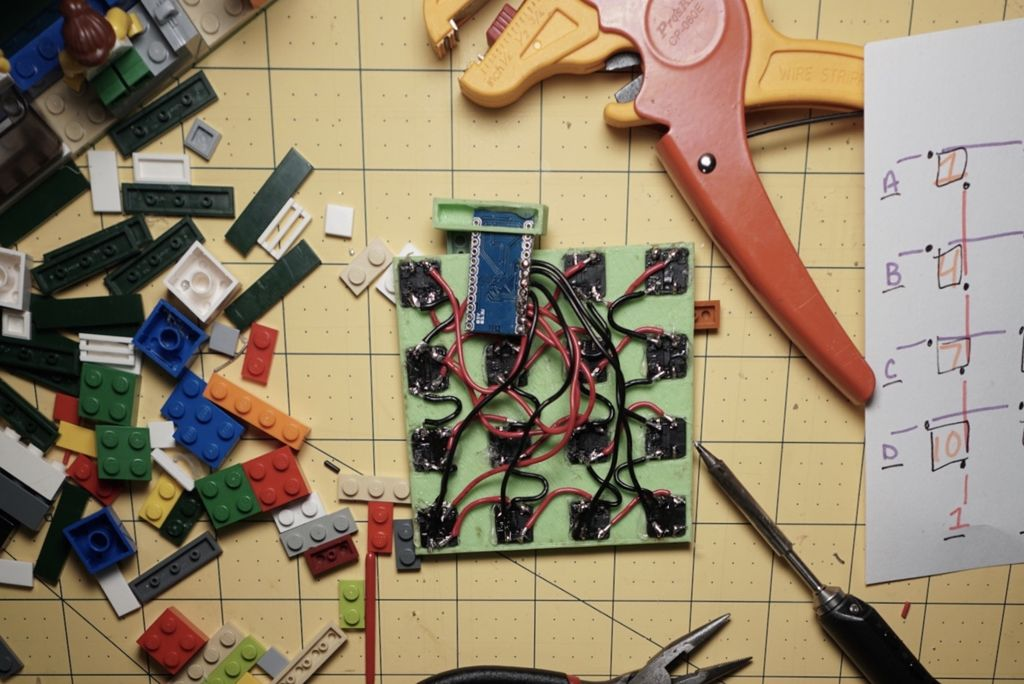
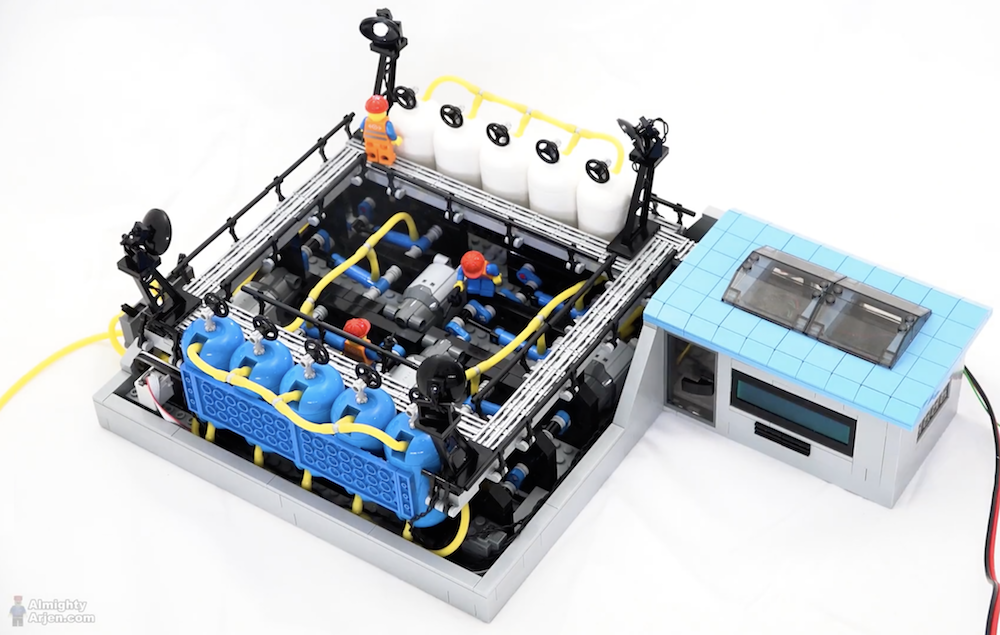
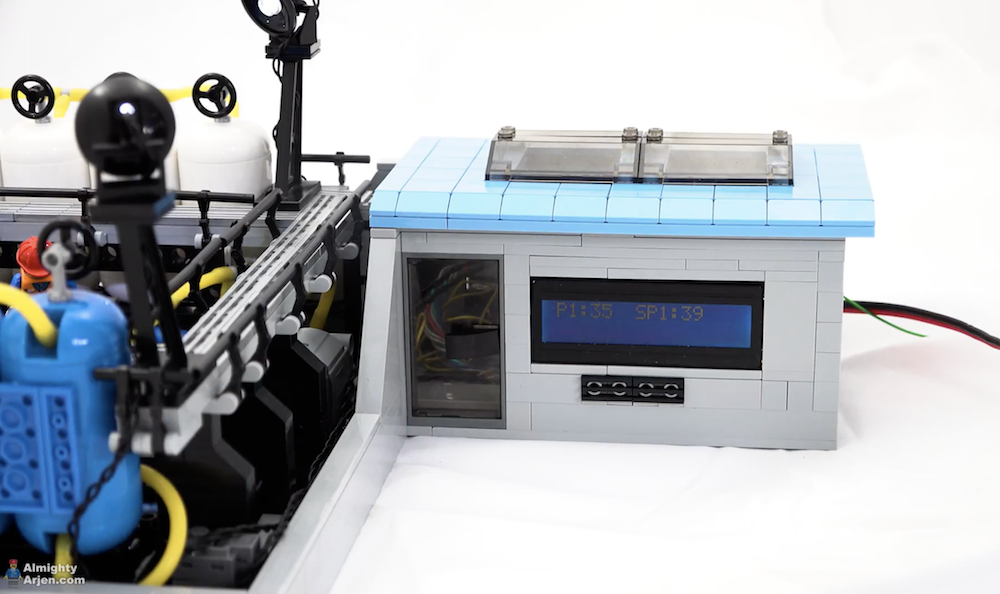
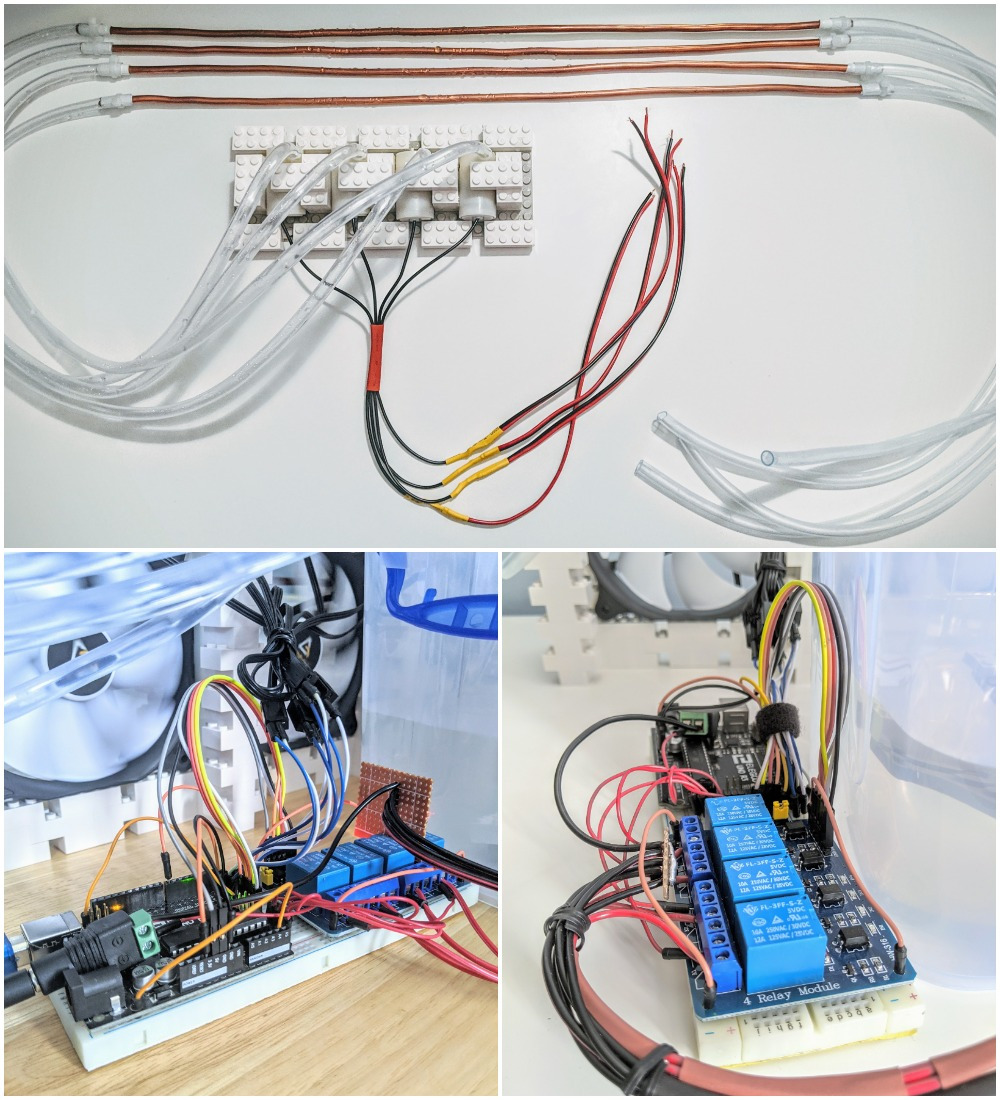
This thoroughly modular design uses an Arduino Uno and a relay module to drive four submersible pumps. The pumps are mounted on a LEGO base and sunk into a tub filled with water and ice packs. In the middle of the water lines are lengths of copper tubing that carry it past four 120mm PC case fans to spread the coolness. It works well, it’s quiet, and it was cheap to build. Doesn’t get much cooler than that.

[Manoj] had to do a bit of clever coupling to keep the tubing transitions from leaking. All it took was a bit of electrical tape to add girth to the copper tubes, and a zip tie used as a little hose clamp.

We think the LEGO part of this build looks great. [Manoj] says they did it by the seat of their pants, and lucked out because the copper and plastic tubing both route perfectly through the space of a 1x1x1 brick.

DIY cooling can take many forms. It really just depends what kind of building blocks you have at your disposal. We’ve even seen an A/C built from a water heater.

We’ve seen a lot of practical machines built using Lego. Why not? The bricks are cheap and plentiful, so if they can get the job done, who cares if they look like a child’s toy? Apparently, not [Yuksel Temiz]. He’s an engineer for IBM whose job involves taking pictures of microscopic fluidic circuits. When he wasn’t satisfied with the high-power $10,000 microscopes he had, he built his own. Using Lego. How are the pictures? Good enough to appear in many scientific journals.

Clearly, the microscope doesn’t just contain Lego, but it still came in at under $300. According to an interview from Futurism, the target devices are reflective which makes photographing them straight-on difficult. After experimenting with cameras on tripods, [Yuksel] decided he could build his own specialized device. You can see a video of the devices in question and some of the photographs below.

According to the same interview, it took several prototypes to get it right. The first prototype didn’t use Lego but was 3D printed. However, in a quest to make the microscope more modular and configurable, [Yuksel] raided the toy box.

The open source microscope is fully motorized, modular, and uses a Raspberry Pi with an 8-megapixel camera to capture images. An Arduino controls stepper motors and the lighting. The second video, below, shows the construction, and you can find documentation on IBM’s GitHub repository.

Not that we haven’t seen custom microscope builds before. If you prefer 3D printing, this might get you started.

Like so many of us, [EducatedAce] has been quelling the quarantine blues by resurrecting old projects and finding new challenges to fill the days. He’s just finished building this blocky macro keypad to hold a bunch of shortcuts for Photoshop, thus continuing and compounding the creative spree.

[EducatedAce] already had everything on hand except the Arduino Micro. Instead of standard key switches, this macro block uses 16 of the loudest, crunchiest tactile buttons out there — those big ones with the yellow stems that sound like small staplers.

And don’t worry — no LEGO or LEGO accessories were harmed in the making of this macro pad — the base plate and switch plate are 3D printed. [EducatedAce] has the STL files posted along with great build instructions if you want to wire one up for yourself.

This is a great project because it’s sturdy, it gets the job done without a lot of expense, and still looks like something you’d want on your desk. [EducatedAce] plans to rebuild it with uniformly colored bricks, but we think it looks great as-is, especially with those vented 1×2 pieces. If it were ours, we might use a different color for each row or column to help keep the shortcuts straight.

What? You’ve never printed your own interlocking building blocks before? Well, don’t limit yourself to 1:1 scale, otherwise the minifigs have won. Build a go-kart big enough for humans!

[Sofia] spent a lot of time looking around for the perfect LEGO clock. Eventually, she realized that the perfect LEGO clock is, of course, the one you build yourself. So if you find yourself staring at the same old boring clock, contemplating time and the meaning of time itself, why not spend some time making a new timepiece?

You probably already had the LEGO out (no judgment here). This build doesn’t take a whole lot of building blocks — just a microcontroller, a real-time clock module, some LED matrices to display the digits, shift registers if they’re not already built into the matrices, and a pair of buttons for control. [Sofia] used an Arduino Nano, but any microcontroller with enough I/O ought to work. Everybody needs a colorful new way to block out their time.

We love the way this clock looks, especially the transparent panels in front of the LED panels. Given the countless custom pieces out there from all the special sets over the years, we bet you could come up with some really interesting builds.

If your kid is too young to tell time, try building a kid-friendly clock to give them segmented structure.

Via r/duino

[beshur]’s 2-year-old is obsessed with transportation, so he lifted a few DUPLO blocks from the bin and made this toy traffic light as a birthday present. Hey, might as well get him used to the realities of traffic, right? It also makes for a good early hacker lesson: why buy something when you can make it yourself?

The traffic pattern is determined by an Arduino Nano V3 situated inside the carved-out rear block. There’s a push button on the side in case there’s a spill and the lights need to go blinking red until the issue is dealt with. Instead of trying to solder everything in situ and risk melting the plastic, [beshur] dead-bugged the LEDs and resistors to the Nano with a helping hands and then worked everything into the case. The 5mm LEDs fit perfectly into the drilled-out posts of a second block and produce a nice, soft glow. Proceed with caution and check it out after the break.

Of course, plastic building blocks can do real work, too. This LEGO chocolate pantograph is pretty sweet.

Have you ever looked around your city’s layout and thought you could do better? Maybe you’ve always wanted to see how she’d run on nuclear or wind power, or just play around with civic amenities and see how your choices affect the citizens.

[Robbe Nagel] made this physical-digital simulator for a Creative Programming class within an industrial design program. We don’t have all the details, but as [Robbe] explains in the video after the break, each block has a resistor on the bottom, and each cubbyhole has a pair of contacts ready to mate with it. An Arduino nestled safely in the LEGO bunker below reads the different resistance values to determine what block was placed where.

[Robbe] wrote a program that evaluates various layouts and provides statistics for things like population, overall health, education level, pollution, etc. As you can see after the break, these values change as soon as blocks are added or removed. Part of what makes this simulator so cool is that it could be used for serious purposes, or it could be totally gamified.

It’s no secret that we like LEGO, especially as an enclosure material. Dress it up or dress it down, just don’t leave any pieces on the floor.

Via r/Arduino

We’ve seen countless different robot kits promoted for STEM education, every one of which can perform the robotic “Hello World” task of line following. Many were in attendance at Maker Faire Bay Area 2019 toiling in their endless loops. Walking past one such display by Microduino, Inc. our attention was caught by a demonstration of their mCookie modules in action: installing a peripheral module took less than a second with a “click” of magnets finding each other.

Many Arduino projects draw from an ecosystem of Arduino shields. Following that established path, Microduino had offered tiny Arduino-compatible boards and peripherals which connected with pins and headers just like their full-sized counterparts. Unfortunately their tiny size also meant their risk of pin misalignment and corresponding damage would be higher as well. mCookie addresses this challenge by using pogo pins for electrical contacts, and magnets to ensure proper alignment. Now even children with not-quite-there-yet dexterity can assemble these modules, opening up a market to a younger audience.

Spring loaded electric connections are a popular choice for programming jigs, and we’ve seen them combined with magnets for ideas like modular keyboards, and there are also LittleBits for building simple circuits. When packaged with bright colorful LEGO-compatible plastic mounts, we have the foundation of an interesting option for introductory electronics and programming. Microduino’s focus at Maker Faire was promoting their Itty Bitty Buggy, which at $60 USD is a significantly more affordable entry point to intelligent LEGO creations than LEGO’s own $300 USD Mindstorm EV3. It’ll be interesting to see if these nifty mCookie modules will help Microduino differentiate themselves from other LEGO compatible electronic kits following a similar playbook.

South Korean LEGO Certified Professional Wani Kim, with the help of Olive Seon, has created an incredible replica of the Death Star Trench Run scene from Star Wars: Episode IV – A New Hope.

The LEGO diorama—which measures 2,680mm (8.79 feet) long, 1,370 mm (4.49 feet) deep, and stands 1,100 mm (3.60 feet) tall— features defensive turrets, along with Luke’s X-Wing, the wreckage of another Rebel ship, and Vader and two TIE Fighters in pursuit.

The build consists of 80,000 LEGO bricks and 100 minifigures, and even includes a cutaway of the back to reveal the insides of this astronomical object. If that wasn’t enough, an Arduino was used to coordinate flashing effects to further enhance this iconic recreation. 

Additional images of Kim’s impressive project, plus some of his other work, can be found on Instagram.

LEGO sets have long been able to work with simple pneumatic controls, but what about a full air compressor built out of these components? Would this be possible?

As demonstrated in the video below, this can in fact be accomplished, and in brilliant style no less. The design uses four motors, eight pneumatic pumps, and 10 air tanks to produce a pressure of 35PSI and beyond.

Controls consist of an Arduino board, along with a pair of resistors to set two separate tank pressures. User feedback is provided by two external displays, and the setup even features a lighting system to allow “workers” to perform maintenance access 24 hours a day!

For a quick start, the compressor has a Turbo function which is enabled under 35 psi this makes the motors run on 12V instead of the rated 9V. This way the air tanks are filled a bit faster but without overloading the motors.

The compressor has two sections which can be used separately with their own setpoint or as one big compressor. This selection is done by switching the outlet valves at the back of the compressor and by setting a jumper on the circuit board.

The Arduino control also tracks the running time of each section in hours and is shown when a switch on the circuit board is pressed.

The pressure is measured by a non official Lego pneumatic sensor by Mindsensors.com.

If your kids (or you) have somehow gotten tired of playing with LEGO bricks, Lenka Design Workshop has a great way for you to breathe new life into this unused pile. 

Their game enclosure consists of a 32×32 LEGO baseplate, along with walls made of blocks to support a clear acrylic cover. This in turn holds four large arcade buttons for gameplay control. Five games are currently implemented to run on the game’s Arduino, with light and sound feedback.

We decided to recycle the unwanted Lego bricks and created an arcade game.

The code has been written in such a way that it doesn’t have dependencies and will compile on any Arduino board. And of course the games have been intensively tested by our kids. 🙂

How is this game different from many others that have been published before?

First of all, there are 5 games built into it:

  • Memory Game (“Simon-Says”-like, similar to Touch Me game)
  • Reaction game (similar to Whack-a-Mole game)
  • Contest/Competition game (for 2-4 players)
  • Melody Game (Push and Play free mode for toddlers and smaller ones)
  • War game (for 2-4 adults)

Secondly, it has a great design (from our perspective) and can be easily repeated.

And thirdly, it is earth-friendly because it allows you to recycle the plastic.

You can see a short demo of the system in the video below, or check out the project write-up for more info. 


  • Newsletter

    Sign up for the PlanetArduino Newsletter, which delivers the most popular articles via e-mail to your inbox every week. Just fill in the information below and submit.

  • Like Us on Facebook