Posts | Comments

Planet Arduino

Archive for the ‘fruit’ Category

You don’t have to be an extinct mammal or a Millennial to enjoy the smooth, buttery taste of an avocado. Being psychic on the other hand is definitely an advantage to catch that small, perfect window between raw and rotten of this divaesque fruit. But don’t worry, as modern problems require modern solutions, [Eden Bar-Tov], [Elan Goldberg], and [Mizpe Ramon] built the AvoRipe, a device to notify you when your next avocado has reached that window.

Taking both the firmness and color of an avocado as indicators of its ripeness into account, the team built a dome holding a TCS3200 color sensor as stand for the avocado itself, and 3D printed a servo-controlled gripper with a force sensor attached to it. Closing the gripper’s arms step by step and reading the force sensor’s value will determine the softness the avocado has reached. Using an ESP8266 as centerpiece, the AvoRipe is turned into a full-blown IoT device, reporting the sensor readings to a smartphone app, and collecting the avocado’s data history on an Adafruit.IO dashboard.

There is unfortunately one big drawback: to calibrate the sensors, a set of nicely, ripe avocados are required, turning the device into somewhat of a chicken and egg situation. Nevertheless, it’s a nice showcase of tying together different platforms available for widescale hobbyist projects. Sure, it doesn’t hurt to know how to do each part from scratch on your own, but on the other hand, why not use the shortcuts that are at our disposal to remove some obstacles — which sometimes might include programming itself.

Feb
07

Fruit piano uses a different circuit than the Makey Makey

arduino, arduino hacks, banana, capacitive, fruit, Makey Makey, peripherals hacks, piano, touch sensor Comments Off on Fruit piano uses a different circuit than the Makey Makey 

screen

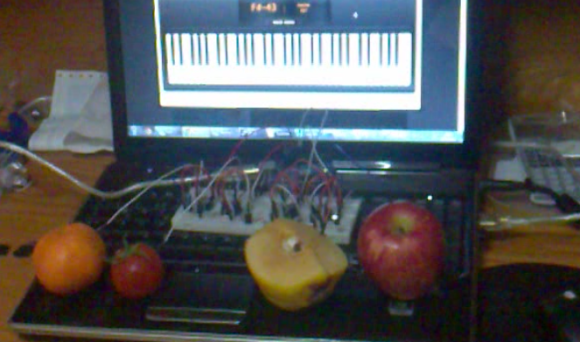
[Hasbi Sevinç] is using perishable goods in his electronics project. The orange, tomato, and two apples seen above act as keys for the virtual piano. The concept is the same as the Makey Makey which is often demonstrated as a banana piano. This implementation uses an Arduino to read the sensors and to connect to the computer running the piano program.

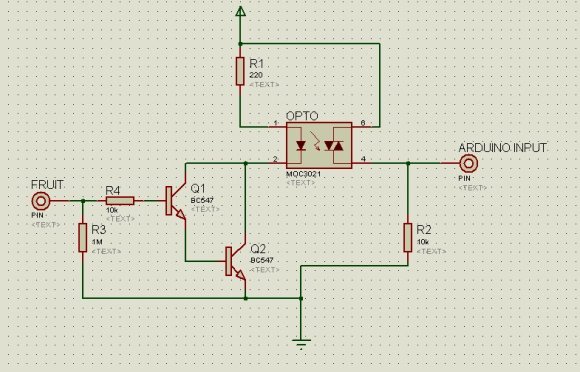
You can see there’s a fair amount of circuitry built on the breadboard. Each piece of fruit has its own channel to make it into a touch sensor. The signal produced when your finger contacts the food is amplified by transistors connected in a Darlington pair. That circuit drives the low side of a optoisolator transmitter. The receiving side of it is connected the I/O pin of the Arduino. You can see the schematic as well as a demo clip after the break.

This use of hardware frees up a lot of your microcontroller cycles. That’s because projects like this banana piano use the timers to measure RC decay. [Hasbi's] setup provides a digital signal that at most only needs to be debounced.

circuit


Filed under: arduino hacks, peripherals hacks


  • Newsletter

    Sign up for the PlanetArduino Newsletter, which delivers the most popular articles via e-mail to your inbox every week. Just fill in the information below and submit.

  • Like Us on Facebook