Posts | Comments

Planet Arduino

Archive for the ‘python’ Category

Today’s makers have access to the most advanced materials, resources, and support in history, and it’s improving all the time. The downside is that finding the right software can sometimes feel confusing and overwhelming. There are seemingly endless options, all with different attributes and advantages.

In this article, we’re here to help make things easier. We’ll walk you through the best software for makers at each experience level — beginner, intermediate, and expert — and help you identify the right software for your needs.

The best maker software for each experience level

Beginner-level software

If you’re new to the world of making, you’ll likely have some specific needs and requirements that won’t apply to more experienced folks.

For example, you’ll want software that’s forgiving and beginner-friendly, that comes with more opportunities to learn the basics, and is easy enough that you won’t be discouraged from making.

With that in mind, here are our top picks for the best beginner-level maker software.

Arduino IDE

Arduino is one of the most well-established and well-known platforms for makers of all levels. Arduino’s microcontrollers allow you to program projects with your own custom code, creating gadgets that work exactly the way you want them to.

If you’re new to the game, you’ll want to start with a microcontroller that’s suitable for beginners. The Arduino IDE is perfect for this: it’s free, user-friendly, and leverages a simplified version of the C/C++ programming languages so you can learn the basics in a fun and rewarding way.

TinkerCAD

Since it first came onto the scene in 2011, TinkerCAD has been a great choice for beginners looking to get started with making their own projects.

As a CAD (computer-aided design) software, TinkerCAD is a fantastic tool for designers and can be used to create models for 3D printing. 

Due to its beginner-friendly nature, TinkerCAD is often used in schools to help learners get to grips with basic coding and design, building their own elementary tech projects. It’s also completely free of charge.

The advantage of using TinkerCAD is that it also contains a simple circuit designer and visual code tool useful to generate the code for Arduino boards.

Intermediate-level software 

Once you’ve learned the basics of making, you’ll likely be craving some more challenging and stimulating projects.

Taking your coding skills to the next level requires more sophisticated software, allowing you to be more adventurous and ambitious with your plans. The good news is that there is plenty of software out there for intermediate makers. Let’s take a look at some examples.

Python

Python is one of the most well-known programming languages out there, and it’s compatible with most maker-friendly platforms and microcontrollers.

Python works well with Arduino hardware, and is especially well-suited for projects that use sensors and other components. You don’t need to be a coding wizard to start using Python in this way, but you will need some familiarity and experience.

Check out this project — a Nicla Vision-based fire detector built by Arduino user Shakhizat Nurgaliyev using Python. Shakhizat created an entirely generated dataset and then trained a model on that data to detect fires.

MicroPython

MicroPython is an experimental, lean, and lightweight implementation of the programming language Python, and it’s designed specifically to be used with microcontrollers.

This makes it ideal for use with Arduino projects, and it works especially well with those that use sensors and similar components. MicroPython does require a base of coding knowledge to use, but you don’t need to be an expert.

Visual Studio Code

Visual Studio Code, often abbreviated as VS Code, is an open-source editor created by Microsoft that is compatible with Windows, Linux, and macOS. 

It offers a range of features such as debugging support, syntax highlighting, smart code completion, snippets, code refactoring, and integrated Git functionality. Visual Studio Code can be used to develop code for Arduino boards, and, by using the available extensions, you can upload code directly to the Arduino boards.

Node-RED

Node-RED is built to bring hardware devices, software, and online services together, creating ever more interesting and advanced projects.

It works especially well with IoT projects — and is a great choice if you want to integrate platforms like Arduino with other devices to build your own custom designs for use in your home.

Node-RED’s browser-based editor and built-in library make it a powerful tool for those with some coding experience to make new projects.

Arduino’s Portenta X8 can host a Node-RED instance running it on a container, making it easy to connect and integrate several different services, either locally or online with Arduino Cloud or third-party software. 

In this project, David Beamonte used Node-RED and Arduino Cloud, to integrate a TP-Link smart Wi-Fi plug with other projects. This way, they were able to link multiple smart home devices together and control them from one central hub.

Expert-level software

Are you a true veteran of making and coding? Fluent in more programming languages than you can remember, with a host of impressive projects under your belt and a slot at next year’s Maker Faire?

If so, you have the skills to achieve some truly exciting things. Let’s take a look at the software available for expert-level makers.

MATLAB

MATLAB is an advanced piece of software that works well with Arduino hardware and similar products. 

It’s especially useful when building projects that require data analysis and complex, large-scale computations. Proficiency in MATLAB can lead to some truly impressive creations, but it takes a solid amount of experience and skill to realize those results.

Arduino users MadhuGovindarajan and ssalunkhe used MATLAB to build their very own lane-following rover. The project used the rover from Arduino’s Engineering Kit, combined with an algorithm that allows the rover to stay within a designated lane while driving.

The Arduino Engineering kit contains three different projects that involve physical hardware and MATLAB/Simulink to create amazing results. 

C/C++ IDEs

The programming languages C and C++ have been around for decades, underpinning the worlds of computer science and software engineering.

If you have a solid base of coding ability, you can use C/C++ development environments to program Arduino boards and create ever more advanced and impressive projects.

Other resources

GitHub

Do you want to share your code with your mates, or with the world? 

If so, GitHub is the perfect place to do it. It’s an open-source community with multiple contributors and lots of integrations with developer-oriented software. 

Inside, you’ll find more than 300 million projects, known as repos. Makers use the platform to share their work, but it can also be useful to take a look and draw inspiration from the trending repositories.

AI/ML

AI is making headlines all over the world, but it extends far beyond ChatGPT.

Makers today have access to a wealth of fantastic tools to speed up work, correct errors, and document your shiny new code. Check out GitHub copilot and OpenAI Codex to get started.

Using software with Arduino

By combining the right software tools with Arduino’s products, you have the perfect recipe for your next awesome project.

If you want to gain inspiration, or share your own work with our community, check out the Arduino Project Hub where you can search for projects and filter by type and difficulty level.

The post The best maker software by experience level appeared first on Arduino Blog.

mauwb dw3000 st tag test

Hello, the device I am going to review is the MaUWB_DW3000 with STM32 AT Command. This is an Ultra-wideband (UWB) module from MakerFabs. The core UWB module on this board is the DW3000 UWB transceiver, and it is also equipped with an ESP32 microcontroller programmable with the Arduino IDE, as well as OLED display. The manufacturer claims that this UWB board resolves multiple anchors and tags mutual conflicts and supports up to 8 anchors and 64 tags. Additionally, the manufacturer has added an STM32 microcontroller to handle UWB multiplexing, allowing users to control the core UWB module by simply sending AT commands from an ESP32 microcontroller to the STM32 microcontroller. More information about this UWB board can be found on the manufacturer’s website. “MaUWB_DW3000 with STM32 AT Command” unboxing MakerFabs sent the package to me from China. Inside the package, there were 4 sets of the MaUWB_DW3000 with STM32 AT [...]

The post “MaUWB_DW3000 with STM32 AT Command” Review – Using Arduino to test UWB range, precision, indoor positioning appeared first on CNX Software - Embedded Systems News.

top angle view of the trinkey

It’s half USB key, half temperature-humidity sensor… it’s the Adafruit SHT4x Trinkey. There’s an ATSAMD21 microcontroller on board with just enough circuitry to keep it happy. One pin of the microcontroller connects to a NeoPixel LED. Another pin is used as a capacitive touch input on the end. A reset button lets you enter bootloader mode if necessary.

The Adafruit SHT4x Trinkey guide has everything you need to get started with using this board. There’s pages for overview, pinouts, CircuitPython, Arduino, CPython and resources for download.

Read more at Adafruit SHT4x Trinkey

Lark Weather Station Arduino ESP32 Raspberry Pi

The Lark Weather Station measures wind speed, wind direction, temperature, humidity, and air pressure through a range of sensors and connects to popular development boards such as Arduino UNO, ESP32, BBC micro:bit, Raspberry Pi, or DFRobot Unihiker through I2C or UART. We’ve seen several projects for Internet-connection weather stations that retrieve weather data from the web and display the results locally, but the Lark Weather Station allows the users to get atmospheric data right in his/her current location thanks to its built-in anemometer, wind vane, and built-in sensors, as well as expansion interfaces for additional sensors. Lark Weather Station specifications: Storage – 16MB flash good to store about 160 days of data (when data is recorded once per minute) Sensors Compass Anemometer Wind Speed: 0.5~12m/s Cover to protect the anemometer during storage/transport Wind vane and wind direction shaft to report the wind direction (eight directions) Temperature Range –20~60℃ ±0.2℃ Humidity [...]

The post The Lark Weather Station works with Arduino, ESP32, micro:bit, Raspberry Pi, and other boards appeared first on CNX Software - Embedded Systems News.

DivingBoard is a homemade MIDI controller aiming to solve the lack of parameter accessibility on the Roland JD-Xi synthesiser. It differs from other solutions – customizability and potential ease-of-use are greater, and general use with a range of synthesisers is possible, rather than just with the JD-Xi.

The project uses an Arduino Nano running Arduino and a Raspberry Pi Zero 2 W running Python.

See the video below and read more on hackster.io and the project website.

Usually, the problem comes before the solution, but for [Stavros], the opposite happened. A 4.7″ E-Ink screen with integrated battery management and ESP32 caught his eye, and he bought it and started thinking about what he wanted to do with it. The Timeframe (hackaday.io link as well) is a sleek desk calendar based around the integrated e-ink screen.

[Stavros] found the device’s MicroPython support was a little lackluster, and often failed to draw. He found a Platform.io project that used an older but modified library for driving the e-ink display which worked quite well. However, the older library didn’t support portrait orientation or other niceties. Rather than try and create something complex in C, he moved the complexity to a server environment he knew more about. With the help of CoPilot, he got some code that would wake up the ESP32 every half hour, download an image from a server, and then display it. A Python script uses a headless browser to visit Google Calendar, resize the window, take a screenshot, and then upload it.

The hardest part of the exercise was getting authentication with Google working reliably. A white sleek 3d printed case wraps the whole affair in an aesthetically pleasing shell. So far, this has been a great story of someone building something for themselves and using their strengths. Where’s the hack?

The hack comes when [Stavros] tried squeezing his calendar into a case that was too tight and cracked the screen. Suddenly a large portion of the screen wouldn’t draw. He turned what was broken into something new by mapping out the area that didn’t draw and converting the Python to draw weather information with Pillow rather than screenshot a webpage: clever reuse and a way to make good out of a bad accident.

The code is up on GitLab, and the 3d files for the case are available on Printables. Unfortunately, while the Timeframe is pretty power efficient, it doesn’t last as long as this calendar with a 50-year battery life.

[Neumi] over on Hackaday.IO wanted a simple-to-use way to drive stepper motors, which could be quickly deployed in a wide variety of applications yet to be determined. The solution is named Ethersweep, and is a small PCB stack that sits on the rear of the common NEMA17-format stepper motor. The only physical connectivity, beside the motor, are ethernet and a power supply via the user friendly XT30 connector. The system can be closed loop, with both an end-stop input as well as an on-board AMS AS5600 magnetic rotary encoder (which senses the rotating magnetic field on the rear side of the motor assembly – clever!) giving the necessary feedback. Leveraging the Trinamic TMC2208 stepper motor driver gives Ethersweep silky smooth and quiet motor control, which could be very important for some applications. A rear-facing OLED display shows some useful debug information as well as the all important IP address that was assigned to the unit.

Control is performed with the ubiquitous ATMega328 microcontroller, with the Arduino software stack deployed, 
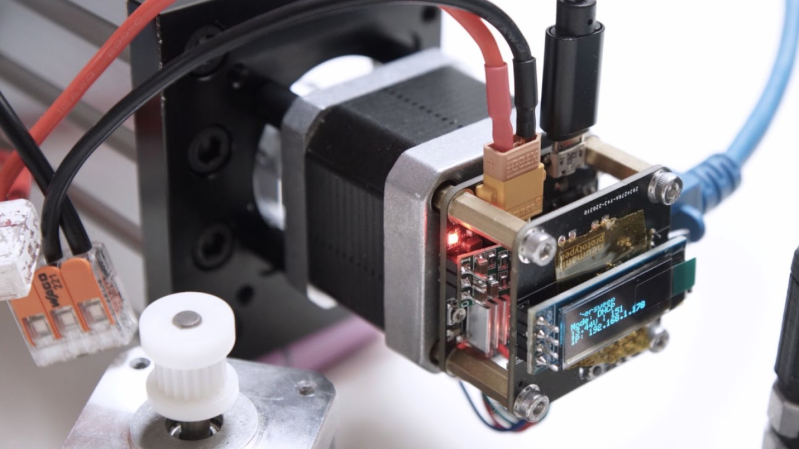
making uploading firmware a breeze. To that end, a USB port is also provided, hooked up to the uC with the cheap CP2102 USB bridge chip as per most Arduino-like designs. The thing that makes this build a little unusual is the ethernet port. The hardware side of things is taken care of with the Wiznet WS500 ethernet chip, which implements the MAC and PHY in a single device, needing only a few passives and a magjack to operate. The chip also handles the whole TCP/IP stack internally, so only needs an external SPI interface to talk to the host device.

Talking about firmware for a moment, to ease deployment, the network configuration is handled by DHCP, although some control over MAC address assignment is promised for the future. All control is via UDP over ethernet, and again the basic functionality is there, but some niceties such as motor synchronisation and state querying are again subject to further releases. Hardware design is implemented in KiCAD and FreeCAD, with Arduino covering the firmware and host control side in python. You can read all about it on the Ethersweep project GitHub, what is there not to like?

If you thought you’d seen this stepper-mounted driver setup before, you’d be correct, here’s a Hackaday Prize 2017 Entry for a CANBUS controlled driver. We also saw this on Dummy: the obscenely well made robot arm by [Zhihui Jun], which if you missed it, then do circle back and take a look, you won’t regret it!

Micropython for Arduino

Python support for three of the hottest Arduino boards out there is now yours. Through our partnership with OpenMV, the Nano RP2040 Connect, Nano 33 BLE and Nano 33 BLE Sense can now be programmed with the popular MicroPython language. Which means you get OpenMV’s powerful computer vision and machine learning capabilities thrown in.

OpenMV IDE and MicroPython Editor

While you can’t use Python directly with the Arduino IDE, you can use the OpenMV editor, and its version of MicroPython. From the editor, you can install MicroPython and load your scripts directly to the supported Arduino boards.

MicroPython is a great implementation of the full Python programming language, designed to run on microcontrollers. There’s extensive documentation all across the web, which is another huge advantage of learning and using Python for your Arduino projects.

There are so many reasons to get excited about MicroPython for these new Arduino boards. To name a few…

  • OpenMV’s machine learning and computer vision tools.
  • Great for computer science education.
  • Easy for web developers and coders to switch from other platforms to Arduino.
  • Huge number of MicroPython libraries, tutorials, guides and support online.
  • Simple to upgrade hardware as project demands increase (eg, upgrade from a Nano RP2040 Connect to a Portenta H7).

There are also lots of Arduino + Python projects that have been posted over the years. Now you can add the Nano devices to those projects and expand on them with their new MicroPython capabilities.

Python for Nano RP2040 Connect

Get Started with Python on Arduino

To help you get cracking, we’ve put together a few guides for each of the supported Arduino boards. The Portanta H7 already supports MicroPython, but we’ve included it below for the sake of completion.

Firstly you’ll need to install the OpenMV IDE on your computer. You can grab that from the OpenMV download page right here

If it’s the first time you’ve used Python on your Arduino board, you’ll need to follow a few steps to get everything working together. Depending on which board you’re using, you might need to update the bootloader to make it compatible with OpenMV. Then you can connect to the board to upload the latest firmware and make it compatible with the editor.

There are guides to take you through the process for each board, and it’s not a complex task. Once completed, your boards will be ready to program them using MicroPython.

These simple tutorials will get you moving quickly.

Furthermore, you can find a few examples of MicroPython scripts you can upload and run on the various boards, too. It’s a great way to test the Python waters with your Arduino boards, and pick up a couple of hints and tips on using the language.

If you’ve got any resources, hints or tips of your own when it comes to learning or using Python, please do share them with the community! We want to hear all about your experiences, and any projects you build using Arduino and Python together.

We’ll keep you updated as we add more documentation and tutorials for MicroPython over on Arduino Docs, so keep an eye out for those.

The post Power of Python for Arduino Nano RP2040 Connect and Nano 33 BLE appeared first on Arduino Blog.

We’ve all seen videos of blisteringly fast SCARA arms working on assembly lines, and more than a few of us have fantasied about having that same kind of technology for the home shop. Unfortunately, while the prices for things like 3D printers and oscilloscopes have dropped lower than what many would have believed possible a decade ago, high-performance robotics are still too pricey for the home player.

Unless of course, you’re willing to build it yourself. The PyBot designed by [jjRobots] is an open source robotic arm that should be well within the means of the average hardware hacker. One could argue that this is a project made entirely possible by desktop 3D printing; as not only are most of the structural components printed, but most of the mechanical elements are common 3D printer parts. Smooth rods, linear bearings, lead screws, and NEMA 17 motors are all exceptionally cheap these days thanks to the innumerable 3D printer kits that make use of them.

A custom control board keeps the wiring tight.

Those who’ve researched similar projects might notice that the design of this arm has clearly been influenced by the Mostly Printed SCARA (MPSCARA). But while that robot was designed to carry an extruder and act as a 3D printer, [jjRobots] intends for the PyBot to be more of a general purpose platform. By default it features a simple gripper, but that can easily be changed out for whatever tool or gadget you have in mind.

In the base of the arm is a custom control board that combines an Arduino M0, an ESP8266, and a trio of stepper motor drivers. But if you wanted to build your own version from the parts bin, you could certainly wire up all the principle components manually. As the name implies, the PyBot is controlled by Python tools running on the computer, so it should be relatively easy to get this capable arm to do your bidding.

We’ve seen some impressive 3D printed robotic arms over the years, but the simplicity of the PyBot is particularly compelling. This looks like something that you could reasonably assemble and program over a weekend or two, and then put to work in your ad-hoc PPE factory.

The Consumer Electronics Show in Las Vegas is traditionally where the big names in tech show off their upcoming products, and the 2020 show was no different. There were new smartphones, TVs, and home automation devices from all the usual suspects. Even a few electric vehicles snuck in there. But mixed in among flashy presentations from the electronics giants was a considerably more restrained announcement from a company near and dear to the readers of Hackaday: Arduino is going pro.

While Arduino has been focused on the DIY and educational market since their inception, the newly unveiled Portenta H7 is designed for professional users who want to rapidly develop robust hardware suitable for industrial applications. With built-in wireless hardware and the ability to run Python and JavaScript out of the box, the powerful dual-core board comes with a similarly professional price tag; currently for preorder at $99 USD a pop, the Portenta is priced well outside of the company’s traditional DIY and educational markets. With increased competition from other low-cost microcontrollers, it seems that Arduino is looking to expand out of its comfort zone and find new revenue streams.

That’s a Lot of Pins

The Portenta H7 is obviously a far cry from the relatively dinky 8-bit Arduinos that we’ve all got filling up our parts drawers. Developed for high performance edge computing applications, the new board is powered by a 32-bit STM32H747XI that utilizes both an ARM Cortex M7 and an M4 running at 480 MHz and 240 MHz respectively. The two cores can work independently, allowing for example one core to run interpreted Python while the other runs code compiled in the Arduino IDE. When they need to work together, the cores can communicate with each other via a Remote Procedure Call (RPC) mechanism.

The new 80-pin connectors on the Portenta

Outwardly, the new board doesn’t look far removed from the modern Arduino form factor we’re used to. The USB connector has been upgraded to a Type-C, but the Portenta still retains the dual rows of pads ready for hand-soldered headers — that’s their more recent pinout that they call the Arduino MKR form factor.

If you look on the back of the board however, you’ll see that they’ve added two 80-pin high density connectors. According to the product page, these are intended to allow the Portenta to simply be plugged into a device as a removable module. The idea being that devices in the field can easily have their Portenta swapped out for an upgraded model. Some digging into the product page documentation section turns up a schematic that lists the connectors as Hirose DF40C-80DP-0.4V(51).

The base model Portenta features 8 MB SDRAM and 16 MB NOR flash, but it can be custom ordered with up to 64 MB of memory and 128 MB of flash should you need it. It’s also possible to delete various interfaces from the board when ordering, so if you don’t want network connectivity or the NXP SE050C2 crypto chip, they can simply be left off. However as of this writing it is unclear as to what minimum order quantity is necessary to unlock this level of customization, or or how much these modifications will change the unit cost.

Year of the Arduino Desktop?

The Portenta Carrier Board

The Portenta H7 is an impressive enough piece of hardware on its own, but when it’s plugged into the optional Carrier Board, things really start to get interesting. The Carrier Board provides full size connectors for all of the onboard peripherals, and according to documentation, turns the Portenta into an eNUC-class embedded computer. There’s even support for DisplayPort to connect a monitor, and miniPCI for expansion cards.

With a fully loaded Portenta H7 slotted into the Carrier Board, it would seem you have the makings of a low-power ARM “desktop” computer. Albeit one that wouldn’t outperform the Raspberry Pi Zero, and which costs several times more.

The Arduino press release and product page doesn’t make any mention of what kind of software or operating system said computer would run, so presumably that’s left as an exercise for the customer. While not particularly well suited to it, the ARM Cortex-M family of processors is capable of running the Linux kernel, so spinning up a “real” OS image for it should be possible. Of course with a maximum of just 64 MB of RAM, you’ll want to keep your performance expectations fairly low.

Where Does Portenta Fit?

We can’t even speculate what a maxed out Portenta would cost, and there’s no pricing or release date for the Carrier Board. But even at $99, the base model Portenta H7 would be a tough sell for hackers and makers who are used to buying dual-core ESP32 boards at 1/10 of the price, or the Teensy 4.0 which has a 600 MHz Cortex-M7 at 1/4 of the price. Which is fine, since this board isn’t intended for the traditional core Arduino audience.

Seeing the carrier board, we can’t help but notice some parallels here with the Raspberry Pi Compute Module. With connections broken out to a SODIMM header, the idea of the Computer Module was to help bridge the gap between the DIY community and the commercial one by offering up a Raspberry Pi in a more rugged form factor that would be easier to integrate into end-user products. But since it wasn’t any cheaper than the stock Pi, there wasn’t a whole lot of incentive to switch over. We haven’t seen consumer products advertising “Raspberry Pi Inside!” so it’s hard to tell if there has been any meaningful adoption from industry.

One has to wonder why any company that has the resources to integrate such an expensive board into their products wouldn’t just come up with their own custom design around the Portenta’s STM32H747XI chip, which even in single quantities, can currently be had for less than $15. The difference may end up coming down to the world-renowned community that surrounds the Arduino brand, and the company’s efforts to modernize their toolchain.


  • Newsletter

    Sign up for the PlanetArduino Newsletter, which delivers the most popular articles via e-mail to your inbox every week. Just fill in the information below and submit.

  • Like Us on Facebook