Twitter is not only a convenient way to consume daily news and converse with friends online, it has become an excellent platform for gaining insight on what’s important at any particular moment in time. With this in mind, Maker Chadwick John Friedman has decided to harness the social network’s data into web-connected physical representations with the help of Arduino and Temboo.
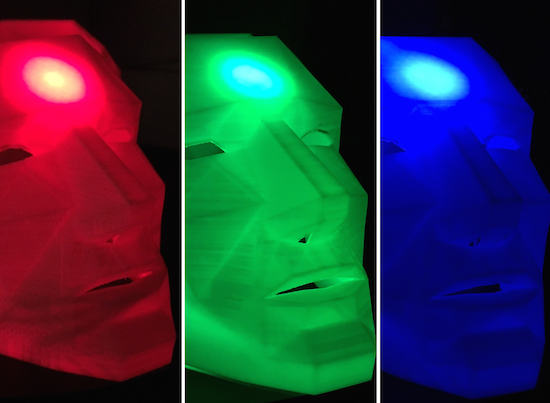
PrecogNation uses three 3D-printed geometric masks as real-time sci-fi future forecasters, which illuminate and change colors to reflect sustainability trends throughout the world.
The three geometric 3D-printed masks are wirelessly connected to the Internet via an Arduino Yún. The masks were printed using a Zortrax 3D printer and white Z-ABS filament. The masks are a remixed version of Stephen Kongsle’s “Low Poly Mask.” Each mask took approximately 16 hours to print. The masks are constantly scraping data from Twitter in real-time via Temboo Choreos. Temboo assigns special API keys for Arduino devices that allow the user grab real-time data from Twitter that would otherwise be difficult to gather. That live data is then fed to the Arduino Yún, which illuminates a specific 10mm super bright LED, connected to the masks.
One of the largest challenges in representing this overload of data physically was finding the correct terms and/or keywords that activate a specific color/thought in the Precog’s faces. The three colors present in the faces are scraping the Twitterverse for terms relating to sustainability, environmental threats, and political involvement. PrecogNation has its very own Twitter account, which allows the masks to scan through data specifically submitted by sustainability related users, corporations, and initiatives.
As seen in the video below, progress in sustainable development (green) is represented by keywords such as renewable energy, clean coal, water treatment and wind turbines. Threats to sustainability (red) include deforestation, global warming, record heat, extinction, pollution, pandemics and so on. Meanwhile, blue denotes an overload of data and contradicting results.
The overload of data in the color blue works like this… say the word ‘polar’ is found, but then the words ‘melting-polar’ are found, followed by the words ‘polar bear.’ This is an unreadable thread of information – it’s not really giving us threats or progress related to sustainability so the face reflects the color blue to signify that confusion. Coming up with the correct terms to represent the overload of information was especially tricky, and writing the code to reflect that confusion was equally as challenging. I eventually found a series of keywords and demands that elicited the response I was hoping for in this category.
It is important to highlight the fact that although the colors red and blue may be perceived as negative (and usually appear more than the color green), they also mean that there are discussions about those negative sustainability issues happening every time those colors are activated. This is, in fact, a positive outcome, as one of the main goals of this project is to highlight the importance maintaining a dialogue – even if that dialogue surrounds daunting threats to sustainability. It is important that the masks provoke a highlighted continuation of focus surrounding social and political sustainability issues.
The internet of things is this strange marketing buzzword that seems to escape from the aether and infect our toasters and refrigerators. Now even a hamster is not safe.
[Mifulapirus]’s hamster, Ham, was living a pleasant hamster life. Then his owner heard about another hamster named Sushi, whose running wheel stats were broadcasted to the internet. Not to be left behind, Ham’s wheel was soon upgraded. Now Ham is burdened by the same social pressures our exercise apps try to encourage us to use. No, we are most certainly not going to tell our friends about two fourteen minute miles with a twenty minute coffee break in the middle, MapMyRun, we are not.
The feat of techno enslavement for the little hamster was accomplished with a custom board, an esp8266, and an arduino as described in the instructable. The arduino can be left out of the project now that the libraries have been ported to the esp8266. A hall effect sensor detects when the 3D printed hamster wheel is spinning.
If you’d like to check in on Ham, the little guy is alive and well, and the twitter is here. It looks like it’s been upgraded since the original article was posted. Now it shows when Ham is awake and running around the cage doing hamster errands.
Data Cocktail is a device which translates in a tasty way the Twitter activity and running on Arduino Due and Arduino Pro Mini. When you want a cocktail, the machine will look for the five latest messages around the world quoting one of the available ingredients. These messages define the drink composition and Data Cocktail not only provides a unique kind of drink, but it also prints the cocktail’s recipe along with the corresponding tweets.
Once the cocktail mix is done, Data Cocktail thanks the tweeters who have helped at making the recipe, without knowing it. Check the video below to see how it works:
Data Cocktail was created in a workshop held at Stereolux in Nantes by a theme composed by Bertille Masse, Manon Le Moal-Joubel, Sébastien Maury, Clément Gault & Thibaut Métivier.
They made it using Processing and Arduino:
A first application, developed in Processing, pilots the device. The requests are performed using the Twitter4J library, then the application processes the data and controls the device, i.e. the robot, the solenoid valves and the light. The robot itself is based on a modified Zumo frame, an Arduino Pro, a Motor Shield and a Bluetooth module. The solenoid valves and the LEDs are controlled by an Arduino Due connected via USB. The impression is realized by Automator.
To prepare a cocktail, the machine can take up to a minute and may provide up to 6 different ingredients!
Halloween time is a great moment to explore nice interactive projects and get inspired for installations for other selfie occasions. To spice up the office Donnie Plumly, a creative technologist, decided to make and share with us a molded zombie arm that takes pictures and post them to Twitter.
He used a silicone arm (molded on his own hand ), a custom steel mount to clip to an office partition, and a vibration sensor hooked up to an Arduino Uno. Once the arm is slapped a photo will be taken using an IR Led and passed to the Eye-Fi card in the camera.
The photo is then saved into a Dropbox folder and, using If This Then That (IFTTT), posted to Twitter on the account @ZombieSelfie.
[Ashish] is bringing office warfare to the next level with a motion sensing water gun. Not only does this water gun automatically fire when it detects motion, but it also takes a photo of the victim and publishes it on Twitter.
This hack began with the watergun. [Ashish] used a Super Soaker Thunderstorm motorized water gun. He pulled the case apart and cut one of the battery wires. he then lengthened the exposed ends and ran them out of the gun to his control circuit. He also placed a protection diode to help prevent any reverse EMF from damaging his more sensitive electronics. The new control wires run to a MOSFET on a bread board.
[Ashish] is using a Lightblue Bean board as a microcontroller. The Bean is Arduino compatible and can be programmed via low energy Bluetooth. The Bean uses an external PIR sensor to detect motion in the room. When it senses the motion, it activates the MOSFET which then turns on the water gun.
[Ashish] decided to use Node-RED and Python to link the Bean to a Twitter account. The system runs on a computer and monitor’s the Bean’s serial output. If it detects the proper command, it launches a Python script which takes a photo using a webcam. A second script will upload that photo to a Twitter account. The Node-RED server can also monitor the Twitter account for incoming direct messages. If it detects a message with the correct password, it can use the rest of the message as a command to enable or disable the gun.
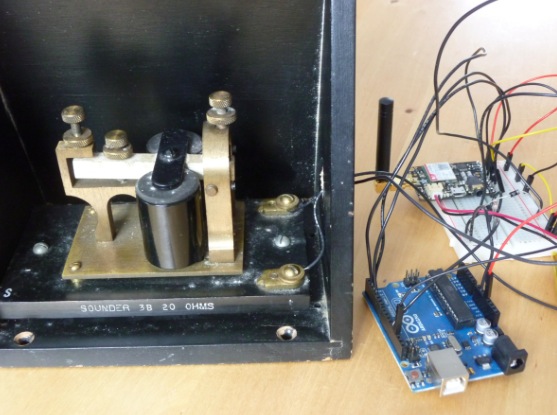
Twitter telegraph is a project by Devon Elliot making telegraph sounder tap out Twitter messages using Arduino Uno. It’s an interesting attempt to connect technology rooted in the 19th- and early 20th-centuries with 21st-century networks:
A local architectural heritage project spawned a wider interest in railways and roundhouses. One of the related technologies of railways in the 19th century was the telegraph. Having acquired an old telegraph sounder, we wondered if it could tap out Twitter messages.
An Arduino UNO was used to test and control the telegraph sounder. The coils on the telegraph were tested with power drawn from the Arduino’s 3.3V and 5.0V pins. Momentarily powering the telegraph from the Arduino confirmed that the coils still worked, and the device made satisfying clicks in response from the electromagnetic action of the coils.
With it confirmed that the telegraph is still operable, the Arduino UNO was then used to control the sounder. Mark Fickett’s Arduinomorse library was a quick route to controlling the telegraph in Morse code timing. Using that library, string characters are converted into Morse code, and a digital pin on the Arduino goes high and low, as if to turn an LED on and off. That pin became the control pin for the telegraph, and simple circuit was built using a transistor, resistor and diode to control the telegraph without damaging the Arduino’s digital pins. This circuit is common for connecting relays to Arduinos.
The final step was adding an Adafruit FONA to the Arduino. The FONA connects to cellular phone networks, and the Arduino UNO can interact with it by sending and receiving actions to and from the FONA. In this case, the FONA connects to the cellular network and the Arduino checks the FONA periodically to see if there are any SMS messages available. If there are, the Arduino starts to read through them, convert them to Morse code, and tap them out on the telegraph.
The completed device can be operated from batteries if necessary, providing operation anywhere a cellular signal can reach. The cellular connection provides wireless connectivity with the FONA handling the connection, rather than the Arduino.
To package it up, the Arduino UNO and FONA were attached to a piece of acrylic. That board was then mounted under the telegraph sounder’s resonator. Four holes were pre-existing in the resonator’s base and used for mounting, so no permanent alterations were made to the historic components.
If you find yourself glued to social media and also wish to know Morse code… we can think of no better invention to help hone your skills than the Twitter Telegraph. This vintage to pop culture mashup by [Devon Elliott] is a recent project that uses a sounder from the 19th century to communicate incoming tweets with dots and dashes.
Back in the day when everyone was connected by wire, the sounder was a device on the receiving end of the telegraph which translated the incoming signal to an audible clicking. Two tall coils sat with a metal tab teetering between them. When electricity surged into one of the coils it would magnetize, pulling the tab downward in a pattern which mimicked the incoming current sent from the other end. [Devon] decided to liberate the sounder from its string-and-two-can origins and use a more modern source of input. By adding a FONA board which comes equipped with a SIM card, the device was capable of connecting and receiving data from the Internet. An Arduino is responsible for taking the data received and translating it into Morse code using the Mark Fickett’s Arduinomorse library, and then sending it out through an I/O pin to the sounder itself to be tapped.
The finished project is connected to a cellular network which it uses to receive SMS messages and tweets. By mentioning the handle @ldntelegraphco you can send the Twitter Telegraph your own message which will be tapped in code for everyone in the vicinity to hear… which is worth giving a try for those of you curious types. Lastly, if you have an interest in taking a look at the code for your own use, it is available on [Devon’s] github.
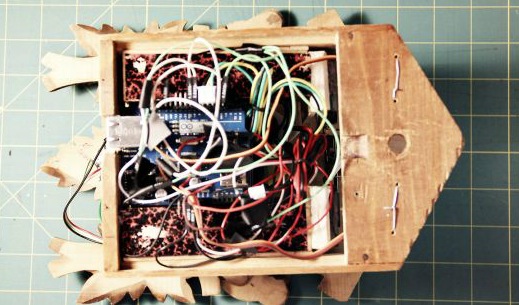
[Hunter] wanted to do something a bit more interesting for his holiday lights display last year. Rather than just animated lights, he wanted something that was driven by data. In this case, his display was based on the mood of people in his city. We’ve seen a very similar project in the past, but this one has a few notable differences.
The display runs off of an Arduino. [Hunter] is using an Ethernet shield to connect the Arduino to the Internet. It then monitors all of the latest tweets from users within a 15 mile radius of his area. The tweets are then forwarded to the Alchemy Sentiment API for analysis. The API uses various algorithms and detection methods to identify the overall sentiment within a body of text. [Hunter] is using it to determine the general mood indicated by the text of a given tweet.
Next [Hunter] needed a way to somehow display this information. He opted to use an LED strip. Since the range of sentiments is rather small, [Hunter] didn’t want to display the overall average sentiment. This value doesn’t change much over short periods of time, so it’s not very interesting to see. Instead, he plots the change made since the last sample. This results in a more obvious change to the LED display.
Another interesting thing to note about this project is that [Hunter] is using the snow in his yard to diffuse the light from the LEDs. He’s actually buried the strip under a layer of snow. This has the result of hiding the electronics, but blurring the light enough so you can’t see the individual LEDs. The effect is rather nice, and it’s something different to add to your holiday lights display. Be sure to check out the video below for a demonstration.
In this article you will learn how to send messages from an Ethernet-enabled Arduino to twitter. For the uninitiated who may be thinking “what is all this twitter nonsense about?”, twitter is a form of microblogging.
You can create a message with a maximum length of 140 characters, and broadcast this on the twitter service. For people to receive your messages (or tweets) they also need to be a member of twitter and choose to subscribe to your tweets.
Generally people will use the twitter service using one of two methods: either using a web browser, or using the twitter application on a smartphone or tablet computer. For example, here is a typical web browser view:
… and here is an example of a twitter application running on an Android OS smartphone:
The neat thing about twitter on a mobile device is that if your username is mentioned in a tweet, you will be notified pretty well immediately as long as you have mobile data access. More on that later. In some areas, you can set twitter to send tweets from a certain user to your mobile phone via SMS – however if doing so be careful to confirm possible charges to your mobile phone account.
Finally, if you are worried about privacy with regards to your tweets, you can set your account to private and only allow certain people to follow your tweets.
So let’s get started.
First of all – you will need a twitter account. If you do not have one, you can sign up for one here. If you already have a twitter account, you can always open more for other uses – such as an Arduino.
For example, my twitter account is @tronixstuff, but my demonstration machine twitter account is @tronixstuff2. Then I have set my primary account to follow my machine’s twitter account.
Now log into twitter with using the account you will have for your Arduino and visit this page and get yourself a token by following the Step One link. The process will take you through authorising the “tweet library” page to login to your twitter account – this is ok. It will then present you with a long text called a “token”, for example:
Save your token somewhere safe, as you will need to insert it into your Arduino sketch. Finally, don’t give it to others as then they will be able to post onto twitter using your account. Next, follow step two from the same page – which involves download and installation of the required Arduino library.
Now for the hardware.
You will need an Arduino Uno or compatible board with an Ethernet shield that uses the W5100 Ethernet controller IC (pretty much all of them) – or consider using a Freetronics EtherTen – as it has everything all on the one board, plus some extras:
Furthermore you will need to power the board via the external DC socket – the W5100 IC uses more current than the USB power can supply. A 9V 1A plug pack/wall wart will suffice. Finally it does get hot – so be careful not to touch the W5100 after extended use. In case you’re not sure – this is the W5100 IC:
If you’re looking for an Arduino-twitter solution with WiFi, check out the Arduino Yún tutorials.
From this point it would be a good idea to check your hardware is working. To do so, please run the webserver example sketch as explained in chapter sixteen (Ethernet). While you do that, we’ll have a break…
Sending your first tweet
If you want your Arduino to send a simple tweet consider the following sketch. We have a simple function tweet() which simply sends a line of text (which has a maximum length of 140 characters). Don’t forget to update your IP address, MAC address and token:
// Simple twitter interface

#include <SPI.h>
#include <Ethernet.h>
#include <Twitter.h>

// Alter IP address to suit your own network!
byte mac[] = {   0xDE, 0xAD, 0xBE, 0xEF, 0xFE, 0xED }; // create MAC address for ethernet shield
byte ip[] = {   192, 168, 0, 99}; // choose your own IP for ethernet shield
Twitter twitter("aaaaaaa"); // replace aaaaaaa with your token

void setup()
{
  delay(5000);
  Ethernet.begin(mac, ip);
  Serial.begin(9600);
}

void tweet(char msg[])
{
  Serial.println("connecting ...");
  if (twitter.post(msg))
  {
    // Specify &Serial to output received response to Serial.
    // If no output is required, you can just omit the argument, e.g.
    // int status = twitter.wait();
    int status = twitter.wait(&Serial);
    if (status == 200)
    {
      Serial.println("OK.");
    }
    else
    {
      Serial.print("failed : code ");
      Serial.println(status);
    }
  }
  else
  {
    Serial.println("connection failed.");
  }
}

void loop()
{
  delay(1000);
  tweet("Purple monkey dishwasher");
  do{} while(1>0); // endless loop
}
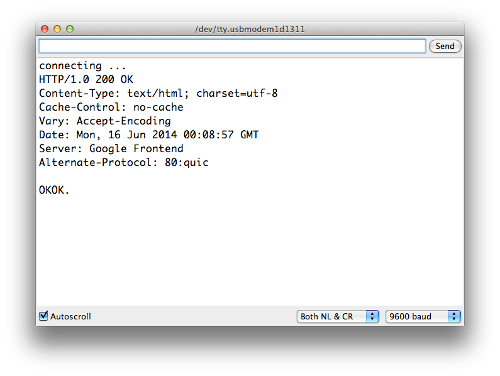
You can check the status of the tweeting via the serial monitor. For example, if the tweet was successful you will see:
However if you try to send the same tweet more than once in a short period of time, or another error takes place – twitter will return an error message, for example:
And finally if it works, the tweet will appear:
Previously we mentioned that you can be alerted to a tweet by your mobile device. This can be done by putting your own twitter account name in the contents of the tweet.
For example – my normal twitter account is @tronixstuff. If I put the text “@tronixstuff” in the text tweeted by my Arduino’s twitter account – the twitter app on my smartphone will let me know I have been mentioned – as shown in the following video:
You may have noticed in the video that a text message arrived as well – that service is a function of my cellular carrier (Telstra) and may not be available to others. Nevertheless this is a neat way of getting important messages from your Arduino to a smart phone or other connected device.
Sending data in a tweet
So what if you have a sensor or other device whose data you want to know about via twitter? You can send data generated from an Arduino sketch over twitter without too much effort.
In the following example we’ll send the value from analogue pin zero (A0) in the contents of a tweet. And by adding your twitter @username you will be notified by your other twitter-capable devices:
// Simple twitter interface

#include <SPI.h>
#include <Ethernet.h>
#include <Twitter.h>

// Alter IP address to suit your own network!
byte mac[] = {   0xDE, 0xAD, 0xBE, 0xEF, 0xFE, 0xED }; // create MAC address for ethernet shield
byte ip[] = {   192, 168, 0, 99}; // choose your own IP for ethernet shield
Twitter twitter("aaaaaaa"); // replace aaaaaaa with your token

int analogZero;
char tweetText[140];

void setup()
{
  delay(5000);
  Ethernet.begin(mac, ip);
  Serial.begin(9600);
}

void tweet(char msg[])
{
  Serial.println("connecting ...");
  if (twitter.post(msg))
  {
    // Specify &Serial to output received response to Serial.
    // If no output is required, you can just omit the argument, e.g.
    // int status = twitter.wait();
    int status = twitter.wait(&Serial);
    if (status == 200)
    {
      Serial.println("OK.");
    }
    else
    {
      Serial.print("failed : code ");
      Serial.println(status);
    }
  }
  else
  {
    Serial.println("connection failed.");
  }
}

void loop()
{
  // get some data from A0.
  analogZero=analogRead(0);

  // assemble message to send. This inserts the value of "analogZero" into the variable "tweetText" at point %d
  sprintf(tweetText, "Pin analogue zero reads: %d. @username.", analogZero); // change @username to your twitter account name

  delay(1000);
  tweet(tweetText);
  do{ }
  while(1>0); // endless loop
}
You may have noticed a sneaky sprintf function in void loop(). This is used to insert the integer analogZero into the character array tweetText that we send with the tweet() function. And the results of the example:
So you can use the previous sketch as a framework to create your own Arduino-powered data twittering machine. Send temperature alerts, tank water levels, messages from an alarm system, or just random tweets to your loved one.
Conclusion
So there you have it, another useful way to send information from your Arduino to the outside world. Stay tuned for upcoming Arduino tutorials by subscribing to the blog, RSS feed (top-right), twitter or joining our Google Group. Big thanks to @neocat for their work with the twitter Arduino libraries.
And if you enjoyed the tutorial, or want to introduce someone else to the interesting world of Arduino – check out my book (now in a third printing!) “Arduino Workshop” from No Starch Press.
In the meanwhile have fun and keep checking into tronixstuff.com. Why not follow things on twitter, Google+, subscribe for email updates or RSS using the links on the right-hand column? And join our friendly Google Group – dedicated to the projects and related items on this website. Sign up – it’s free, helpful to each other – and we can all learn something.
Johannes Hoffmann is an interaction and graphic designer sharing with us his hand-made Tweety Clock. It’s a vintage but interactive Twitter clock , built with Arduino and Ethernet Shield, and featured with the original ‘cuckooo’ sound and a little printer for the output.
Arduino is checking if there are new tweets from a specific Twitter-Account. If so, the “bird servo” starts to rotate and the bird-door opens. Then the two “sound servos” brings the Cuckoo Clock flutes to sing and the bird nod with his head. Simultaneously, the thermo printer prints all new tweets.
Planet Arduino is, or at the moment is wishing to become, an aggregation of public weblogs from around the world written by people who develop, play, think on Arduino platform and his son. The opinions expressed in those weblogs and hence this aggregation are those of the original authors. Entries on this page are owned by their authors. We do not edit, endorse or vouch for the contents of individual posts. For more information about Arduino please visit www.arduino.cc
You are currently browsing the archives for the twitter category.


 If you’re looking for an Arduino-twitter solution with WiFi, check out the