Posts | Comments

Planet Arduino

Archive for the ‘Humidity’ Category

Humidify the Air Around You with Home Automation

Keeping the air in your home in the right condition is incredibly important. Your home is your safe haven from the outside world, a place where you can control your environment and enjoy the comfort and peace of a secure space.

Humidifiers are an excellent way to keep the atmosphere of your home in exactly the right balance for your health and enjoyment. Traditional humidifiers work well, but automated humidifiers can work even better.

In this article, we’ll look at why humidifiers are so useful and how you can use home automation to create your own smart home humidifiers.

Why home humidification is important

  • Stay moisturized. Humidifiers keep the air in your home sufficiently full of moisture, which helps counteract the effects of artificial heating systems. This prevents dry skin — especially on the lips and hands — as a result of dry indoor air.
  • Keep your sinuses in good condition. Dry air, over time, can cause your sinuses to become irritated. It’s a feeling most people are aware of and can result in discomfort, headaches, and even nosebleeds. A good humidifier helps avoid this, ensuring your sinuses are lubricated and healthy at all times.
  • Make it easier to recover from illness. The right humidifier can ease the path to recovery from illnesses like the flu or a cold by helping your sinuses recover.
  • Minimise snoring. A noisy bed partner, over many months, can be the source of much stress and frustration. Snoring is a complex issue that can be difficult to solve, but a good humidifier can often ease the problem significantly by providing enough moisture to keep the throat and nose clear. 

Examples of projects

Automatic Humidifier

Living in Boston, Arduino user chenwei19940207 found that the air was so dry, especially in the evening, that a solution was needed. As a result, they decided to develop their own humidifier to turn on and off automatically, ensuring a consistent level of humidity in the air all year round and all day long.

Smart Humidifier

Healthy air has three components — be fresh, clean, and the right humidity. The third factor is important because humans use evaporative cooling (sweating) to rid our bodies of excess heat. This is why humans can be comfortable and safe within a fairly wide range of humidity — between 30 to 70 percent at a push.

But we still struggle at lower levels of humidity. It can result in great discomfort, trouble breathing, and aggravated allergies, and anything below 20% humidity is especially difficult. As a result, it’s best to keep our homes at the right level of humidity.

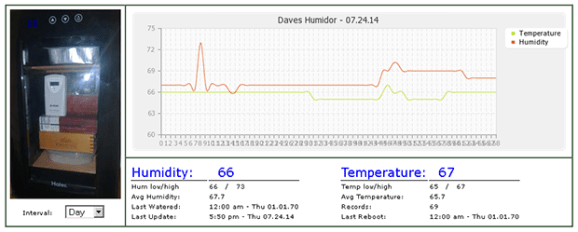
Recognizing this, Arduino member Md. Khairul Alam developed a project to keep the home sufficiently humidified year round. His device senses the temperature and humidity in your home, checks if it is in the ideal humidity range, and turns on the humidifier to ensure you stay in the right zone.

Arduino Humidifier Control

Arduino “having11” Guy developed this project to regulate the humidity of their home. It involves attaching a dht11 temperature and humidity sensor to an Arduino, letting you modify your humidifier in a way that allows you to automatically turn the device on whenever the humidity in your home drops below a set level, for example 30%.

You also have the ability to set a “cooling down” period, avoiding the humidifier becoming overheated.

NOTE: It’s worth noting that this project uses high voltage and amperage, and doing any of these steps incorrectly could result in serious injury or even death. So be careful and don’t attempt this without any prior experience or skill!

Build a healthier smart home with Arduino

With Arduino, controlling the humidity of your home is just the beginning. Our Project Hub is filled with examples of home automation projects, using all kinds of technology to make their homes smarter, safer, and easier to live in.

Check out our site to find out more uses for Arduino and how you can get started with your own home automation projects.

The post Humidify the air around you with home automation appeared first on Arduino Blog.

Gardening is a rewarding endeavour, and easily automated for the maker with a green thumb. With simplicity at its focus,  Hackaday.io user [MEGA DAS] has whipped up a automated planter to provide the things plants crave: water, air, and light.

[MEGA DAS] is using a TE215 moisture sensor to keep an eye on how thirsty the plant may be, a DHT11 temperature and humidity sensor to check the airflow around the plant, and a BH1750FVI light sensor for its obvious purpose. To deliver on these needs, a 12V DC water pump and a small reservoir will keep things right as rain, a pair of 12V DC fans mimic a gentle breeze, and a row of white LEDs supplement natural light when required.

The custom board is an Arduino Nano platform, with an ESP01 to enable WiFi capacity and a Bluetooth module to monitor the plant’s status while at home or away. Voltage regulators, MOSFETs, resistors, capacitors, fuses — can’t be too careful — screw header connectors, and a few other assorted parts round out the circuit. The planter is made of laser cut pieces with plenty of space to mount the various components and hide away the rest. You can check out [MEGA DAS]’ tutorial video after the break!

[MEGA DAS] has made his Arduino code and phone app available to download for anyone else wanting to build their own. Once assembled, he can ensure his plant is well taken care of wherever he is with a few taps on his phone. Not too shabby for a seven day build.

For those preferring gardening outdoors, here’s a hack to jump-start the germinating process of your seeds. Even if you call the concrete jungle your home, that doesn’t mean you can’t have your own robot farm and automated compost bin on hand too!

May
23

Mini weather station

arduino, Humidity, temperature, weather, wireless Comments Off on Mini weather station 

FDVH1IXI9YBYAL5.MEDIUM

by indigod0g @ instructables.com:

In this project, we will be making a mini weather station that measures temperature and humidity and transmits them wirelessly to a ground station, which displays the readings on an LCD display!

It’s a fairly easy project and can be used either on its own or part of something bigger.

Mini weather station – [Link]

May
15

[Xerxes3rd] works at a place where they raise reptiles in terrariums. Such enclosures require controlled lighting, temperature and humidity. Humidity is maintained using “misting” devices. These are usually water containers with a pump whose outlet ends in a series of very fine spray nozzles which create the mist. A timer controls the pump’s on and off cycles.

[Xerxes3rd] purchased an Exo Terra Monsoon RS400 misting system – a low-cost misting device and soon discovered that it had a serious design flaw. The built-in timer malfunctions, and it mists a hundred times more than it should! A lot of folks who buy a product and discover it has an inherent design flaw will return it back for a refund. Instead,  [Xerxes3rd] decided to break in and fix it instead –  “warranty void if tampered” be damned.

To start with, he needed to figure out what the problem was. He went about it in clinical fashion, eventually creating a slick document (PDF) outlining his observations and diagnosis. The timer controller board has a PIC micro, some buttons, potentiometers, LED’s and an IR receiver. The misting cycles are set using the two potentiometers – Off time and On time for the pump. His analysis and resolution makes for interesting reading.

What he found was that the PIC micro was reading inconsistent values from the potentiometers. More specifically, the software isn’t doing any smoothing on the analog values it reads from the potentiometers. Since the PIC that controls the system wasn’t easily re-programmable, he opted to replace it with an Arduino Nano. At the same time, he got rid of the potentiometers that were used to set the misting frequency and duration, and added a 16×2 LCD. Time setting is now done using the three on board buttons. He removed the PIC micro and replaced it with two female header sockets, onto which he plugged a small board containing an Arduino Nano and a few components. He also cut the original PCB in half, removing the potentiometers and crystal oscillator in order to make room for the 16×2 character LCD.

The lizards are now probably thanking him for their perfectly timed doses of moisture. Having done this, he could probably add in more features such as a temperature-humidity sensor, a water level sensor or maybe even throw in an ESP8266 module and have the Lizards tweet when they need to be hydrated. Because that’s another thing hackers love – feature creep.


Filed under: Arduino Hacks, Microcontrollers
Feb
25

HDC1000 temperature and humidity sensor breakout, with Arduino library!

arduino, HDC1000, Humidity, i2c, Sensor, temperature Comments Off on HDC1000 temperature and humidity sensor breakout, with Arduino library! 

DSC_5869-1024x784

by Francesco Truzzi :

Some time ago I came across a new chip from TI, the HDC1000. It’s a temperature and humidity sensor with I2C interface and requires little to no additional components. It comes in an 8BGA package: we can all agree it’s pretty small.
Some of the peculiar characteristics of this chip are that it has a DRDYn pin which goes low any time there is a new reading from the chip (so you can precisely time your requests) and that the sensor is located on the bottom of the IC, so that it’s not exposed to dust and other agents that may false the readings. Also, it has an integrated heater that can remove humidity from the sensor.

So I developed a very small breakout board for this chip as well as an Arduino library (yay, my first one! raspberryPi and nodemcu might come next).

[via]

HDC1000 temperature and humidity sensor breakout, with Arduino library! - [Link]

Jul
28

humidor

If you’re a cigar aficionado, you know storing cigars at the proper temperature and humidity is something you just need to do. Centuries of design have gone into the simple humidor, and now, I guess, it’s time to put some electronics alongside your cigars.

The design of [dzzie]‘s smart humidor consists of an Arduino, WiFi shield, LCD + button shield, and most importantly, a DHT22 temperature and humidity sensor. In a bit of thoughtfulness, only the DHT22 is mounted inside the humidor; everything else is in an enclosure mounted outside the humidor, including a few buttons for clearing alerts and logging when water is added.

The smart humidor reads the DHT22 sensor every 20 minutes and uploads the data to a web server where useful graphs are rendered. The control box will send out an alert email to [dzzie] if the temperature or humidity is out of the desired range.


Filed under: Arduino Hacks, misc hacks
Jun
26

Build Temperature & Humidity & Smoke Detector Alarm System Based on Arduino

arduino, Humidity, ICStation, smoke, temperature Comments Off on Build Temperature & Humidity & Smoke Detector Alarm System Based on Arduino 

FL2MO8AHV72CMIW.MEDIUM

By ICStation:

Build temperature & humidity & smoke alarm system based on ICStation Mega 2560 compatible with Arduino( Cost is USD32.39 ONLY) .
The working voltage of this system is DC5V.It can measure the current temperature, humidity and smoke. It can display real-time data by the 1602 LCD and can realize the sound and light alarm when in the dangerous temperature and humidity. It is a simply and easily to operate monitoring alarm system about temperature humidity and smoke.

Build Temperature & Humidity & Smoke Detector Alarm System Based on Arduino - [Link]

May
22

DIY Temperature & Humidity & Smoke Detector

arduino, ATMEGA2560, DHT11, Gas, Humidity, MQ-2, Sensor, smoke, temperature Comments Off on DIY Temperature & Humidity & Smoke Detector 

FPTBQC4HV72CMNV.MEDIUM

ICStation @ instructables.com writes:

ICStation team introduce you how to DIY this temperature & humidity & smoke alarm system based on ICStation Mega 2560 compatible with Arduino.The working voltage of this system is DC5V.It can measure the current temperature, humidity and smoke. It can display real-time data by the 1602 LCD and can realize the sound and light alarm when in the dangerous temperature and humidity. It is a simply and easily to operate monitoring alarm system about temperature humidity and smoke.

DIY Temperature & Humidity & Smoke Detector - [Link]

Mar
10

Visualizing temperature and humidity with Plotly from a mountain edge

arduino, Humidity, temperature, Visualizing Data Comments Off on Visualizing temperature and humidity with Plotly from a mountain edge 

Plotly

Matt from Plotly team, sent us this cool video about streaming remote temperature + humidity data with an Arduino Uno and visualizing with Plotly from a mountain edge, in Peachland, BC.

The Arduino (We’re using the UNOr3) was connected to wifi tethering from a mobile (through a WIFI Shield), from there it received data from a DHT22 temperature + humidity sensor and streamed to Plotly’s servers, to be visualized. View streamed data: plot.ly/1023/~demos

Enjoy the video and the beautiful visualisations!


Sep
05

Make a WiFi Weather Station With Arduino and Adafruit’s CC3000 breakout

arduino, CC3000, Humidity, temperature, Test/Measurements, weather, wifi Comments Off on Make a WiFi Weather Station With Arduino and Adafruit’s CC3000 breakout 

cc3000_small

Make a WiFi Weather Station With Arduino and Adafruit’s CC3000 breakout.

As open-source hardware users and makers, we love playing with new chips, boards and tools. And there is one chip which is quite popular these days: the CC3000 WiFi chip from TI. This chip comes with many promises: cheap (around $10), easy to use, low-power … It was featured in many articles around the web, but somehow it was quite hard to use with Arduino as there was no breakout board or library available. Luckily, Adafruit solved that for us with a nice breakout board and a working library for Arduino. In this article, I will show you how to use this chip for home automation purposes. Remember that weather station project? We are going to do the same: measure the temperature and the humidity. But this time we won’t display the information on an LCD screen. Instead, we will transmit the data wirelessly via WiFi to your computer and display it there. Excited ? Let’s get started!

Make a WiFi Weather Station With Arduino and Adafruit’s CC3000 breakout - [Link]


  • Newsletter

    Sign up for the PlanetArduino Newsletter, which delivers the most popular articles via e-mail to your inbox every week. Just fill in the information below and submit.

  • Like Us on Facebook