We love the ingenuity at work in this cuckoo clock project from maker oliverb.
Using an ESP32 WROOM 32D Microprocessor & Stepper Motor to Repair & NTP Time Synchronize a Worn Out Regula 25 Cuckoo Clock. This modification contains 3D printed parts but the parts could be faily easily made from wood/metal.
This project uses a Regula 25 Cuckoo Clock movement which are very common and worn out ones should be cheap and easy to find.
Fun build from maker Markus Opitzk! The end result is both functional and friendly; a less-stress approach to timekeeping.
To be honest: If you’re not working, you don’t really need an exact time: it’s about afternoon, I’m hungry, I’m tired, it’s time to go to bed. And in the morning, the alarm clock on my mobile phone wakes me up again.
In the meantime, an hourglass would be enough to show the passage of time. Unfortunately, the large hour glasses are hardly available any more.. Only small ones for the kitchen that show maybe 3 or 5 minutes.
That’s why I built an hourglass that takes exactly one hour to run through. The hour time is still displayed as a number in the top glass.
Fun project video from maker Lukas Deem on YouTube based on this tutorial on Instructables by alstroemeria. We appreciate how well the project challenges are documented.
Peter started making an alarm clock during the pandemic with Adafruit Feather components. Things took off from there:
My next step was to make a “talking” clock which, at the push of a button, announces the time. This was a gift for my 91 year old mother-in-law who has almost completely lost her sight.
Recently I decided that I wanted some way in which the date and time parameters could be set without attaching the clock to a computer.
Using Adafruit’s open source designs, Peter modified the display to use 4 character 14 segment LED displays from China including integrated colons for the clocks.
All the code, in Arduino, has been made available.
You can see testing the displays in the video (below) and read it all in the post here.
Neat build from Elaine Gao up on Instructables! The finish product has a great look.
Ever forget to check the weather and end up without an umbrella? Introducing the Acrylic Weather Clock, an elegant weather forecasting device. Adorn your entryway with this stylish piece, and conveniently access weather forecast information before stepping out!
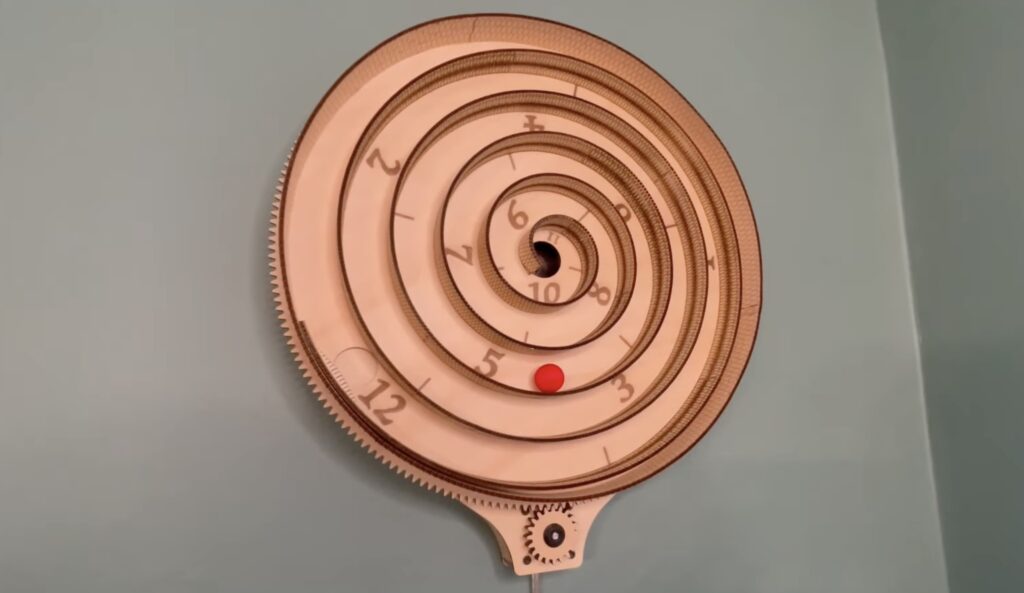
Sometimes makers come across products that they’d love to buy, but which are too expensive to justify. When that happens, the natural inclination of the maker is to build a DIY version. Such projects often end up costing way more — in both time and literal currency — than the product would have. But when we get lucky, we can save some money. That’s the case with this spiral clock built by Kelton.
Kelton based this design on the Aspiral Clock. That product was quite expensive at $542 and the company that made it seems to be defunct now anyway. Kelton’s version looks similar and works in the same way, but only requires about $60 in materials.
This clock is a giant spiral and indicates the time with a ball that rolls along the spiral. The entire spiral rotates at a constant speed, causing the ball to move towards the center. Numbers marked along the path show the time. When the ball reaches the center, it drops through a chute that puts it back at the beginning of the spiral. That repeats endlessly in 12-hour cycles.
The electronics are very simple: an Arduino Nano ESP32 board tells a stepper motor to spin at the exact rate that Kelton calculated. That stepper motor turns the spiral, keeping the ball in motion. Because this development board has an ESP32, it would have been possible to connect it to a WiFi network to find the time and keep everything in sync. But Kelton didn’t think that was necessary, so the spiral just rotates at a constant rate.
The real trick with this clock was the woodworking. All of the parts are laser-cut plywood and Kelton made heavy use of kerf cuts. Those break up a length of wood into many segments, so the wood can easily bend. That technique was perfect for creating the smooth spiral path and the result looks fantastic.
This project is a continuation of my quest to build a robotic clock that can write and rewrite the time continuously, day in and day out. My first attempt, Doodle Clock, was a failure due to the marker drying up. Doodle Clock #2 failed because the display — a kids’ magnetic drawing board — soon got […]
This project is a continuation of my quest to build a robotic clock that can write and rewrite the time continuously, day in and day out. My first attempt, Doodle Clock, was a failure due to the marker drying up. Doodle Clock #2 failed because the display — a kids’ magnetic drawing board — soon got […]
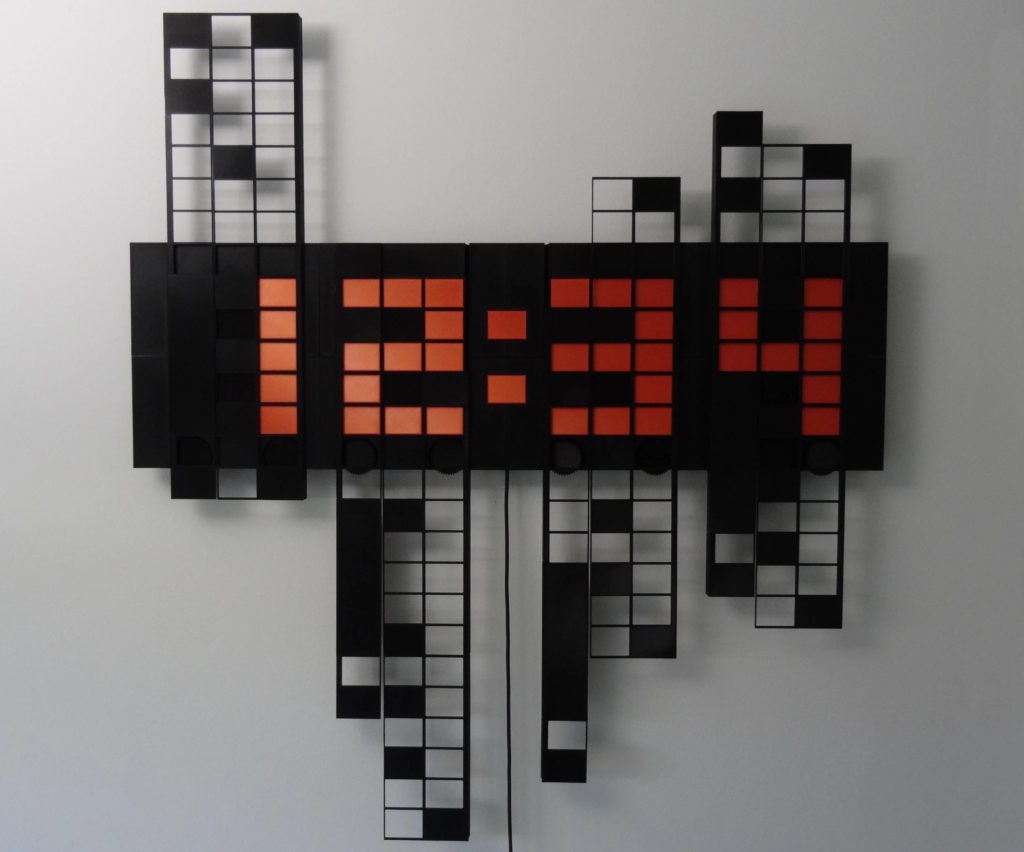
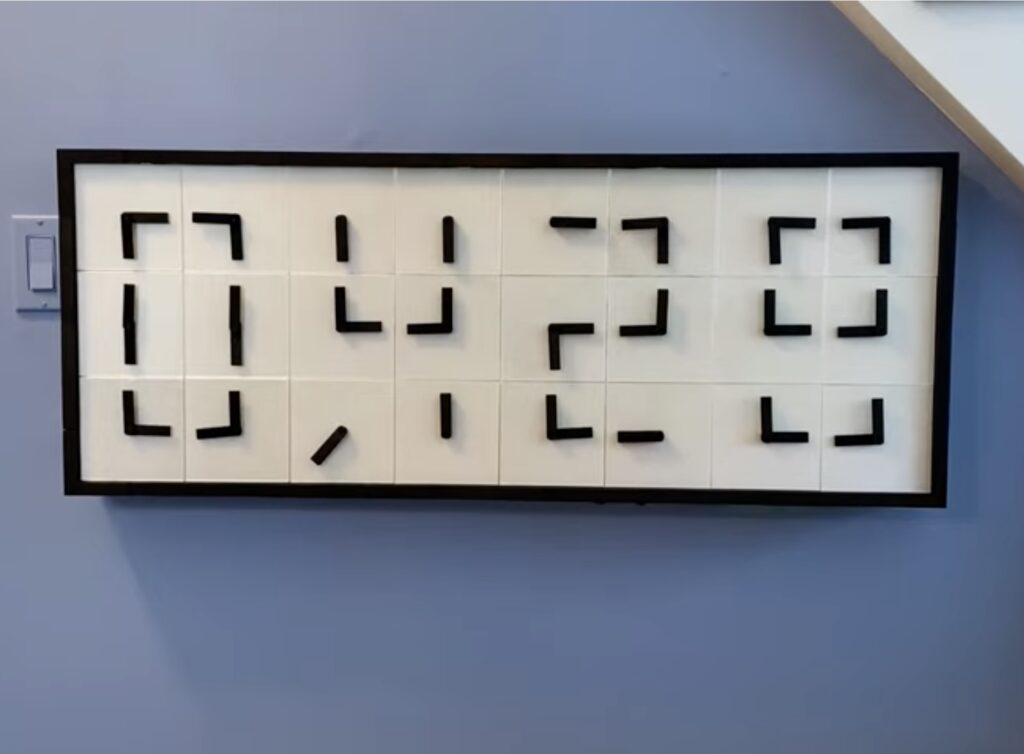
You can build a simple and accurate clock with any Arduino board, an RTC (real-time clock) module, and a four-digit seven-segment display. But if you want to be inspired by a more unique design, check out Hans Andersson’s Time Slider.
This clever clock contains four sliders — one for each digit of the time. Those sliders are 3D-printed frames that contain grids of “pixels” that are either open to make the backing visible, or closed to be black. They move up and down to whatever position is necessary to show the pixels necessary to form a numeric digit. The great thing about this design (aside from the interesting aesthetic), is that it is easy to scale up or down to whatever size the user wants.
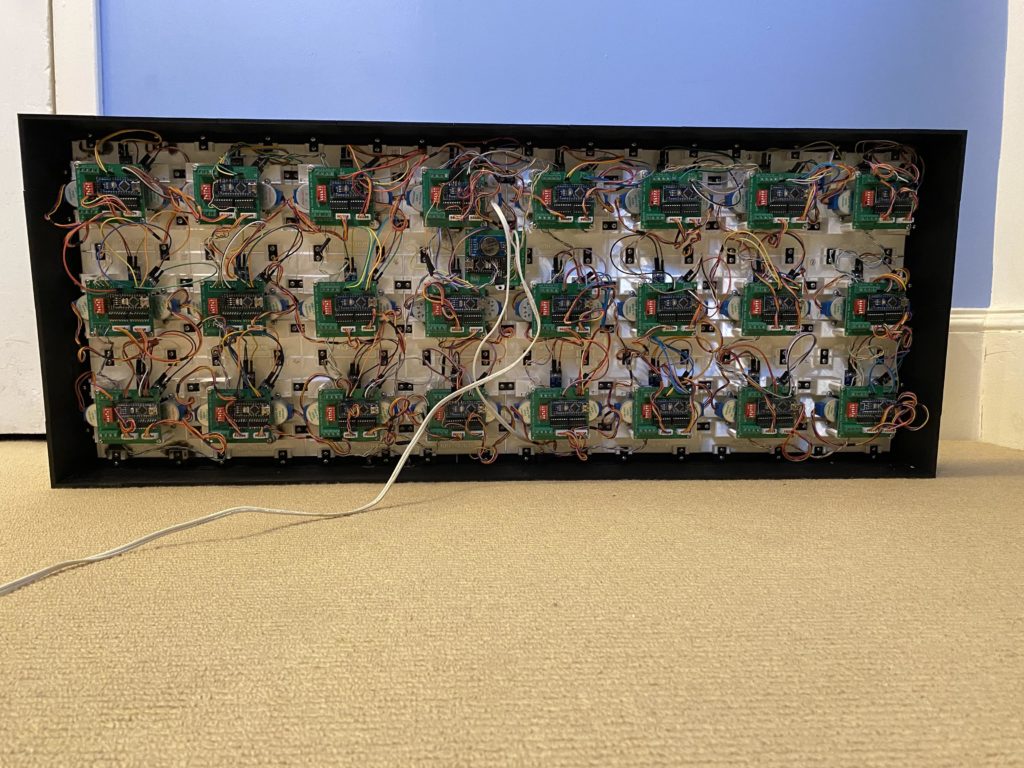
The hardware components for this project include an Arduino Mega 2560 board, a DS3231 RTC module, eight ULN2003 motor drivers with 28BYJ-48 pancake stepper motors, wires, and a power supply. All of the mechanical parts are 3D-printable. Two stepper motors drive each slider to ensure smooth operation. There are not any buttons to set the time, so the user must configure that in the included sketch and then immediately upload the code during setup.
Clocks are fantastic means of creative expression, as they serve a practical purpose and therefore have a reason to exist, but aren’t limited to pure functionality. As such, we see many interesting clock designs. But ihart’s 3D-printed digital clock made from 24 individual analog clocks takes the proverbial cake.
When observed from a distance, this clock looks like it contains large seven-segment displays. But it actually displays the numerical digits of the time using the two hands of 24 individual analog clocks. Those analog clocks don’t show the time, but instead form the segments that make up the “digital” digits. The choreographed dance of the clock hands as the time changes is mesmerizing and the sheer complexity of the system should excite even the most stoic engineers in our audience.
Each of the 24 analog clocks has two hands that move independently, so this clock requires a total of 48 stepper motors. Each hand also requires a Hall effect sensor for finding its home position. While there were many other potential solutions, ihart chose to use one Arduino Nano board for every analog clock. That means that each Arduino controls two stepper motors. To simplify wiring and power distribution, ihart designed a custom PCB to host each of those 24 Arduino boards. A 25th Arduino Nano, paired with an RTC (real-time clock) module, coordinates the operation of the other 24.
All of the mechanical components of the clock were 3D-printed. The design is somewhat modular to keep the unique part count down, which means that this could be expanded into a larger display. But even as it is, the clock is very impressive.
Planet Arduino is, or at the moment is wishing to become, an aggregation of public weblogs from around the world written by people who develop, play, think on Arduino platform and his son. The opinions expressed in those weblogs and hence this aggregation are those of the original authors. Entries on this page are owned by their authors. We do not edit, endorse or vouch for the contents of individual posts. For more information about Arduino please visit www.arduino.cc
You are currently browsing the archives for the clocks category.