Posts | Comments

Planet Arduino

Archive for the ‘laser’ Category

While researching how to detect a laser beam configured as a tripwire I came across a number of ‘recommended’ ways to do this. I decided to test the two cheapest viable options – an LDR and LED – to see which would best suit my needs.

The sensor requirements for this application are relatively simple – detect a low power red laser beam interrupted by something passing through the it. The sensor needs to provide a reliable on/off signal within a few milliseconds of the event. It should also be inexpensive and implementable with a minimum of supporting passive components (ie, no op-amps, transistors, etc).

The two candidates that could suit this application are a

  • Light Dependent Resistor (LDR).
  • Light Emitting Diode (LED) used as a photodiode.

Light Dependent Resistor

A LDR (also known as photoresistor or photocell) is a passive component that decreases resistance when exposed to increased light intensity. The resistance range can span orders of magnitude when exposed to light – from as several megaohms to as low as a few hundred ohms.

Inexpensive cadmium sulfide (CdS) cells are readily available and can be found in many consumer items. Importantly for this application, LDRs are also commonly used in laser-based security systems to detect the laser beam is interrupted.

LDRs are usually configured as in voltage divider (see the circuit here) that provides a voltage proportional to the light intensity to a microporcessor’s analog input.

Light Emitting Diode

A Light Emitting Diode (LED) is a semiconductor light source that emits light when current flows through it. The color of the light is determined by the energy required for electrons to cross the band gap of the semiconductor and commonly enhanced by the color of the encapsulating plastic lens.

In addition to emitting light, a LED can be used as a photodiode light sensor/detector. When used this way, a LED is sensitive to wavelengths equal to or shorter than the predominant wavelength it emits. The current produce is very small (microamps).

The small current produced can be measured using high impedance inputs common in modern microprocessors. The LED is wired in a circuit ‘as normal’ with the microprocessor pin configured as an analog input measuring the voltage generated by the light detection, which should be about the same as the LED forward voltage.

Testing

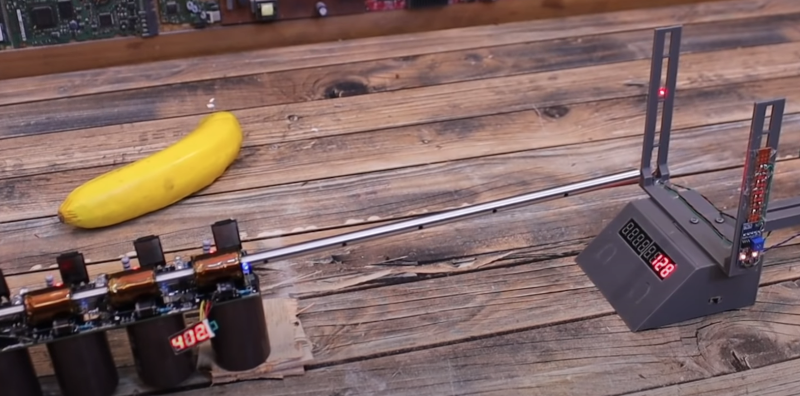
The test hardware setup shown below is built up from my standardized prototyping mini-circuits (see this previous article) and the software used is found at the end of this article.

A small 5mW red laser is directly connected to an output pin and can be turned on/off using a tact switch connected to input pin.

The LDR/LED sensors are in turn connected to a third input pin and sampled by the software. The Arduino board’s bult-in LED is used to indicate the binary sensor output and the corresponding analog values are written to the serial monitor.

The LED had a few shortcomings in this application. The analog range was relatively small (260 to 140) making it tricky to find the on/off threshold. The sensor values read also jumped around quite a bit, so each reading was actually the average of multiple reads with senor recovery delays between each reading.

The LDR performed the best for this application. The sensor was 100% reliable, with the analog values reported between 1000 (exposed to the laser) and 100 (dark). This large range makes it easy to convert to an on/off signal. The sensor could also be read in one operation and requires minimal software additional hardware to use.


Test Code

// Test Laser Tripwire
//
// Test laser sensor types
// Switch off the built-in LED when the laser is blocked
//
// MD_UISwitch from https://github.com/MajicDesigns/MD_UISwitch or Arduino Library Manager


#include <MD_UISwitch.h>

#define TEST_LDR 1
#define TEST_LED 0

const uint8_t PIN_LASER = 12;
const uint8_t PIN_DETECT = A0;
const uint8_t PIN_SWITCH = 3;

MD_UISwitch_Digital sw(PIN_SWITCH); // laser toggle switch

void setup(void) 
{
  Serial.begin(57600);
  Serial.print(F("\n[Laser Test]"));
  pinMode(PIN_LASER, OUTPUT);
  pinMode(PIN_DETECT, INPUT);
  pinMode(LED_BUILTIN, OUTPUT);
  sw.begin();
}

#if TEST_LDR
const uint16_t threshold = 200;

inline uint16_t readSensor(void)
{
  return(analogRead(PIN_DETECT));
}
#endif

#if TEST_LED
// LED is in circuit with anode in the PIN_DETECT and gnd to ground
const uint16_t threshold = 160;
const uint8_t samples = 20;
const uint16_t recovery = 2;

uint16_t readSensor(void)
{
  uint32_t sens = 0; 

  for (uint8_t i = 0; i < samples; i++) // remember the lowest value out of many readings
  {
    sens += analogRead(PIN_DETECT);
    delay(recovery);                 // the sensor needs a delay here to catch its breath
  }
  sens /= samples;

  return(sens);
}
#endif

void loop(void)
{
  // toggle laser on/off with momentary switch
  if (sw.read() == MD_UISwitch::KEY_PRESS)
    digitalWrite(PIN_LASER, digitalRead(PIN_LASER) == LOW ? HIGH : LOW);

  // display the value of the input detected
  uint16_t v = readSensor();
  
  digitalWrite(LED_BUILTIN, v < threshold ? HIGH : LOW);

  Serial.print(F("\n"));
  Serial.print(v < threshold);
  Serial.print(F("  "));
  Serial.print(v);
}

[Electronoobs] built a coil gun and the obvious question is: how fast is the projectile? To answer it, he built a chronograph suitable for timing a bullet. The principle is straightforward. A laser and a light sensor would mark the entry and exit of the projectile over a known distance. As it turns out, there are some issues to resolve.

For one thing, a laser is too narrow and might miss the projectile. The first attempt to rectify this used mirrors, but the loss was too great — we suspect he was using a second surface mirror. The final answer was to use an array of detectors and removed the laser’s collimation lens to cover a wider area.

That worked, so all that was left was a nice mechanical design to allow changing the height of the sensors and the distance between the sensors. After that, an Arduino can take over.

We liked the mechanical design and the way he managed pushbuttons in the 3D printed case. We couldn’t help but wonder if a first surface mirror might have worked better. We also thought it would be nice to add some sort of encoder to let the device measure the distance between sensors automatically since it is adjustable. We also thought the response time and wavelength sensitivity of light-sensitive resistors might be a bit off. It seems like a photodiode or transistor would be more accurate and have better sensitivity to the laser or even just a conventional light source. But this does seem to work.

How fast was the coil gun? Well over 100 meters per second. For a point of reference, a .22 caliber round will have a muzzle velocity of well over 300 meters per second, but, still, 120 to 130 meters per second is nothing to sneeze at.

If you need a coilgun, we always liked the looks of this one. Or, you might prefer a more futuristic look.

A 3D-printed mini laser engraver made from DVD-RW drive motors.

Got a couple of old DVD-RW drives lying around, just collecting dust? Of course you do. If not, you likely know where to find a pair so you can build this totally adorable and fully dangerous laser engraver for your desk. Check out the complete build video after the break.

[Smart Tronix] doesn’t just tell you to salvage the stepper motors out of the drives — they show you how it’s done and even take the time to explain in writing what stepper motors are and why you would want to use them in this project, which is a remix of [maggie_shah]’s design over on Thingiverse. As you might expect, the two steppers are wired up to an Arduino Uno through a CNC shield with a pair of A4988 motor drivers. These form the two axes of movement — the 250mW laser is attached to x, and the platform moves back and forth on the y axis. We’d love to have one of these to mess around with. Nothing that fits on that platform would be safe! Just don’t forget the proper laser blocking safety glasses!

Need something much bigger that won’t take up a lot of space? Roll up your sleeves and build a SCARA arm to hold your laser.

[jbumstead] used MATLAB to convert the text messages into binary to be cut out of the disk.
[jbumstead] wanted to demonstrate the idea of information-storing devices such as LPs, CDs, and old hard drives. What he came up with lies directly at the intersection of art and technology: an intricately-built machine that plays beautiful collaged wooden disks. Much like the media that inspired the Wooden Disk Player, it uses a laser to read encoded data, which in this case is short bits of text like “Don’t Panic”.

These snippets are stored in binary and read by a laser and photodiode pair that looks for holes and not-holes in the disk. The message is then sent to an Arduino Nano, which translates it into English and scrolls the text on an LED matrix. For extra fun, the Nano plays a MIDI note every time it reads a 1, and you can see the laser reading the disk through a protective acrylic shield.

Though the end result is fantastic, [jbumstead] had plenty of issues along the way which are explored in the build video after the break. We love it when people show us their mistakes, because it happens to all of us and we shouldn’t ever let it tell us to stop hacking.

If anyone knows their way around lasers, it’s [jbumstead]. We loved playing their laser harp at Supercon!

Via adafruit

[a-RN-au-D] was looking for something fun to do with his son and dreamed up a laser blaster game that ought to put him in the running for father of the year. It was originally just going to be made of cardboard, but you know how these things go. We’re happy the design went this far, because that blaster looks fantastic.

Both the blaster and the target run on Arduino Nanos. There’s a 5mW laser module in the blaster, and a speaker for playing the pew pew-related sounds of your choice. Fire away on the blaster button, and the laser hits a light-dependent resistor mounted in the middle of the target. When the target registers a hit, it swings backward on a 9g servo and then returns quickly to vertical for the next shot.

There are some less obvious features that really make this game a hit. The blaster can run in 10-shooter mode (or 6, or whatever you change it to in the code) with a built-in reload delay, or it can be set to fully automatic. If you’re short on space or just get sick of moving the target to different flat surfaces, it can be mounted on the wall instead — the target moves forward when hit and then resets back to flat. Check out the demo video we loaded up after the break.

No printer? No problem — here’s a Node-RED shooting gallery that uses simple wooden targets.

Ever wish you could augment your sense of sight?

[Nick Bild]’s latest hack helps you find objects (or people) by locating their position and tracking them with a laser. The device, dubbed Artemis, latches onto your eyeglasses and can be configured to locate a specific object.

Images collected from the device are streamed to an NVIDIA Jetson AGX Xavier board, which uses a SSD300 (Single Shot MultiBox Detection) model to locate objects. The model was pre-trained with the COCO dataset to recognize and localize 80 different object types given input from images thresholded in OpenCV. Once the desired object is identified and located, a laser diode activates.

Probably due to the current thresholds, the demo runs mostly work on objects placed further apart against a neutral background. It’s an interesting look at applications combining computer vision with physical devices to augment experiences, rather than simply processing and analyzing data.

The device uses two servos for controlling the laser: one for X-axis control and the other for Y-axis control. The controls are executed from an Adafruit Itsy Bitsy M4 Express microcontroller.

Perhaps with a bit more training, we might not have so much trouble with “Where’s Waldo” puzzles anymore.

Check out some of our other sunglasses hacks, from home automation to using LCDs to lessening the glare from headlights.

We missed [iliasam’s] laser text projector when it first appeared, perhaps because the original article was in Russian. However, he recently reposted in English and it really caught our eye. You can see a short video of it in operation, below.

The projector uses raster scanning where the beam goes over each spot in a grid pattern. The design uses one laser from a cheap laser pointer and a salvaged mirror module from an old laser printer. The laser pointer diode turned out to be a bit weak, so a DVD laser was eventually put into service. A DVD motor also provides the vertical scan which is just a slight wobble of a mirror. A Blue Pill CPU provides all the smarts. You can find the code on GitHub.

The projector is fairly limited in size with a maximum resolution of 32×14. Some displays use a vector scheme that draws with the laser. This is brighter and more capable, but also more difficult to arrange since the laser has to move rapidly in a complex motion. The raster scanning is much easier to accomplish.

A light sensor tells the CPU when the laser is about to start hitting the vertical scan mirror. Obviously, there are other ways you could arrange for the mirrors to move, but the logic would be the same.

We’ve seen [illiasam] has a lot of interest in lasers. He’s hacked rangefinders and even 3D scanners that we’ve looked at before.

There’s an interesting side effect of creating a popular piece of science fiction: if you wait long enough, say 30 or 40 years, there’s a good chance that somebody will manage to knock that pesky “fiction” bit off the end. That’s how we got flip phones that looked like the communicators from Star Trek, and rockets that come in for a landing on a tail of flame. Admittedly it’s a trick that doesn’t always work, but we’re not in the business of betting against sufficiently obsessed nerds either.

Coming in right on schedule 32 years after the release of Metroid on the Nintendo Entertainment System, we now have a functional laser arm cannon as used by the game’s protagonist Samus Aran, courtesy of [Hyper_Ion]. It’s not quite as capable as its video game counterpart, but if your particular corner of the solar system is under assault from black balloons you should be in good shape. Incidentally no word yet on a DIY Power Suit that folds the wearer up into a tiny ball, but no rush on that one.

Modeled after the version of the weapon Samus carried in 2002’s iconic Metroid Prime, [Hyper_Ion] 3D printed the cannon in a number of pieces that screw together in order to achieve the impressive final dimensions. He printed it at 0.3 mm layers to speed up the process, but as you can probably imagine, printing life-size designs like this is not for the faint of heart or short of time. While the use of printed threads does make the design a bit more complex, the fact that the cannon isn’t glued together and can be broken down for maintenance or storage is a huge advantage.

Ever popular NeoPixel strips give the cannon a bit of flash, and a speaker driven by a 2N2222 transistor on an Arduino Nano’s digital pin allows for some rudimentary sound effects with nothing more than a PWM signal. In the video after the break you can see how the lights and sounds serve as a warning system for the laser itself, as the cannon can be seen “charging up” for a few seconds before emitting a beam.

Of course, this is the part of the project that might have some readers recoiling in horror. To provide some real-world punch, [Hyper_Ion] has equipped his arm cannon with a 2.5W 450nm laser module intended for desktop engraving machines. To say this thing is dangerous is probably an understatement, so we wouldn’t blame you if you decided to leave the laser module off your own version. But it certainly looks cool, and as long as you’ve got some proper eye protection there’s (probably) more dangerous things you can do in the privacy of your own home.

Shame this kind of technology wasn’t really practical back when [Ryan Fitzpatrick] made this fantastic Power Suit helmet for a Metroid fan production.

Whether it’s our own cat or a neighbor’s, many of us have experienced the friendly feline keeping us company while we work, often contributing on the keyboard, sticking its head where our hands are for a closer look, or sitting on needed parts. So how to keep the crafty kitty busy elsewhere? This roboticized laser on a pan-tilt mechanism from the [circuit.io team] should do the trick.

The laser is a 650 nm laser diode mounted on a 3D printed pan-tilt system which they found on Thingiverse and modified for attaching the diode’s housing. It’s all pretty lightweight so two 9G Micro Servos do the grunt work just fine. The brain is an Arduino UNO running an open-source VarSpeedServo library for smooth movements. Also included are an HC-05 Bluetooth receiver and an Android app for controlling the laser from your phone. Set it to Autoplay or take a break and use the buttons to direct the laser yourself. See the video below for build instructions and of course their cat, [Pepper], looking like a Flamenco dancer chasing the light.

Think your cat might get bored chasing a light around by itself? Mount the laser on a mobile robot with added IR proximity sensor which can roll around and play with the cat.

We don’t know what cats see when they see a red laser beam, but we know it isn’t what we see. The reaction, at least for many cats — is instant and extreme. Of course, your cat expects you to quit your job and play with it on demand. While [fluxaxiom] wanted to comply, he also knew that no job would lead to no cat food. To resolve the dilemma, he built an automated cat laser. In addition to the laser module, the device uses a few servos and a microcontroller in a 3D printed case. You can see a video, below. Dogs apparently like it too, but of course they aren’t the reason it was built.

If you don’t have a 3D printer, you can still cobble something together. The microcontroller is an Adafruit Pro Trinket, which is essentially an Arduino Pro Mini with some extra pins and a USB port.

There are twelve different patterns the device cycles through at random to attempt to confuse your cat. We couldn’t help but wonder if this ought to be on the Internet so you could take control and manually play with your cat. Sounds like a job for Blynk. The last time we saw a cat laser, it was a little more mobile.


Filed under: 3d Printer hacks, Arduino Hacks, laser hacks


  • Newsletter

    Sign up for the PlanetArduino Newsletter, which delivers the most popular articles via e-mail to your inbox every week. Just fill in the information below and submit.

  • Like Us on Facebook