04
Archive for the ‘laser’ Category
04
16
Affordable Opensource Arduino Laser Engraver for Everbody
arduino, engraver, laser, ZelosLaser Comments Off on Affordable Opensource Arduino Laser Engraver for Everbody
The ZelosLaser Engraver is affordable, with a compact design and the perfect entry for the Daily Hobbyist.
What are the characteristics of the ZelosLaser Engraver?
- Work area *Normal* 300mm x 200mm
- Housing dimensions Normal 440mm x 350mm x 220mm
- Work area *BIG MAMA* 660mm x 650mm
- Housing dimensions *BIG MAMA* 800mm x 800mm x 220mm
Affordable Opensource Arduino Laser Engraver for Everbody – [Link]
29
Arduino Laser Trip Wire
alarm, arduino, laser Comments Off on Arduino Laser Trip Wire
by ronnietucker @ instructables.com:
So, first thing I did was to get the LCD and keypad working together.
For this I pretended that it was some sort of arm/disarm (or entry/exit) thing.
My code for this part is at: http://pastebin.com/YndLneqm.
Getting the LCD wired up was tricky as most wiring diagrams for it don’t show the last two pins wired up and these are required for the back light. Check my snazzy Fritzing wiring diagram to see how I wired up my LCD screen, pot (for adjusting brightness) and keypad. The pins for them all are also mentioned in my code.
Arduino Laser Trip Wire - [Link]
20
DIY Hot Wheels Drag Race Timer
7-segment display, arduino, arduino hacks, birthday, Cars, hot wheels, laser, lasers, phototransistors, timer, toy, toy hacks, track Comments Off on DIY Hot Wheels Drag Race Timer
[Apachexmd] wanted to do something fun for his three-year-old son’s birthday party. Knowing how cool race cars are, he opted to build his own Hot Wheels drag race timer. He didn’t take the easy way out either. He put both his electronics and 3D printing skills to the test with this project.
The system has two main components. First, there’s the starting gate. The cars all have to leave the gate at the same time for a fair race, so [Apachexmd] needed a way to make this electronically controlled. His solution was to use a servo connected to a hinge. The hinge has four machine screws, one for each car. When the servo is rotated in one direction, the hinge pushes the screws out through holes in the track. This keeps the cars from moving on the downward slope. When the start button is pressed, the screws are pulled back and the cars are free to let gravity take over.
The second component is the finish line. Underneath the track are four laser diodes. These shine upwards through holes drilled into the track. Four phototransistors are mounted up above. These act as sensors to detect when the laser beam is broken by a car. It works similarly to a laser trip wire alarm system. The sensors are aimed downwards and covered in black tape to block out extra light noise.
Also above the track are eight 7-segment displays; two for each car. The system is able to keep track of the order in which the cars cross the finish line. When the race ends, it displays which place each car came in above the corresponding track. The system also keeps track of the winning car’s time in seconds and displays this on the display as well.
The system runs on an Arduino and is built almost exclusively out of custom designed 3D printed components. Since all of the components are designed to fit perfectly, the end result is a very slick race timer. Maybe next [Apachexmd] can add in a radar gun to clock top speed. Check out the video below to see it in action.
Filed under: Arduino Hacks, toy hacks
20
Touching Conversations: Email Snippets Scroll By on Electro-Embroidery Piece
arduino, arduino hacks, embroidery, laser, LED, led hacks, Microcontroller, wearable, wearable hacks Comments Off on Touching Conversations: Email Snippets Scroll By on Electro-Embroidery Piece
[Wei Chieh Shih] really moves the needle when it comes to wearable technology. His textile design project entitled There is No Love, Just Relationships is a striking marriage of masterful hand embroidery, delicate circuitry, and careful programming.
[Wei] is using an Arduino micro to drive a matrix of surface-mount LEDs in the Hello, World video, which is a ramp-up to the scrolling text version that’s in progress. That full version is part of his residency project at Arquetopia in Oaxaca, Mexico and displays snippets of emails from his past relationships. It’s huge, with multiple matrices as large as 8×25 pixels!
No build notes could be found for this or any of [Wei]‘s similar projects, like this awesomely dangerous 200 laser diode jacket or this eerily beautiful light installation on Taiwan’s north beach. Based on the pictures, our speculation is that he is using ordinary 6-strand embroidery floss to make stem or half cross-stitches on all the paths. He then runs very thin, flexible conductor underneath the channel of stitches and solders the wires to the component pads.
If [Wei] wants another way to wear his heart on his sleeve, he could investigate these dynamic LED clothing hacks.
[via adafruit]
Filed under: Arduino Hacks, led hacks, wearable hacks
24
Hack-a-Day Logo Laser Light Show
arduino hacks, laser, laser hacks, logo, Processing, scanning, servo, software hacks Comments Off on Hack-a-Day Logo Laser Light Show
The Hack-a-Day logo challenge keeps on bearing fruit. This tip comes from [Enrico Lamperti] from Argentina who posted his follies as well as success creating a Hack-a-Day logo using a home built scanning laser projector.
The build consists of a couple small servos, a hacked up pen laser and an Arduino with some stored coordinates to draw out the image. As usual the first challenge is powering your external peripheral devices like servos. [Enrico] tackled this problem using 6 Ni-MH batteries and an LM2956 simple switcher power converter. The servos and Arduino get power directly from the battery pack and the Arduino controls the PWM signals to the servos as they trace out the stored coordinate data. The laser is connected to the servo assembly and is engaged and powered by an Arduino pin via an NPN transistor. He also incorporated a potentiometer to adjust the servo calibration point.
His first imported coordinate data generated from some Python script was not very successful. But later he used processing with an SVG file to process a click-made path the Arduino could use as map data to draw the Hack-a-Day logo. It requires a long exposure time to photograph the completed drawing in a dark room but the results are impressive.
It’s an excellent project where [Enrico] shares what he learned about using Servo.writeMicroseconds() instead of Servo.write() for performance along with several other tweaks. He also shared the BOM, Fritzing diagram, Processing Creator and Simulator tools and serial commands on GitHub. He wraps up with some options that he thinks would improve his device, and he requests any help others may want to provide for better performance. And if you want you could step it up a notch and create a laser video projector with an ATMega16 AVR microcontroller and some clever spinning tilted mirrors.
Filed under: Arduino Hacks, laser hacks, software hacks
31
The MicroSlice – A tiny Arduino laser cutter
arduino, cutter, laser, MicroSlice, Tools Comments Off on The MicroSlice – A tiny Arduino laser cutter
Arduino UNO R3 mini laser cutter:
A few years ago I saw an Instructable where Groover had used a pair of DVD-RW drives to make a pocket laser engraver. Inspired by the idea, driven by the recent purchase of a full-sized 50 watt CO2 laser cutter, and roused by the launch of the Microcontroller contest I took the decision to have a crack at making my own mini laser engraver.
The MicroSlice – A tiny Arduino laser cutter - [Link]
14
Let’s go creative with lighting on a DIY laser device
arduino, arduino ethernet, ethernet, inspiration, Interaction Design, laser, performance, servo motor Comments Off on Let’s go creative with lighting on a DIY laser device
Last year MediaInteractiveDesign and PlayModes , two interactive design and creative technology studios based in Catalonia, collaborated to develop a system to control DIY Laser robot.
They created a new shield to control Dinamyxel servomotors to work with PWM laser drivers. The shield works using Arduino Ethernet programmed with a specific firmware to control laser and motor using Open Sound Control.
The project involved a team of 3 people (Eloi Maduell, Alex Posada and Santi Vilanova) coming from the field of audiovisual creativity, hardware engineering and software development.
To show us the way this system can be used, they sent us two of their projects. Enjoy!
RADIAL
Radial is a fully immersive audiovisual experience driven by cutting edge DIY technologies. Composed by a set of 8 moving blue laser heads and a kinetic light sculpture, it drives the audience into an abstract synaesthesic trip.
While laying down on the center of the installation, you let yourself be surrounded of synchronized three dimensional light compositions, multichannel sound and the intricate moving color patterns of the Particle.
Here’s the technical schematic of Radial, some pics, and below the video:
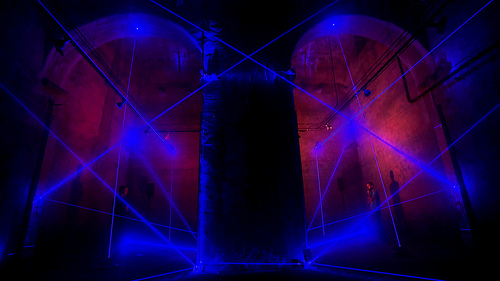
BLAUS
Blaus is an immersive space where light and sound relate intimately to impact on the visitor. It can be a cube or a blossoming flower, a grid or a jellyfish; a mutant entity of reflecting lights which submerge the audience into a symbolical universe, driven by hidden forces of the architecture. Movement and reflections of light, sound and laser beams generates a kinetic atmosphere that transforms the architecture into the main character of a geometric play.
And here you can see some pics and the video about how they made it:
Last but not least for the implementation of the system they used and want to thank:
- Savage Electronic Dinamyxel library
- ZOSC library for Arduino
- Duration Open Source software by James George, to control independently, compose, and play a full score for the laser diodes, servomotors, lights and music.