Regular candles can be awfully boring at times. They can only produce one color and the flicker is so… predictable. They can’t even be controlled by an infrared remote control, not to mention the obvious fire hazard. Now, however, [Jose] has come up with an LED candle that solves all of these problems. (Original link to the project in Spanish.)
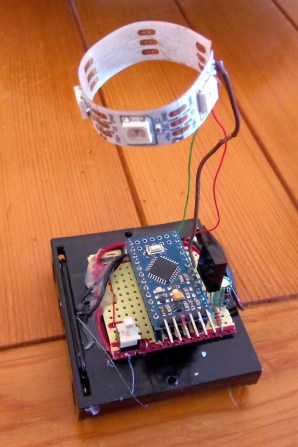
The heart of the project is an Arduino Pro Mini, which is especially suited for this project because of its size. [Jose] put the small form-factor microcontroller in the base of a homemade wax enclosure and wired it to a Neopixel WS2812b LED strip. The strip can produce any color, and has some programmed patterns including flicker, fade, rainbow, and fire.
The artificial candle is controlled with an infrared remote control, and all of the code for the project is available on the project site if you want to build your own. [Jose] has been featured here before for his innovative Arduino-driven RGB lighting projects, and this is another great project which builds on that theme!
Getting into home automation usually starts with lighting, like hacking your lights to automatically turn on when motion is detected, timer controls, or even tying everything into an app on your smart phone. [Ken] took things to a completely different level, by giving his lighting intelligence.
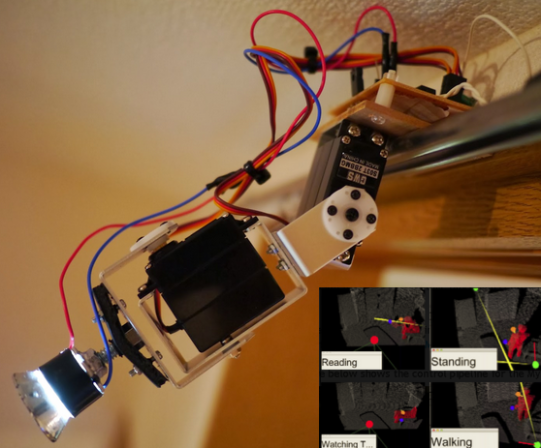
The system is called ‘Myra’, and it works by detecting what you’re doing in the room, and based on this, robotic lights will optimally adjust to the activity. For example, if you’re walking through the room, the system will attempt to illuminate your path as you walk. Other activities are detected as well, like reading a book, watching TV, or just standing still.
At the heart of the ‘Myra’ system is an RGBD Sensor (Microsoft Kinect/Asus Xtion). The space in the room is processed by a PC running an application to determine the current ‘activity’. Wireless robotic lights are strategically placed around the room; each with a 2-servo system and standalone Arduino. The PC sends out commands to each light with an angle for the two axis and the intensity of the light. The lights receive this command wirelessly via a 315MHz receiver, and the Arduino then ‘aims’ the beam according to the command.
This isn’t the first time we’ve seen [Ken’s] work; a couple of years ago we saw his extremely unique ‘real life’ weather display. The ‘Myra’ system is still a work in progress, so we can’t wait to see how it all ends up. Be sure to check out the video after the break for a demo of the system.
Last March, Alexandra Deschamps-Sonsino registered a new limited company in London, and booked a booth at CES, the consumer electronics trade show, taking place 10 months later. She had no team, and only a dated prototype product that she had designed back in 2005. “I thought what’s the biggest kick [...]
Since I first got my Arduino and some RGB LEDs I’d wanted to build myself a mood lamp with some funky features (note that I used the word funky and not useful). Well, I’ve finally done it, and here is the blog post describing how. For this project I used the Ikea Grönö, which was …
Planet Arduino is, or at the moment is wishing to become, an aggregation of public weblogs from around the world written by people who develop, play, think on Arduino platform and his son. The opinions expressed in those weblogs and hence this aggregation are those of the original authors. Entries on this page are owned by their authors. We do not edit, endorse or vouch for the contents of individual posts. For more information about Arduino please visit www.arduino.cc
You are currently browsing the archives for the lighting category.

 Watch Darbin Orvar create a modern-looking light fixture that uses high powered LEDs for a dimmable effect.