Posts | Comments

Planet Arduino

Archive for the ‘ham radio’ Category

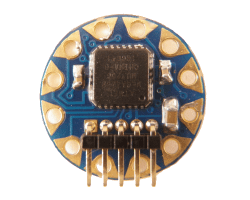
TinyLilyThumbnail[Rob Bailey] likes to build things and he likes ham radio. We are guessing he likes mints too since he’s been known to jam things into Altoids tins. He had been thinking about building a code practice oscillator in a Altoids Smalls tin, but wasn’t sure he could squeeze an Arduino Pro Mini in there too. Then he found the TinyLily Mini. The rest is history, as they say, and 1CPO was born.

The TinyLily Mini is a circular-shaped Arduino (see right) about the size of a US dime. most of the pads are arranged around the circle and there is a small header that takes a USB programmer. A small rechargeable battery can run the device for a long time.

If you’ve ever written Morse code software, one challenge is to compute the actual sending speed in words per minute (WPM). If you are doing a serial port, for example, the speed is easy because the sent elements are the same length. However, with Morse code, some things are very short (like an E, for example) and some are much longer (like a zero). In fact, the code tries to reflect the frequency certain letters occur. E is the shortest character and the most common in English texts.

You might think [Samuel Morse] was responsible for this, but his original code was only numbers. The idea is you would get numbers and look them up in a code book. Presumably, some of the codes would have been single letters forming an early coding like ASCII, Baudot, or EBCDIC. [Alfred Vail] expanded the system to include letters and other characters and assigned lengths based on the examination of type cases at the local newspaper. That code also used dots, dashes, and long dashes, but it is almost recognizable as the Morse code in use today.

So [Rob] looked for a way to determine the speed and found that the ARRL uses the timing of the word PARIS as an average word. [Rob] wasn’t quite convinced that was the right way to go, so he compiled a list of the 1,000 most common English words, the 100 largest cities in the word, and a few other groups of words and computed the average element length of the words. PARIS has 50 elements total. The average of [Rob’s] list was 49.489. Pretty close.

If you think Morse code is dead, there are still a number of hams who enjoy it. Also, the US Air Force trains 10 Morse code operators every year. Morse has been used to transfer data over cell phones cheaply, and we’ve seen plenty of larger practice devices.


Filed under: Arduino Hacks

There’s an old saying that the nice thing about standards is there are so many of them. For digital voice modes, hams have choices of D-Star, DMR, System Fusion, and others. An open source project, the Multimode Digital Voice Modem (MMDVM), allows you to use multiple modes with one set of hardware.

There are some kits available, but [flo_0_] couldn’t wait for his order to arrive. So he built his own version without using a PCB. Since it is a relatively complex circuit for perf board, [flo_0_] used Blackboard to plan the build before heating up a soldering iron. You can see the MMDVM in action below.

The build includes an Arduino, of course, and the neat perf board wiring makes for a good-looking project. We’ve covered digital voice that uses PCs before and even some digital ham modes that use an Arduino. Or check out the MMDVM project for more info.


Filed under: Arduino Hacks, radio hacks

[Tom Hall], along with many hams around the world, have been hacking the Silicon Labs Si5351 to create VFOs (variable frequency oscillators) to control receivers and transmitters. You can see the results of his work in a video after the break.

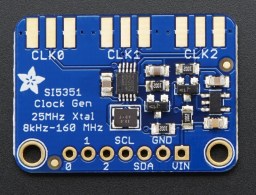
vfo board[Tom] used a Teensy 3.1 Arduino compatible board, to control the Si5351 mounted on an Adafruit breakout board. An LCD display shows the current frequency and provides a simple interface display for changing the output. A dial encoder allows for direct adjustment of the frequency. The ham frequency band and the frequency increment for each encoder step are controlled by a joystick. When you get into the 10 meter band you definitely want to be able to jump by kHz increments, at least, since the band ranges from 28 mHz to 29.7 mHz.

So what is the Si5351? The data sheets calls it an I2C-Programmable Any-Frequency CMOS Clock Generator + VCXO. Phew! Let’s break that down a bit. The chip can be controlled from a microprocessor over an I2C bus. The purpose of the chip is to generate clock outputs from 8 kHz to 160 kHz. Not quite any frequency but a pretty good range. The VCXO means voltage controlled crystal oscillator. The crystal is 25 mHz and provides a very stable frequency source for the chip. In addition, the Si5351 will generate three separate clock outputs.

[Tom] walks through the code for his VFO and provides it via GitHub. An interesting project with a lot of the details explained for someone who wants to do their own hacks. His work is based on work done by others that we’ve published before, which is what hacking is all about.


Filed under: Arduino Hacks, radio hacks

Historically when hams built low power (QRP) transmitters, they’d use a crystal to set the frequency. Years ago, it was common to find crystals in all sorts of radios, including scanners and handheld transceivers. Crystals are very stable and precise and it is relatively easy to make a high quality oscillator with a crystal and a few parts.

The big problem is you can’t change the frequency much without changing crystals. Making a high quality variable frequency oscillator (VFO) out of traditional components is quite a challenge. However, today you have many alternatives ranging from digital synthesis to all-in-one IC solutions that can generate stable signals in a wide range of frequencies.

[N2HTT] likes to build radio projects and he decided to take an Si5351 clock generator and turn it into a three frequency VFO for his projects. The Si5351 uses a crystal, so it is very stable. However, you can digitally convert that crystal frequency into multiple frequencies over a range of about 8kHz to 160MHz.

The chip has two PLLs that multiply the crystal frequency by a programmable amount. Then you can set each channel to start with the crystal frequency or either PLL and divide it by an integer or a fractional amount. As you might expect, the integer divisions result in a more stable output, but if you really need a particular frequency and can accept some jitter, you can get almost anything you want out of the device.

The device [N2HTT] used is in a tiny 10 pin MSOP package, but there are plenty of inexpensive breakout boards available. You control all the multiplying and dividing by sending configuration data to the chip via I2C. There’s even a software package that can tell you the best settings for the frequencies you want to generate.

One thing of interest is the breadboard the VFO is built on. [N2HTT] used an Arduino and a small display along with an encoder to control the chip. But the chip generates some high frequencies and common wisdom is that solderless breadboards aren’t good for high frequency. Acting on a tip he read in a magazine article [N2HTT] took a bamboo cutting board and then affixed standard solderless breadboards to unetched copper PCB material. He then made sure the PCB ground planes were well connected and grounded. It seems to work (you can see it working in the video below).

The output of the chip is a square wave, so if you wanted to use it for radio applications, you’d probably have to low pass filter the output to get a sine wave. The device is only as accurate as the crystal and will exhibit some phase noise and jitter (especially if you don’t have integer divisions). However, having a wide range programmable frequency source for a few bucks is a great building block for lots of different projects.

In fact, we covered a project to use the same part to implement a digital communications mode a few months ago. There’s also more than one Arduino library out there. Since it is I2C, you can use it with many other processors, too.


Filed under: Arduino Hacks, wireless hacks

You may wonder why anyone would want to learn Morse code. You don’t need it for a ham license anymore. There are, however, at least three reasons you might want to learn it anyway. First, some people actually enjoy it either for the nostalgia or the challenge of it. After all, . Another reason is that Morse code can often get through when other human-readable schemes fail. Morse code can be sent using low power, equipment built from simple materials or even using mirrors or flashlights. Finally, Morse code is a very simple way to do covert communications. If you know Morse code, you could privately talk to a concealed computer on just two I/O lines. We’ll let you imagine the uses for that.

In the old days, you usually learned Morse code from an experienced sender, by listening to the radio, or from an audio tape. The state of the art today employs a computer to randomly generate practice text. [M0TGN] wanted a device to generate practice code, so he built it around an Arduino. The device acts like an old commercial model, the Datong D70, although it can optionally accept an LCD screen, something the D70 didn’t have.

You can see the project in operation in the video below. Once you learn how to read Morse code, you might want to teach your Arduino to understand it, too. Or, you can check out some other Morse-based projects.


Filed under: Arduino Hacks

[jmilldrum] really gets a lot of use out of his Si5351A breakout board. He’s a ham [NT7S], and the Si5351A can generate multiple square waves ranging from 8 kHz to 160 MHz, so it only stands to reason that it is going to be a useful tool for any RF hacker. His most recent exploit is to use the I2C-controllable chip to implement a Fast Simple QSO (FSQ) beacon with an Arduino.

FSQ is a relatively new digital mode that uses a form of low rate FSK to send text and images in a way that is robust under difficult RF propagation. There are 32 different tones used for symbols so common characters only require a single tone. No character takes more than two tones.

The Si5351A can easily handle the encoding job. Since the output is a square wave, you do need a low-pass filter to put it on the air. [jmilldrum] also used some relatively small amplifiers to get the output up to 20 watts.

You might remember, we’ve talked about [jmilldrum’s] work with the Si5351A before. We also recently were talking about hams experimenting with digital modes and this is a great example, both by the developers of FSQ and [jmilldrum] for implementing it with an Arduino. If you want to learn more about FSQ, see the video below.


Filed under: Arduino Hacks, radio hacks, wireless hacks
Aug
06

$40 Antenna Analyzer with Arduino and AD9850

ad9850, Amateur Radio, antenna analyzer, arduino hacks, dds, ham radio, radio hacks Comments Off on $40 Antenna Analyzer with Arduino and AD9850 

If you are a hacker, you might consider ham radio operators as innovative. Most people, however, just see them as cheap. So it is no surprise that hams like [jmharvey] will build an antenna analyzer from a DDS module and an Arduino instead of dropping a few hundred dollars on a commercial unit. As he points out, you probably only need an analyzer for a day or two while you set up an antenna. Unless you are a big time antenna builder, the unit will then sit idle on the shelf (or will wind up on loan to hams even cheaper than you are).

The design is rooted in another proven design, but changed to take advantage of parts he happened to have on hand. Although the build is on a universal circuit board, [jmharvey] used Eagle to lay out the circuit as though it were a PCB. Since placement can be important with an RF circuit, this isn’t a bad idea. It’s always easier to move stuff around on the screen than on the perf board.

Since this is a no frills, unit, you are expected to grab the output from the Arduino and manually put it in a spreadsheet to plot the results. There is another version of the Arduino code that drives an OLED screen, although you still need a PC to kick the process off. One interesting feature of the Arduino code is how it deals with the nonlinear nature of the diodes used in the circuit. After plotting the values with known loads, [jmharvey] broke the diode operation into three regions and used different equations for each region. Even so, he warns that readings higher than 1:1 VSWR are only accurate to 10% or 20% – still good enough for ham shack use.

If you want an antenna analyzer for $40 (or less, if you have a good stock of parts) this looks like a worthwhile project. If, however, you want to repurpose it to Rickroll your neighbor’s AM radio, you might want to go with the commercial unit.

Click past the break to see the analyzer in action.


Filed under: Arduino Hacks, radio hacks

Anybody can grab a USB TV tuner card and start monitoring the airwaves, but to get into the real meat of radio you’ll need your amateur radio license. Once you have that, the bandwidth really opens up… if you can afford the equipment. However, [spaceneedle] and friends have dramatically lowered the costs while increasing the possibilities of owning a radio by creating this ham radio shield for the Arduino.

The HamShield, is a versatile shield for any standard Arduino that allows it to function like an off-the-shelf radio would, but with a virtually unlimited number of functions. Anything that could be imagined can be programmed into the Arduino for use over the air, including voice and packet applications. The project’s sandbox already includes things like setting up mesh networks, communicating over APRS, setting up repeaters or beacons, monitoring weather stations, and a whole host of other ham radio applications.

HamShield operates on a wide range of frequencies and only uses a 250 mW amplifier. The power draw is small enough that the HamShield team operated it from a small solar panel, making it ideal for people in remote areas. The project is currently gathering funding and has surpassed their goal on Kickstarter, branding itself appropriately as the swiss army of amateur radio. The transceiver seems to be very robust, meaning that the only thing standing in the way of using this tool is simply writing the Arduino code for whatever project you want to do, whether that’s as a police scanner or even just a frequency counter. And if you want to follow along on hackaday.io, the project can be found here.


Filed under: Arduino Hacks, radio hacks
Apr
30

New in the Maker Shed: Telegraph Decoder and Calculator Kits from Spikenzie Labs

Amateur Radio, arduino, Calculator Kit, ham radio, Morse Code, telegraph Comments Off on New in the Maker Shed: Telegraph Decoder and Calculator Kits from Spikenzie Labs 

MKSKL17-2Spikenzie Labs has a reputation for making innovative, wonderfully designed kits and their new Telegraph Decoder and Calculator Kits are no exception! Both are available now in the Maker Shed.

Read the full article on MAKE


  • Newsletter

    Sign up for the PlanetArduino Newsletter, which delivers the most popular articles via e-mail to your inbox every week. Just fill in the information below and submit.

  • Like Us on Facebook